OPEN DATABASE [File – Open/Login] A. OPEN DATABASE IN LOCAL COMPUTER [LOCAL PC] You can open LEVERAGE Database on Local computer by following the instructions below : 1. Open the LEVERAGE Program, by clicking the Windows Start Menu – All Programs – Nizamer – LEVERAGE V4 Deluxe then clicking the LEVERAGE icon. 2. After opening the LEVERAGE program, you can open your LEVERAGE Database by: a. On the "Welcome To LEVERAGE" screen, click the Open Existing Company option. 
b. When you click Open Existing Company, LEVERAGE will automatically display the Open Database window. Because the LEVERAGE database that you are about to open is located on your local PC, in the Open Database window check the Local check box, then in the File Name column, type the path to your database address and the name of your LEVERAGE database, or you can fill in the fields File Name by clicking the Ellipsis button [...] then browse to the address and location of your LEVERAGE database. After the File Name column in the Open Database window is filled with the address and name of your database, the next step is to click the OK button to open the database. c. For more details, consider the following picture: 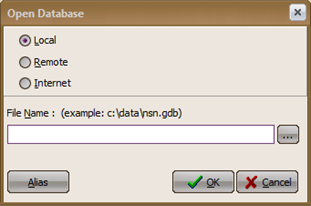
Click the Ellipsis Button to browse addresses and the place Database LEVERAGE You. 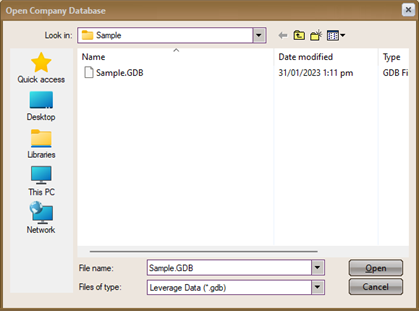
Click on the name of the LEVERAGE Database that will be yours Open it, then click the Open button. 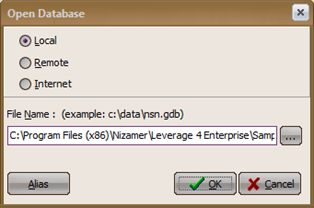
d. LEVERAGE will display a login window to enter your LEVERAGE Database. Please login by typing your username and password. B. OPEN DATABASE ON SERVER COMPUTER (REMOTE) You can open the LEVERAGE Database on a Server (Remote) computer by following the instructions below: 1. Open the LEVERAGE Program by clicking the Windows Start menu – All Programs – Nizamer – LEVERAGE V4 Deluxe then clicking the LEVERAGE icon. 2. After opening the LEVERAGE program, you can open your LEVERAGE database by: a. In the Welcome To LEVERAGE display, click the “Open Existing Company” option 
b. When you click "Open Existing Company", LEVERAGE will automatically display the Open Database window. Because the LEVERAGE Database that you are about to open is located on a Server Computer, in the Open Database window, check the Remote check box, then in the Server Name column, type the Computer name. Server or Computer Server IP Address where the LEVERAGE database is located. After that, in the File Name column, you can type the address and name of the LEVERAGE Database that you want to open. The typing of the address and name of the LEVERAGE database must match the address and name of the database on the server computer. After filling in the File Name column, click the OK button to open the Database. c. For more details, consider the following picture: 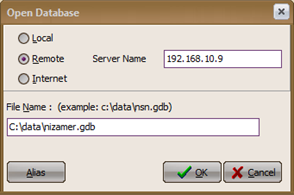
d. LEVERAGE will display a login window to enter your LEVERAGE Database. Please login by typing your username and password. You can also open the LEVERAGE database from the main menu by clicking on the Main Menu then selecting Open Data [File – Open/Login], the next steps are the same as the instructions previously described. SAVE WITH ALIAS [File – Save As Alias] The Save As Alias file is a file provided by LEVERAGE to create an Alias from your Database. With Database Alias, you don't need to type your LEVERAGE Database address and name every time you open the Database, but simply click the Alias button and then select your Database Alias name. HOW TO CREATE DATABASE ALIAS 1. Open your LEVERAGE Database. 2. After the LEVERAGE Database opens, click the File main menu, then click Save As Alias. 3. In the Input The Alias window, type the Alias name you want. As an example, consider the image below: 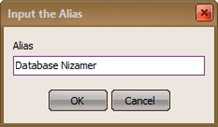
4. Click the OK button to save the database with the Alias name you input. HOW TO OPEN DATABASE WITH ALIAS The LEVERAGE Database can be opened with an Alias, provided that you have previously saved the Database with the Alias name (Read How to Create a Database Alias). Here are the steps you can follow to open LEVERAGE Database with Alias : 1. Open the LEVERAGE Program 2. On the Welcome To LEVERAGE screen, click the Open Existing Company option, then in the Open Database window, click the Alias Button, then click Your Database Alias Name, then click the Open button. For more details, see the image below: 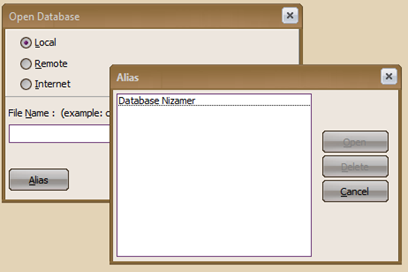
3. Login by typing the user name and password. DATA BACKUP [File – Back Up] A Back-up File is a file that allows you to create a Backup of your LEVERAGE Database. Creating a Backup Data is intended to anticipate if there is damage (Corrupt) to your LEVERAGE Database structure which causes your LEVERAGE Database to be unable to be opened again. Making Backup Data (Backup) can be done in 2 ways: 1. Making Backup Data Automatically Settings for Making Backup Data Automatically can be done by: a. Click the main menu Setup – Preferences (Setup – Preference) b. In the Preferences window, click Company then check the “Backup on Close” check box. 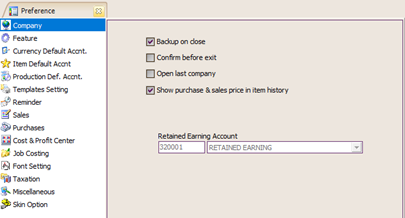
c. Click the OK button, to save the settings you have made. By ticking the "Backup on Close" check box, every time you close the LEVERAGE database, a confirmation message will automatically appear for creating a Backup Data. The following is an image of the backup data creation confirmation message: 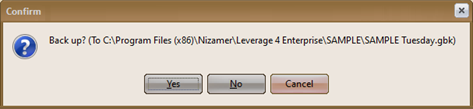
If you click Yes on the confirmation message, LEVERAGE will automatically create a backup file with the name according to your LEVERAGE Database name along with month period information and year (according to your server computer's date setting). Backup data that has been created will automatically be stored at the same address as your LEVERAGE Database storage address. Once a month LEVERAGE will create a different File Backup. The default name for the Backup file is: Filename MMMYY.GBK. 2. Making Backup Data Manually If previously we discussed creating an LEVERAGE Database automatically, where the Backup Data will automatically be stored at the same address as your LEVERAGE Database storage address. Now we will discuss how to make backup data manually where you can save the backup data that you create in a different folder from your LEVERAGE Database storage folder. You can manually create backup data by: a. Click the main menu File – Data Backup [File – Backup] b. In the Back up Database window, fill in the File Name field by typing the address where you will save the Backup file and the name of the Backup file you want. You can also fill in the File Name column by clicking the Ellipsis Button [...]. For more details, see the image below: 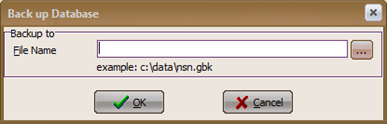
c. Click the OK button, and wait until a confirmation appears that the Data Backup creation process has been successfully carried out. REPAIR DATA [File – Repair] Repair File is a file provided by LEVERAGE to help you repair the Database Structure, if there is damage to your LEVERAGE Database Structure. You can run this Repair file, if there is Corrupt in your LEVERAGE Database. HOW TO RUN THE REPAIR FILE 1. Before running the Repair file, close your LEVERAGE Database (Click the File menu – Close Log Off) and make sure no other users are accessing the Database that you are going to repair. 2. In the LEVERAGE program, click the main menu File – Data Repair (File – Repair) 3. On window Database Repair : 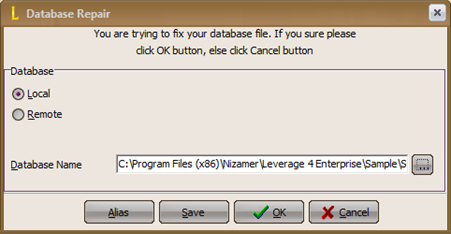
o Check the Local check box, if the Database to be repaired is located on your Local PC (on your computer). Or Check the Remote check box, if the Database to be repaired is located on a Server Computer, and type the name of the server computer or the IP Address of the Server Computer. o In the Database Name Column: Type the address and name of the LEVERAGE Database to be repaired. o Click the OK button to run Repair Database 4. If the Repair file that you ran succeeded in repairing your Corrupt LEVERAGE Database Structure, LEVERAGE will ask you to type a new database name for the repaired Database. Where is the Repair results Database that you have to open every time you open the LEVERAGE Database. USES BACKUP DATA [File - Restore] File Restore is a file that allows you to open your Data Backup (backup file) in LEVERAGE. Database Restore is done with the aim of changing the Backup File (Gbk File) to an LEVERAGE Database (Gdb File), so you can open the file in LEVERAGE. Restore data backup (gbk file) to LEVERAGE database (gdb file) can be done by: 1. Open the LEVERAGE Program without opening the Database 2. Click the main menu File – Use Backup Data (File – Restore) 3. In the Restore Database window: 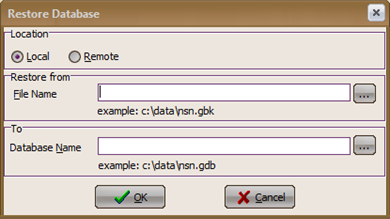
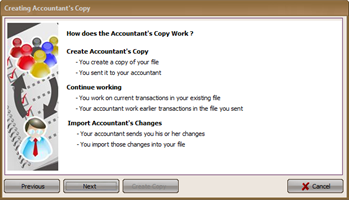
a. Check the Local check box if the gbk file to be restored is on your Local PC (on your Computer) or check the Remote check box and fill in the Server name column if the gbk file to be restored is on a Server Computer. b. In the Restore from detail, fill in the File Name column with the address and name of the gbk file (backup file) that you will restore. c. In Detail To, fill in the Database Name column with the address where you will place the restored database and the name of the restored database you want. d. Click the OK button to run the Restore Data Backup process. Wait until a confirmation message appears stating that the Restore Data Backup has been completed. ACCOUNTANT REVIEWS [File – Accountant’s Review] Accountant Review's File is a special feature provided for companies whose books are audited by an External Accountant. Accountant Review serves to assist the External Accountant to review the company's database without having to stop the process of inputting financial data by the accounting department. With this file, the accountant can easily review the company's books, because with this feature an external accountant can bring the company's database for inspection with the condition of the company still being able to continue to input transaction data. With this feature, companies can also easily adjust their bookkeeping based on the results of reviews carried out by the accountant. The Accountant Review's file consists of: a. Create Accountant ‘s Copy b. Import Accountant’s Change c. Cancel Accountant’s Copy d. Export Changes for Client HOW TO USE FILE ACCOUNTANT REVIEW A. ACTIVITIES CONDUCTED ON THE COMPANY SIDE 1. MEMBUAT FILE ACCOUNTANT’S COPY (CREATE ACCOUNTANT’S COPY) This Accountant's Copy serves to duplicate the Database with exactly the same contents as the Original Database. You can make Copy Accounts by: a. Click the main menu File – Accountant’s Review – Create Copy Accountant’s b. In the Creating Accountant's Copy window click the Next Button then follow the next instructions as shown below: 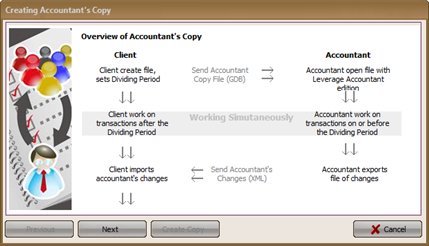

Information : a. Dividing Period, is the period that we limit so that users cannot input or change data in the previous period and is the same as the dividing period. b. Filename of Accountant's copy, is the file name for duplicating company database. So in this column you can type the name of the duplicate file you want (For example, look at the image above). c. After you fill in the Dividing Period and Filename of Accountant's Copy, click the Create Copy button and wait until the process of creating the Accountant's copy file is complete. 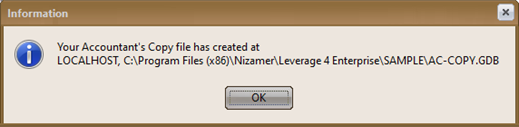
Note, after you have finished creating an Accountant's Copy from your LEVERAGE Database, the LEVERAGE Program Header section will automatically display the information: "Accountant's Copy Exists" as shown in the following image: 
Creating an Accountant's Copy will not change the contents of your Original Database. Accountant's Copy activity only limits user activity according to the dividing period you created, where the user cannot input or change the contents of the database under the specified Divided Period date. How to Cancel Making an Accountant's Copy The LEVERAGE database which has been duplicated/copied (Accountant's Copy) will be limited for input or editing according to the predetermined dividing period. You can cancel the creation of the Accountant's Copy by: 1. Click the main menu File - Accountant's Review - Cancel Accountant's Copy. 2. LEVERAGE will display a confirmation message as below: 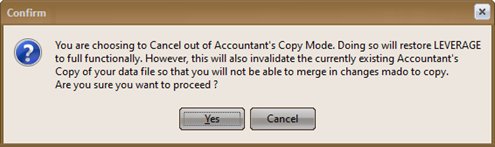
Click the Yes button to cancel the process of making an Accountant's Copy. 2. Note, after you cancel the Accountant's Copy from your LEVERAGE Database, the "Accountant's Copy Exist" information contained in the LEVERAGE Program Header section will automatically disappear. The following is a picture of the LEVERAGE program header after the cancellation of the Accountant's Copy:  
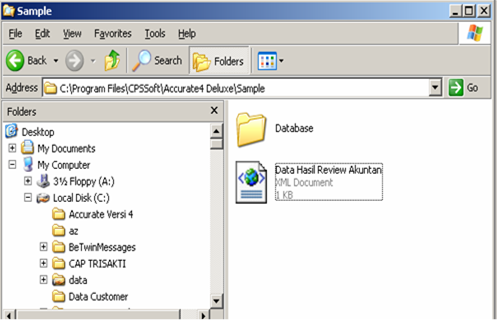
2. IMPORT ACCOUNTANT CHANGES (IMPORT ACCOUNTANT CHANGES) After the Accountant reviews your Database, the Accountant will send the adjusted files according to the review that has been done. The accountant will send the adjusted review file in the form of an XML file. You must import this XML file into your LEVERAGE Database, so that adjustment transactions resulting from the Accountant's review can be entered into your LEVERAGE Database. Import Accountant Changes (Import Accountant Changes) can be done by: a. Before importing accountant changes, first copy the XML file that you received from your accountant to one of the folders on your hard disk. b. Open your LEVERAGE Program and Database. c. Import Accountant Changes by clicking on the main menu File – Accountant's Review – Import Accountant Changes. d. Browse to the address of the folder where the XML file that you received from the accountant is stored, then click the name of the XML file that you will import and then click the Open button: 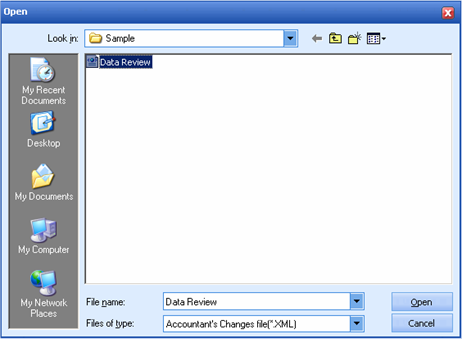
e. LEVERAGE will display a confirmation message to back up your LEVERAGE Database before importing the file. Click the Yes button on the confirmation message and wait until the Database backup process is complete. f. Click the OK button to continue the Import Accountant's Change process. LEVERAGE will display a window informing you that the Import Accountant's Change has been completed. The Import Accountant's Change process cannot be undone, so before you do this activity, make sure you have created your LEVERAGE Database Backup. B. ACTIVITIES CONDUCTED ON THE ACCOUNTANT'S SIDE 1. REVIEW DATABASE CLIENT After the Accountant receives the Client Database Copy (Accountant's File Copy), the Accountant can review the Client Database Copy (Accountant's File Copy) by: a. Copy Database Client in one of the folders on the Hard disk. b. Open the LEVERAGE Program, then open the Client Database Copy (File Accountant's Copy). To enter the Client Database Copy (Accountant's File Copy), please log in with the user name "accountant" and the password "accountant". c. Review a copy of the Client Database, and make adjustment transactions for the review that has been done. In the review of the Client Database Copy, Accountants can only input Create and Delete transactions but are not allowed to edit transactions. d. After the review of the Client Database Copy has been completed, the Accountant must export the changes (adjustments) that have been made to a File with an XML extension. This XML file will be sent to the Client to be imported into the LEVERAGE Client Database. 2. EXPORT CHANGES FOR CLIENT [EXPORT CHANGES FOR CLIENT] In order for the Client to import adjustment transactions (changes) that have been made by the Accountant based on the review that has been carried out on the Client Database Copy, the Accountant must export the adjustment transactions (changes) into a File with an XML extension. The following steps can be taken to export adjustment transactions resulting from the accountant's review into File.XML: a. Open the LEVERAGE Program and the reviewed Database Copy. b. Click on the main menu File - Accountant's Review - Export Changes For Client [File - Accountant's Review - Export Changes For Client]. c. Specify the folder where the xml file will be placed and in the File Name column type the file name you want then click the OPEN button. For more details, consider the following picture: 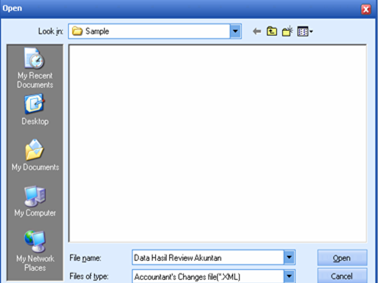
File Import Journal is an improvement over the Import Company feature in veri 3. In version 4 this feature is called Import Journal to suit its function, which is to make it easier for you to combine the financial reports of the Head Office with Branch Offices so that they become one unit of record (combined) that produces financial reports which are called Consolidated Financial Statements. MERGER (CONSOLIDATED) HEAD OFFICE AND BRANCH OFFICE DATABASE IN LEVERAGE WITH IMPORT JOURNAL FEATURES Merging (Consolidation) of Head Office and Branch Office Databases at LEVERAGE with the Import Journal Feature can be done by: 1. Prepare in advance the Head Office Database and Branch Office Database which will be combined (consolidated), by copying the Head Office Database and Branch Office Database to one of the Folders on your Hard disk (Server Hard disk). 2. Open the LEVERAGE Program, then Open the Copy of Head Office Database which will be consolidated. 3. Perform a database consolidation by clicking on the main menu File - Import Journal [File - Import Journal]. 4. In the Import from Other Companies (Import Financial Statement) window, do the following: o Check the Local check box if the Branch Office Copy Database is located on your Local PC (on your computer's hard disk). Or check the Other Machine (Remote) check box and type the server name if the Copy Branch Office Database is located on a Server Computer. o In the Database Location column, type the location address of the Copy Branch Office Database and the name of the Branch Office Database, then click the OK button. o LEVERAGE will display a warning warning you to ensure that no other user is currently accessing the Database that you are about to import. If you are sure that no user is accessing the Database that you are going to import, please click the OK button to continue the Branch Office Database Import process. 5. The next step, you have to do Database Import Validation. Import Database Validation is performed by typing the user name and password to enter the Branch Office Database (the database to be imported). Then click OK Button. The User Name and Password that you type during the Import Database Validation process is the User Name of the User with the Admin level. 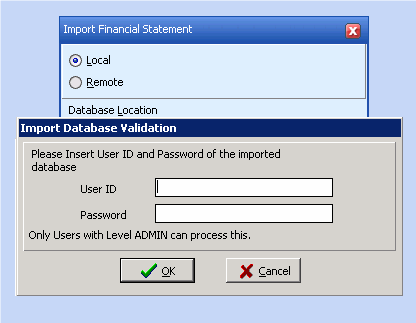
6. After the Import Database Validation process has been successfully carried out, the next step is to do Elimination to eliminate/eliminate balance of all reciprocal accounts. You can do the process of eliminating the balances of all reciprocal accounts in the Merge Accounts window. How to eliminate reciprocal account balances in the Merge Accounts window: a. In the Filter source data from column, specify the date limit of the transactions that you want to import. b. On Merged table details Source Accounts : Ø Source Account: In this column, select the reciprocal account (account) in the Branch Office Database that will be eliminated. Ø Dest. Account : In this column select the reciprocal account (account) in the Central Database that will be eliminated. Ø Click the OK Button to eliminate the reciprocal account(s). c. Wait until an information message. 7. Database Consolidation Process for Head Office and Branch Offices is complete. FILE - UNDO IMPORT JOURNAL File Undo Import Journal (Cancel Import Journal) is a feature that functions to cancel journal import activities, namely canceling activities of merging (consolidating) the Head Office Database and Branch Office Databases. Journal Import Cancellation (consolidation cancellation) in LEVERAGE can be done by: 1. Click the main menu File – Cancel Import Journal (File – Undo Import Journal) 2. In the journal undo import window, check the name of the Branch Office whose merger will be cancelled. Then click the OK button. 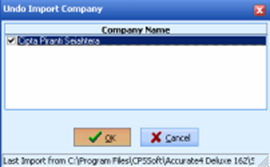
3. Wait until a message appears informing you that the journal import cancellation (merging/consolidation) has been successfully carried out. 
FILE - EXPORT IMPORT TRANSACTION The Export Import Transaction feature is a feature that functions as a medium for exporting and importing transaction data. This feature is an improvement over the Export Import feature Version 3, where the Export Import feature in LEVERAGE Version 3 can only be performed for the Sales Invoice Module which includes Sales Invoices, Sales Returns, and Customer Receipts ( Customer Receipt). Unlike LEVERAGE Version 3, the Export Import feature of LEVERAGE Version 4 can not only be used for the Sales Module, but in Version 4 there are more modules that can be exported or imported using the Export Import Transaction feature. The following are transactions that can be exported and imported using the Export Import Transaction LEVERAGE Ver4 feature: | 1. Currency | 7. Sales Order | 13. Purchase Return | 19. Salesman | | 2. Item | 8. Delivery Order | 14. Vendor Payment | 20. Commission Range | | 3. Account | 9. Sales Invoice | 15. Journal Voucher | 21. Selling Price Adjust | | 4. Customer | 10. Sales Return | 16. Other Deposit | | | 5. Vendor | 11. Customer Receipt | 17. Other Payment | | | 6. Tax | 12. Purchase Invoice | 18. Customer Type | | The Export Import process can be done per transaction or group of transactions and can only export Insert and Delete data, not for Edit (Update) conditions, so data is in insert or edit conditions, LEVERAGE still considers the data as insert mode when imported to another database. To avoid errors when exporting branch data to the center, you must ensure that the central and branch master data are exactly the same. The master data referred to here are: Account Data, Item Data and other Master Data. You can create branch master data by duplicating the central database using the Create New Branch feature. The Create New Branch feature will automatically duplicate data from the main data with a different branch code and automatically create master data such as Item, Customer, Vendor, Tax, etc., so that the branch data is ready to start inputting transactions. EXPORT IMPORT PROCESS FLOW 1. THE BRANCH EXPORTS TRANSACTIONS WHICH ARE DESIRED TO BE SENT TO MAIN DATA THROUGH THE EXPORT IMPORT TRANSACTION FORM. Here are the steps you can take to extract the Branch Database: a. Click the main menu File – Export Import Transaction b. Filter the transaction creation date (Filter by Created Date) for the transactions that you will export (extract). The transaction creation date (created date) is the date the transaction was entered in LEVERAGE (according to the system date). c. Filter the Data Type that you want to export (extract). Filter Data Type (Data Type) consists of: ü Data Type : Ø Original: Data created in the database itself Ø Imported: Data imported from transactions ü Status : Ø No Status: Data that has not been exported Ø Exported: Data that has been exported ü Source Status Ø Inserted : Data is created Ø Delete : Data is deleted ü User Name: Filter the names of users who make transactions ü Transaction Type : Filter which transactions you want to appear on the Transaction List. d. Transactions that will be exported according to the filter you created will automatically be displayed on the Transaction List grid/details. Tick the transactions that you want to export then click the Export Checked Data button. 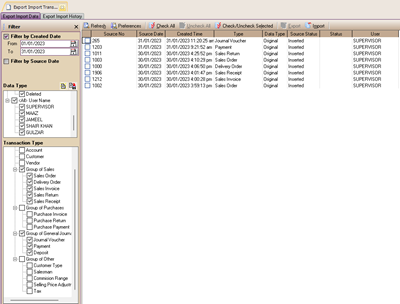
Grid Description/Detailed Transaction List: • Source No : Transaction/Invoice Number • Source Date : Transaction Date/Invoice Date • Created Date: The date and time the transaction was made • Type : Transaction Type • Data Type : Original/Imported • Source Status : Inserted/Deleted • Status : No Status/Exported • Users: Username that created. e. In the Save As window, in the File Name column, type the name of the exported/extracted Branch data XML file, then click the Save button. f. Wait until a message appears informing you that the Export/Extract Branch Data process has been completed. g. Click the OK button. The XML file exported/extracted Branch data is ready to be sent to the Center for import. PREFERENCES EXPORT IMPORT Is setting information during the export and import process, including: 1. Default Export Folder : LEVERAGE will go to that folder when the user exports data. 2. Default Folder Import : LEVERAGE will go to that folder when the user imports data 3. Import Data Manipulation: Serves to set certain import data to be imported into other data. For example, for example, all customers for branch XXX will be mapped to customer YYY in the data center, meaning that when the import process is carried out, as soon as LEVERAGE finds data for branch XXX, the transactions made will set the customer to YYY. 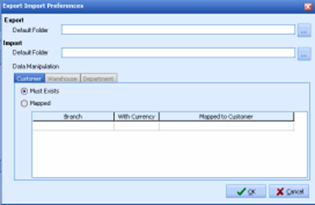
2. CENTER IMPORTS BRANCH DATABASE XML FILE THROUGH FILE EXTRACT IMPORT TRANSACTION. In order to successfully import the Export XML file from Branch Data, you must first register (add) the Branch Database code (ID) to be imported on the Central Company Info Database Form. Database Code is a database code (ID) that is automatically generated by LEVERAGE when creating a New Database. This code is automatically listed on the Branch ID tab on the Company Info Form. 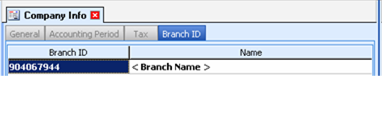
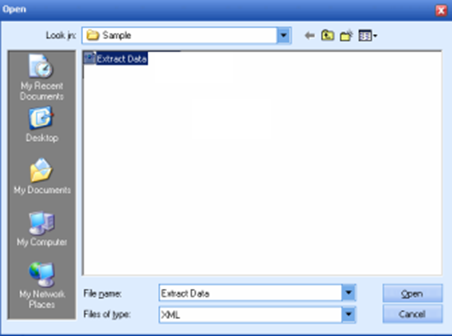
After you have registered the Branch Database code on the Branch Tab on the Company Info Form, import the exported xml file of the Branch Database by: 1. Click the main menu File – Extract Import Transaction 2. In the Export Import Transaction view, click the Import Data button, then in the open window select the Branch Database XML File that you will import then click the OPEN button. 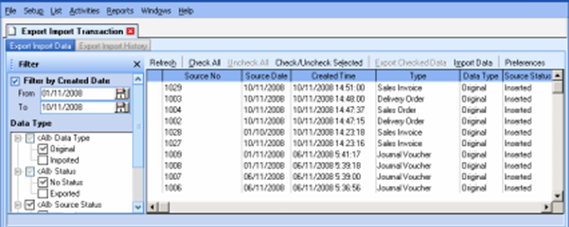
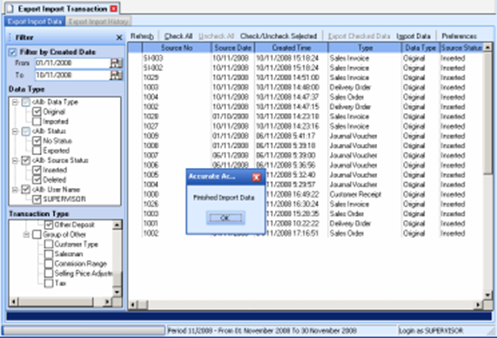
3. Wait a few moments, LEVERAGE will import the Branch Database XML file. After the import process is complete, LEVERAGE will display a message informing you of the amount of data that was successfully imported and the amount of data that was not successfully (failed) to import. Pay attention to the following picture: 
 4. Click the OK button, the import process for the branch database XML file has been completed. EXPORT IMPORT HISTORY The Export Import History list is a list that displays the history of export and import transaction activities that have been carried out by the user. This list also displays transaction details - transactions that had errors during the import process. You can click the Show Log button on the Export Import History List to display details of transactions that have errors during the import process. 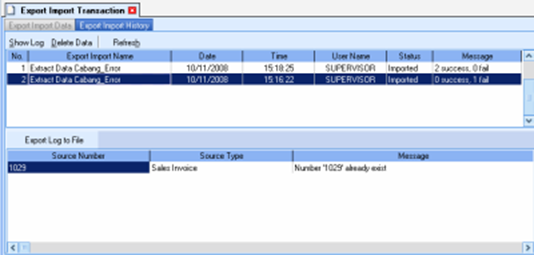
Description of Export Import History List: a. Column Export Import Name: This column displays the name of the xml file, taken from the name of the export file or the name of the import file. b. Date and Time Column: This column displays the date and time the export or import process was carried out. c. User Name column: This column displays the name of the user who carried out the import or export process. d. Status Column: Displays Exported or Imported status e. Column Message: displays information on the results of the Import process. CREATE NEW BRANCH The Create New Branch file is a special file that can help you create a Branch Database (Branch Office). With this file you can easily create a Branch Database (Branch Office). The Create New Branch file will automatically create a new database which is a copy of your Central Database, where this file will automatically copy master data from the Central Database, so that it will make it easier for you to setup the 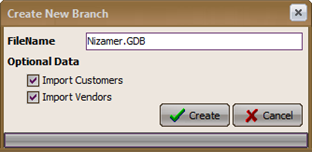
1. In the File Name field, type a name Branch Company Database. 2. You can tick Optional Data if Branch and Central Enterprises have the same Customer and Vendor master data 3. Click the Create button to start the process creation of Branch Database. 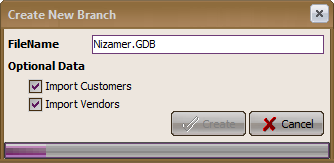
4. Wait until making process Branch Data base have done it 
|