The forms for Return Merchandise Authorization (RMA) activities consist of the New RMA form and the RMA Action form. With this RMA feature, you can easily record your customer's claims for damaged goods that the customer returns. And easily record the activities or actions that you take on your customer's claims, whether to repair damaged goods or replace damaged goods with new, similar items. You can also use the forms in RMA Activity to record the goods service activities that you carry out, where the goods being serviced have nothing to do with sales return activities. FLOW CLAIM GOODS PROCESS 1. Customers come to the store/distributor with goods to be returned. The shop accepts the relevant customer complaint, and if the shop agrees to claim or accept the goods with an agreement to be repaired, the shop makes a "New RMA" form which serves as proof (for the product owner) of receipt of the goods claimed by the shop/distributor. You can do New RMA registration by following these instructions: a. Click the main menu Activities – RMA – New RMA 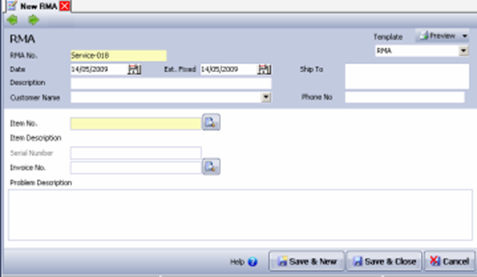
b. Fill in the details of the New RMA form by following the instructions below: Ø RMA No : By default already filled (Auto Counting). You can change the RMA number according to the number you want. Ø Date : Fill in this field with the customer claim date Ø Est. Fixed Date : Estimated date of completion of goods repair Ø Customer Name : Fill in this field with your customer's name. Ø Ship To : This field automatically displays the address information of the customer you selected. You can change the address in this field according to the delivery address your customer wants by typing the requested shipping address. Ø Item No : In this field select the item that the customer claims. Ø Invoice No : Fill in this field with the invoice number associated with the item being claimed. You do not need to fill in this field if the New RMA you created is not related to the invoice in your database. Ø Serial Number Field: This field will automatically be active if the item you fill in on this form has a serial number. Ø Problem Description : In this field you can type Damage Information/Complaint/Agreement 2. The shop/distributor proceeds to the next process, namely checking the condition of the goods, repairing/replacing components if something is damaged,or if necessary sent to the supplier to get a replacement. Every component replaced is recorded. All processes are recorded in the Action Activity form. How to record RMA activity: a. Click the Activities main menu – RMA – RMA Action 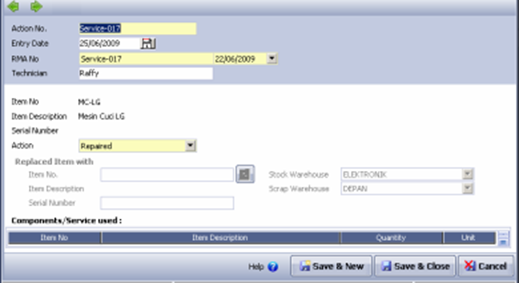
b. Fill in the New RMA Action screen by following the instructions below: • Action No : By default already filled (auto counting). You can change the Action number according to the number you want. • Entry Date: Fill in the date of recording of the RMA Action form • RMA No : You can fill in this field by selecting the RMA form number to be processed (Action). • Action : In this field you can select the Action that will be created to process the RMA form you choose. The actions in question consist of: 1. Repaired, Action where the repair department decides to repair the claimed item. During repairs there may be components that are replaced. These components can later be billed to the customer. 2. Replaced, Action where the store/distributor replaces customer goods. This action will make an automatic Inventory Adjustment with the Warehouse Stock, because selling goods are used as a replacement for damaged goods. And also make Inventory Adjustments to enter the claim item into the Scrap Warehouse. The inventory value for these items is equal to the inventory value of the goods taken from the Stock Warehouse. 3. Canceled, Action that the customer cancels the claim process or the technician can't do anything anymore, can't be repaired and can't be replaced. • Grid/Detail List of Used Components: In this list you can enter items used during the repair of damaged goods and repair services for these damaged goods. In this list you can select Non Inventory Part type Items and Service type Items. These Used Component Details will later be billed to the customer by creating a Sales Invoice select RMA form. The RMA that can be selected on the Sales Invoice form is the RMA form with the "Repair" action. LEVERAGE will automatically display the components used in the process of repairing goods in the Sales Invoice details. At the end of the month, if there are damaged/returned items from the customer where the store is responsible for it, the user will make an inventory adjustment. Based on the number of damaged goods in the damaged goods Warehouse, then if it is an item resulting from replacement to a customer where the action is Replaced, then an Inventory Adjustment is made to eliminate the stock of the damaged goods. RMA LIST 
You can create an RMA List table from the List – RMA – RMA main menu. Display Table RMA list is divided into 3 groups, along with the explanation: 1. Menu Button Group. The Menu button on the RMA List Table consists of the following buttons: a. New Menu Button: This button functions to create a New RMA form b. Edit Menu Button: This button functions to edit the RMA form that you have created. c. Delete Menu Button: This button functions to delete the RMA form d. Filter Menu Button: This button functions to display the Filter column on the left of the RMA List. With this filter you can display only the RMA forms you want in the RMA List Table. RMA List Filter can be done based on: • Filter by Date : Filter the list of RMA forms based on your desired date period. • Status : Filter the list of RMA forms based on the status of the RMA form. There are 5 status options: o Received : Only displays RMA forms that have not been processed into RMA Actions. o Canceled : Only displays the RMA form whose Action was canceled by the customer. o Repaired: Only displays the RMA form with Action Repair (Items claimed by the customer are repaired). o Replaced : Only displays the RMA form with the Action Replaced (items claimed by the customer are replaced with new ones). o Returned: Only displays the RMA form with Return status, namely RMA that has been billed to the customer by making a sales invoice. e. Refresh Menu Button: This button functions to update/update the display of the RMA List according to the input of the New RMA form that you last did. f. Print Menu Button: This button functions to print the display of the RMA Form List on your computer monitor screen, before printing it on paper. g. Find RMA Form : This column makes it easier for you to search for the item you want on the RMA Form List. You can do a quick search by simply typing the RMA number you want in the <RMA No> field. 2. The Details Menu group displays columns that present information from the RMA form that you have created. These columns consist of: a. RMA No : This column displays information on the RMA form number that you created. b. Date : This column displays the date information of the RMA form you created. c. Item Description: This column displays information on the name of the item claimed by the customer. d. Serial Number: This column displays information on the serial number of goods claimed by the customer. e. Customer Name : This column displays information on the name of the customer making the claim f. Status : This column displays information on the status of the RMA form 3. Right Mouse Click on the RMA List. Some of the activities that can be done with the Right Mouse click include: a. New : Right Mouse Click then select New has the same function as if you clicked the New menu button on the RMA Form List, which functions to create a new RMA form. b. Edit: Click the Right Mouse then select Edit. It has the same function as if you clicked the Edit menu button on the RMA Form List, which functions to change the RMA form that you have created. c. Delete: Click the Right Mouse then select Delete. It has the same function as if you clicked the Delete menu button on the RMA Form List, which functions to delete the RMA form that you have created. d. Filter: Right Mouse Click then select Filter has the same function as if you clicked the Filter menu button on the RMA Form List, which functions to display the filter column to the left of the RMA Form List. e. Sort by: Click the Right Mouse then select Sort by. The function is to sort the display of the RMA Form according to the column headings contained in the List. f. Refresh by: Click the Right Mouse then select Refresh (F5). It has the same function as if you clicked the Refresh menu button on the RMA Form List, which functions to update/update the display of the RMA Form List in accordance with the recording of the New RMA activity that you last did. REGISTER RMA ACTION 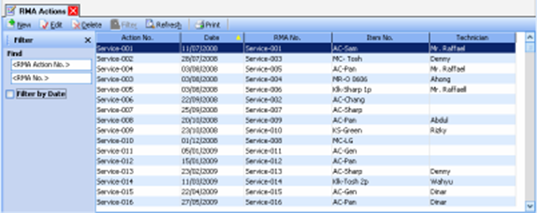
The RMA Action Form List table is a list that displays all the RMA Action forms that you have created. You can open this list from the main menu List – RMA – RMA Action. The table display of the RMA Action Form List is divided into 3 groups, along with the explanation: 1. Menu Button Group. The Menu button in the RMA Action form list table consists of the following buttons: a. New Menu Button: This button functions to create a new RMA Action form. b. Edit Menu Button: This button functions to edit the RMA Action form that you have created. c. Delete Menu Button: This button functions to delete the RMA Action form that you have created. d. Filter Menu Button: This button functions to display the filter column on the left of the RMA Action Form List. With this filter you can display a list of RMA Action forms according to the date parameter filter you want. e. Refresh Menu Button: This button functions to update/update the display of the RMA Action Form List in accordance with the recording of the last RMA Action activity you did. f. Print Menu Button: This button functions to print the display of the RMA Action Form List on your monitor screen, before printing it on paper. g. Find RMA Action Form: This column makes it easier for you to search for the RMA Action form you want on the RMA Action Form List. Quick search you can do only by typing the Action No of the RMA Action Form you want in the <RMA No> field. 2. Table Details group, displays the columns that present the information contained in the view of the RMA Action Form that you created. These columns consist of: a. Action No column: This column displays the serial number of the RMA Action form b. Date Column : This column displays the date of the RMA Action form c. RMA No column: This column displays the RMA form number d. Column Item No : This column displays the Item number contained in the RMA form e. Technician Column: This column displays information on the name of the Technician associated with repairing the item. 3. Right Mouse Click on the RMA Action Form List. Some of the activities that can be done with the right mouse click include: a. New : Right Mouse Click then select New has the same function as if you clicked the New menu button on the RMA Action List, which functions to create a new RMA Action Form. b. Edit: Right Mouse Click then select Edit has the same function as if you clicked the Edit button on the RMA Action List, namely to change the RMA Action Form that you have created. c. Delete : Click the Right Mouse then select Delete. It has the same function as if you clicked the Delete button on the RMA Action List, namely to delete/delete the RMA Action Form that you have created. d. Filter Ctrl + F : Right Mouse Click then select Filter has the same function as if you clicked the Filter menu button on the RMA Action List, namely to display the filter column on the left side of the RMA Action Form List. With this filter you can filter the RMA Action Form List view according to the date parameter filter you want. e. Sort By : Right Mouse Click then select Sort By functions to sort the display of the RMA Action Form List according to the column headings contained in the RMA Action Form List view. |