JOB COST is an activity that you can do to record the production process of finished goods based on an order (Job Order). Besides functioning to record the production process of finished goods (Finished Goods) based on orders, you can also do this activity to: 1. Record the use of goods for their own interests 2. Recording the loading of lost or damaged goods Job Cost consists of 2 activities, namely: 1. Job Costing activities, namely the activity of recording raw materials and costs used in order financing activities. 2. Roll Over Activity, namely the activity of recording completion (Finishing) Job Costing. Completion of this Job Costing can be allocated to Items (Finished Goods) or to Accounts (Account). JOB COSTING ACTIVITIES To record Job Costing Activities, LEVERAGE provides a special form called the Job Costing Form. You can open the Job Costing form from the Activities – Job Cost main menu. 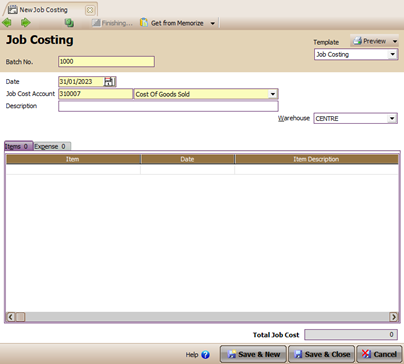
You can fill out the Job Costing Form by following the instructions below: 1. Previous Button : With this button, you can see the appearance of the Job Costing Form that you created earlier. 2. Next Button : With this button, you can see the next (next) Job Costing Form display. 3. Preview button: This button functions to preview the printed Job Costing Form on your computer monitor screen. 4. Printer Button: This button functions to print the Job Costing Form view. 5. Finishing button: In the new Job Costing form display, this button is not yet active (gray). This button will automatically activate if the Job Costing Form you just created is saved. This Finishing button functions to record the completion of the order financing activities (Job Costing) that you have made. When you click this button, LEVERAGE will automatically display the Job Cost Roll Over form, which is the form that will be used to record finishing Job Costing activities. 6. Copy Transaction button: This button functions to copy the details of the Job Costing form that you have previously memorized. If you create a Job Costing form where the details of the Job Costing are the same as the details of the Job Costing form that you created before, then with this button you don't need to manually input the details of your new Job Costing form, but simply copy the details of the Job Costing form. that you have created before. Copying the details of the previous Job Costing Form can be done if you have memorized these details first. 7. Memorize Transaction button: This button functions to memorize (record) the detailed view of the Job Costing Form that you have created. The details that you have memorized can later be copied when you create a Job Costing Form with the same details. 8. Template Column: This column displays the design type of the Job Costing form. By default LEVERAGE has provided one type of Job Costing form design. You can design the Job Costing form the way you want from the main menu Setup – Form Template. 9. Column Batch No : In this column, you can type the voucher number for the Job Costing Form. 10. Date Column: In this column, you can type the date the job costing activity will be carried out. 11. Job Cost Account Column: In this column, you can select the account that you will use to record Job Costing Activities. 12. Description Column: In this column, you can type a brief description regarding the Job Costing activity that you recorded. 13. Dept Column: In this column, you can select the Department number that relates to the Job Costing activity that you recorded. 14. Warehouse Column: In this column, you can select the name of the Warehouse where raw materials (goods used in production) are taken. 15. Item Table Details: In the item table details, you can select which items you use in production (Job Costing activities). The use of this item will be recorded on the credit side. To make it easier for you to fill in the item table details, pay attention to the instructions below: a. Item Column: In this column you can type the item number that you will use in Job Costing Activities. If you do not memorize the number of the item you are going to use, you can select it directly from the list of items by clicking the Ellipsis Button […] or double clicking on the column of the item or by using the Ctrl+Enter key combination on the keyboard. b. Date Column: This column will automatically be filled with the date of Job Costing. In this column, you can fill in the usage date of the item you selected in the Job Costing activity. Filling in the date of use of this item, must not be less than the date of implementation of Job Costing, but must be greater than or equal to the date of implementation of Job Costing. c. Item Description Column: This column will automatically display the description or item name from the item number you selected. d. Quantity column: In this column, you can type the quantity of items that you will use in Job Costing Activities. e. Cost column: If the balance of the item you selected is still available in the Warehouse, this column will automatically display the HPP value of the item you are using. f. Department Column: In this column you can select the Department number that relates to the Job Costing activity that you recorded, if necessary. g. Column SN: If the item you selected has a Serial Number, this column will display the Serial Number of the Item. 16. Expense Table Details: In the expense table details, you can choose the names of the accounts that will be allocated in Job Costing Activities. The allocation of these accounts will automatically be recorded on the credit side. To make it easier for you to fill in detail expenses, pay attention to the instructions below: a. Account No : In this column, you can type the account number that you will use in Job Costing Activities. If you do not memorize the number from the account that you will use, you can directly select it from the Account List by clicking the Ellipsis Button […] or double-clicking on the Account No column or by using the Ctrl+Enter key combination on the keyboard. b. Date : This column will automatically be filled with the date of Job Costing. In this column, you can fill in the date of allocation of the account you choose in Job Costing activities. Filling in the date of allocation of this account, must not be less than the date of implementation of Job Costing, but must be greater than or equal to the date of implementation of Job Costing. c. Account Name : This column will automatically display a description or account name from the account number you choose. d. Notes : In this column, you can type a short note regarding the account you choose. e. .Amount : In this column, you can type the amount of value that you will allocate (charge) to Job Costing Activities. f. Department : In this column, you can select the Department number related to the Job Costing Activity that you recorded, if necessary. 17. Save & New button: This button functions to save the appearance of the Job Costing Form that you have created, as well as functions to open a new Job Costing Form view. 18. Save & Close button: This button functions to save the appearance of the Job Costing Form that you have created, as well as close the display of the Job Costing Form. ROLL OVER ACTIVITY [FINISHING JOB COSTING] Finishing Job Costing activities that you have recorded can be done by: 1 .Click the Activities main menu - Job Cost - Roll Over 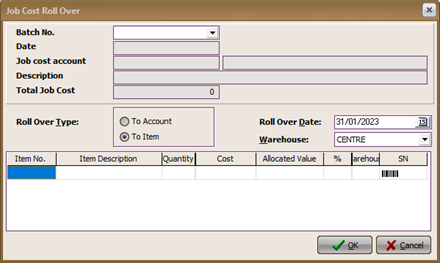
2. Fill out the Job Cost Roll Over form by following the instructions below: a. In the Bacth No field, select the Job Costing number that will be Finished b. In the Roll Over Type option, select the type of finishing you are using. The following is an explanation of the two types of finishing: · You can finish Job Costing To Item (Roll Over To Item) if the Job Costing activities that you create are intended to produce finished goods based on orders (Job Orders). · You can finish Job Costing To Account (Roll Over To Account) if the Job Costing activities that you make are not to produce finished goods but to be financed or allocated to other accounts. CANCELLATION OF JOB COSTING FINISHING ACTIVITIES 1. Cancel Finishing Job Costing To Item (Roll Over To Item) Cancellation of finishing job costing To Item (Roll Over To Item) can be done through the List main menu. Inventory Adjustments by: a. In the Inventory Adjustments list view, filter the date according to the Finishing Job Costing date b. Find the Finishing Job Costing form that you want to cancel by typing "Cost Roll Over For Job Order No (type your Job Costing number) c. Right-click on the Inventory Adjustment line which is a Roll Over of Job Costing whose finishing will be cancelled, then select DELETE; d. Click OK on the confirm window displayed by LEVERAGE. 2. Cancel Finishing Job Costing To Account (Roll Over To Account) Cancellation of finishing job costing to account (Roll Over To Account) can be done through the List | main menu. General Ledger [Ledger] | Journal Voucher [Proof of Journal] by: a. In the Journal Voucher list view, filter the date according to the Finishing Job Costing date, then filter (select) Type Roll Over Goods. b. Right click on the Journal Voucher line which is the Roll Over from Job Costing whose finishing will be canceled then select DELETE. c. Click OK on the confirm window displayed by LEVERAGE. |