2. Next Button : With this button, you can see the next Other Deposit Form display (Next).
3. Preview button: This button functions to preview the printed display of the Other Deposit Form on your computer monitor screen.
4. Printer Button: This button functions to print the appearance of the Other Deposit Form.
5. Clear button: This button functions to clear all account details that you have selected in the details table of the Other Deposit form.
6. Recurring button: This button functions to store details of transaction information on the Other Deposit form which will be used as a recurrence. With this button you can determine or set the number of times the Other Deposit will be repeated within the time range you want.
7. Copy Transaction button: This button functions to Copy Transactions of the Other Deposit form that you have previously memorized. If you create an Other Deposit form with the same account details as the account details on the Other Deposit Form that you created previously, then with this button you don't need to re-enter account details on your new Other Deposit Form, but simply copy the Transaction account from The Other Deposit form that you have previously created. Copy Transaction account from the previous Other Deposit Form
This can be done if you have memorized the account details first.
8. Memorize Transaction button: This button functions to memorize (record) the detailed view of the Other Deposit Form account that you have made. The account details that you have memorized can later be copied when you create the Other Deposit Form with the same account details.
9. Template Column: This column displays the type of design for the Other Deposit form. By default LEVERAGE has provided one type of Other Deposit form design. You can design the Other Deposit Form according to what you want from the main menu Setup – Form Template. With the choice of form design type, you can distinguish Other Deposit printouts for each transaction.
10. Column Deposit To: In this column you can choose a cash account or the recipient's bank or deposit for other receiving transactions that you record.
11.Column Voucher No: In this column you can fill in the voucher number of the Other Deposit Form.
12.Date column: In this column you can record the date of the cash/bank receipt transaction.
13.Rate Column: This column automatically displays the latest rate for the cash or bank account you selected, you can change the rate to the rate that corresponds to the exchange rate at the time the transaction occurred.
14. Memo Column: In this column you can type a brief note on the receipt.
15. Amount column: To fill in the Amount column you can click the Recal button located on the Other Deposit form.
16. Column Say : Displays the number spelled out in a sentence.
17. Column Details Table of the Other Deposit Form consists of the following columns:
a. Account No : In this column you can select the account number that you will use to record the other receipt transaction. The account number you choose will automatically be recorded on the credit position. Account numbers that can be selected are numbers from accounts other than Cash/Bank, Account Receivable,
b. Account Name : This column automatically displays the description or name of the account number you selected in the account details of the Other Deposit Form.
c. Amount : In this column you can fill in the amount to be allocated or recorded in the account number you choose. Plus amount (positive) will be recorded in the credit position, while the minus (negative) amount will be recorded in the debit position.
d. Memo : In this column you can type a more detailed note on the account number you choose in the account details.
e. Department : In this column you can select the Department number associated with the cash/bank receipt transaction that you recorded. If needed.
f. Project : In this column you can select the Project number associated with the cash/bank receipt transaction that you recorded. If needed
18. Save & New button: This button functions to save the displayed Other Deposit form as well as open a new Other Deposit form display.
19. Save & Close Button: This button functions to save the Other Deposit form that appears while simultaneously closing the Other Deposit display or exiting the Other Deposit activity.
Example of Recording Transactions on the Other Deposit Form.
To help your understanding of filling out the Other Deposit Form, in the following we present an example of recording a transaction on the Other Deposit Form.
Illustration :
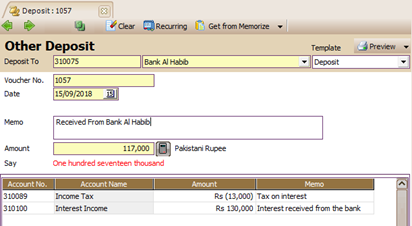
December 31, 2008 The company received a report from Bank that PKR. 130,000 on bank interest income deducted by interest tax of PKR. 13.000,-.
The following is a picture of the display of the Other Deposit form which records the bank's interest income receipt transaction:
How to Change (Edit) the Other Deposit Form
You can change (edit) the Other Deposit Form that you have created from the Other Deposit Form List Table by:
1. Open the Other Deposit Form list table by clicking on the main menu Register – Cash & Bank – Other Receipts (List – Cash & Bank – Other Deposit);
2. Find the Other Deposit form that you want to change or edit, then highlight the Other Deposit form and click the EDIT menu button or right-click and select EDIT.
How to Delete (Delete) the Other Deposit Form
You can delete the Other Deposit Form that you have created from the Other Deposit Form List Table by:
1. Open the Other Deposit Form list table by clicking on the main menu Register – Cash & Bank – Other Receipts (List – Cash & Bank – Other Deposit);
2. Find the Other Deposit form that you want to delete or delete then highlight the Other Deposit form and click the DELETE menu button or click the right mouse button and select DELETE.
LIST OF OTHER DEPOSIT
[Other Acceptance List]
All Other Acceptance forms (Other Deposits) that you have made, will be recapitulated in a special table called the List of Other Acceptance Forms (Other Deposits). In the list of Other Receipt Forms (Other Deposits) table, you can edit and cancel other Receipt activities that you want.
Table of List of Other Receipts (Other Deposits) can be opened by:
1. Click the main menu Register (List) - Cash & Bank (Cash & Bank)
2. Then Other Receipt (Other Deposit)
Table List of Other Receipts (Other Deposits) displays information consisting of
several groups, namely:

The Other Deposit List display is divided into several sections:
1. Menu Button Group. The menu button in the Table of Other Receipts (Other Deposits) consists of the following buttons:
a. New button: This button functions to create a new Other Deposit Form.
b. Edit button: This button functions to change (edit) the highlighted Other Deposit Form.
c. Delete button : This button functions to delete (delete) the highlighted Other Acceptance Form.
d. Filter Button: This button functions to display the Filter column on the side of the Other Deposit Form List. With this filter, you can display only the Other Deposit Forms you want. Filtering the List of Other Receipts (Other Deposits) can be done based on:
• Filter by Date : i.e. filter Other Acceptance List based on the date period you want.
e. Refresh button: This button functions to update/update the appearance of the List of Other Receipts (Other Deposits) according to the last input you made.
f. Print button: This button functions to print a printed display of the List of Other Receipts (Other Deposits) on your computer monitor screen, before printing on paper.
g. Find Other Deposit Column: This column serves to make it easier for you to find the Other Deposit Form you want in the Other Deposit List Table. You can do a quick search simply by typing the number of the Other Acceptance Form you want in the <No> Field or typing the description of the Other Acceptance Form you want in the <Description> Field.
2. Columns in Table Details List of Other Deposit Forms.
Table Details List of Other Acceptance Forms (Other Deposits) displays columns that present the information contained in the Other Acceptance Forms (Other Deposits). These columns consist of:
a. Column No : This column displays information on the number of the Other Receipt Form (Other Deposit).
b. Date Column : This column displays information on the date of the Other Acceptance Form (Other Deposit).
c. Amount Column : This column displays information on the total amount of receipts displayed on the Other Acceptance Form.
d. Column Description : This column displays a brief description that you type in the Memo column on the Other Deposit Form.
3. Right Mouse Click on the Other Deposit List.
Some of the activities that you can do by clicking the Right Mouse on the Other Acceptance List include:
a. New : Right Mouse Click then select New, functions to create a new Other Deposit Form.
b. Edit : Right Mouse Click then select Edit has the same function as if you clicked the Edit menu button on the List of Other Acceptance Forms (Other Deposits), which functions to edit or change the contents of the highlighted Other Acceptance Forms.
c. Delete : Right Mouse Click then select Delete has the same function as if you click the Delete menu button on the Other Deposit List, which functions to delete the highlighted Other Receipt Form.
d. Filter Ctrl+F : Right Mouse Click then select Filter has the same function as if you clicked the Filter menu button on the Other Deposit List, which functions to display the Filter column on the left side of the Other Deposit List.
e. Sort by: Click the Right Mouse then select Sort by, functions to sort the display of the Other Acceptance List according to the column headings contained in the List.
f. Refresh F5 : Right Mouse Click then select Refresh (F5) has the same function as if you click the Refresh menu button on the Other Deposit Form List, which functions to update/update the display of the Other Acceptance List according to the last input you made.
OTHER PAYMENT
Other Payment Form is a form that functions to record cash or bank disbursement transactions. Transactions that can be recorded in this form are other payment transactions that have nothing to do with inventory purchasing activities to vendors (suppliers).
Some examples of other receipt transactions that you can record in this form are as follows:
1. Payment of company costs/expenses such as salaries, electricity, telephone and others;
2. Purchase of Fixed Assets in Cash;
3. Payment of prepaid interest, purchase of equipment;
4. Payment of Bank Administration Fees.
How to Open Another Payment Form
1. Click the Activities | main menu Cash & Bank [Cash & Bank] | Other Payment :
2. Or it can be opened from the menu Explorer, click the Cash Bank button, then
click Other Payment
Other Payment Forms
You can fill out the Other Payment form by following the instructions below:
1. Previous Button : With this button, you can see the appearance of the Other Payment form that you created earlier.
2. Next Button: With this button, you can see the next (next) Other Payment form display.
3. Preview button: This button functions to preview the printed display of the Other Payment Form on your computer monitor screen.
4. Printer Button: This button functions to print the Other Payment Form view.
5. Clear button: This button functions to clear all account details that you have selected in the details table of the Other Payment form.
6. Recurring button: This button functions to store details of transaction information on the Other Payment form which will be used as a loop. With this button you can specify or manage how many times the Other Payment recording will be repeated within the time range you want.
7. Copy Transaction button: This button functions to copy Transactions from the Other Payment form that you have previously memorized. If you created an Other Payment form with the same account details as the account details on the Other Payment Form that you created previously, then with this button you don't need to re-enter account details on your new Other Payment Form, but simply enter Copy Transaction account from the Other Payment Form that you made before. Copy Transaction account from the previous Other Payment Form can be done if you have memorized the account details first.
8. Memorize Transaction button: This button functions to memorize (record) the detailed view of the Other Payment Form account that you have created. The account details that you have memorized can later be copied when you create an Other Payment Form with the same account details.
9. Template Column: This column displays the type of design for the Other Payment form. By default LEVERAGE has provided one type of Other Payment form design. You can design the Other Payment Form according to what you want from the Setup – Form Template menu. With the choice of form design type, you can distinguish Other Payment prints for each transaction.
10. Paid From column: In this column you can select the cash or bank account that you use to pay for these other payment transactions.
11.Column Voucher No: In this column you can type the voucher number for the Other Payment form that you created. Voucher number typing can be done up to 20 characters.
12. Check No column: In this column you can fill in the check number that you used in the payment.
13. Check Box Void Check : Activate this check box if the check you used for payment is canceled (blank check).
14.Date column: In this column you can record the date the payment transaction was made.
15.Rate Column : Automatically displays the latest rate for the cash/bank account you selected. You can replace this rate with another rate according to the exchange rate at the time the payment transaction occurred.
16. Memo Column: In this column you can type a brief description of the payment transaction that you recorded.
17. Payee Column: In this column you can type the name of the person receiving the payment.
18. Amount column: Fill in this column by clicking the Recalc button located in the Amount column.
19.Say column: Displays the amount spelled out in a sentence
20.Detail Table Form Other Payment consists of columns - columns:
a. Account No : In this column you can select the account number that you will use to record these other payment transactions. The account number you choose will automatically be recorded in the debit position.
b. Account Name : This column automatically displays the description or name of the account number you selected in the account details of the Other Payment Form.
c. Amount : In this column you can fill in the amount to be allocated or recorded in the account number you choose. The plus (positive) amount will be recorded in the Debit position, while the minus (negative) amount will be recorded in the Credit position.
d. Memo : In this column you can type a more detailed note on the account number you selected in the account details.
e. Department : In this column you can choose the Department that relates to cash/bank payment transactions that you record, if necessary.
f. Project: In this column you can select a Project related to cash/bank payment transactions that you record, if necessary.
21.Save & New button: This button functions to save the displayed Other Payment form as well as open a new Other Payment form view.
22.Save & Close button: This button functions to save the Other Payment form that appears while simultaneously closing the Other Payment display or exiting the Other Payment activity.
Example of Recording Transactions on the Other Payment Form
To help your understanding of filling out the Other Payment Form, below we present an example of recording a transaction on the Other Payment Form.
Illustration :
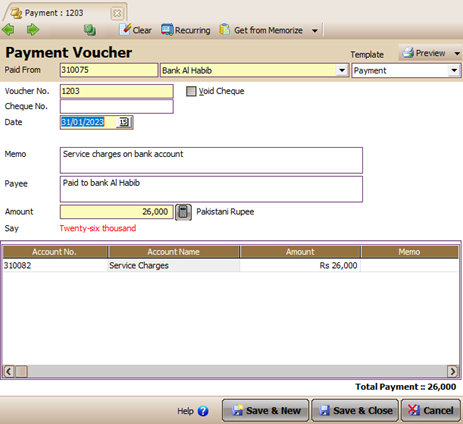
December 31, 2008 Bank checking account stated that the company was deducted a monthly bank charges of PKR. 26.000,-.
The following is a display image of the Other Payment form that records Transactions receiving Bank Administration:
How to Change (Edit) the Other Payment Form
You can change (edit) the Other Payment Form that you have created from the Other Payment Form List Table by:
1. Open the Other Payment Form list table by clicking on the main menu List – Cash & Bank – Other Payments (List – Cash & Bank – Other Payment);
2. Find the Other Payment form that you want to change or edit then highlight the Other Payment form then click the EDIT menu button or right-click and select EDIT.
How to Delete (Delete) the Other Payment Form
You can delete the Other Payment Form that you have created from the Other Payment Form List Table by:
1. Open the Other Payment Form list table by clicking on the main menu List – Cash & Bank – Other Payments (List – Cash & Bank – Other Payment);
2. Find the Other Payment form that you want to delete or delete, then highlight the Other Payment form and click the DELETE menu button or click the right mouse button and select DELETE.
LIST OF OTHER PAYMENT
All Other Payment Forms (Other Payments) that you have made, will be recapitulated in a special table called the List of Other Payment Forms (Other Payments). In this Other Payment List table, you can make edits and cancel other payment activities that you want.
Table of List of Other Payments (Other Payment) can be opened by:
1. Click the main menu Register (List) – Cash & Bank (Cash & Bank)
2. Then select Other Payments (Other Payment).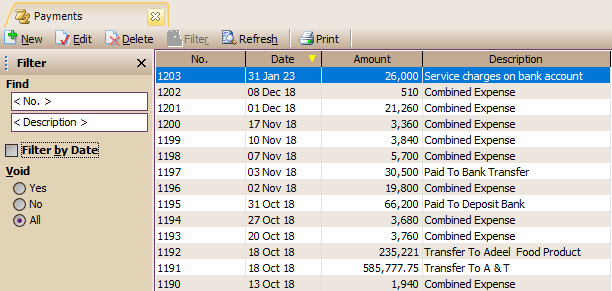
The Other Payment List table displays information consisting of several groups, namely:
1. Menu Button Group. The menu button on the Other Payment List Table consists of the following buttons:
a. New Button: This button functions to create a new Other Payment Form.
b. Edit button: This button functions to change (edit) the highlighted Other Payment Form.
c. Delete button: This button functions to delete the highlighted Other Payment Form.
d. Filter Button: This button functions to display the Filter column on the side of the List of Other Payment Forms. With this filter you can display only the Other Payment Forms that you want. Filter Other Payment List (Other Payment) can be done based on:
ü Filter by date : Filter the list of Other Payments based on the date period you want.
ü Void : Filter Other Payments list based on check status used in payment, consists of 3 filter options:
1. Yes : Displays only the Other Payment form whose check is canceled (blank check).
2. No : Displays only Other Payment forms whose checks are not canceled.
3. All : Displays all Other Payment forms, whether the check is canceled or not.
e. Refresh Button: This button functions to update/update the display of Other Payment List according to the last input that you made.
f. Print button: This button functions to print other payment lists on your computer monitor screen, before printing on paper.
g. Find Other Payment Button: This column serves to make it easier for you to find the Other Payment Form that you want in the Other Payment List Table. You can do a quick search simply by typing the number of the Other Payment Form you want in the <No> Field or by typing the description of the Other Payment Form you want in the <Description> Field.
2. Columns in Table Details of Other Payments List (Other Payments)
Details of the List of Other Payments (Other Payments) table displays columns that present the information contained in the Forms of Other Payments (Other Payments). These columns consist of:
a. Column No : This column displays information on the number of Other Payment Forms.
b. Date Column : This column displays date information for Other Payment Forms.
c. Amount Column : This column displays information on the total amount of payments displayed on the Other Payment Form.
d. Description Column : This column displays a short description that you type in the Description column on the Other Payment Form.
3. Right Mouse Click on the List of Other Payment Forms.
Some of the activities that you can do by clicking the Right Mouse on the Other Payment List include:
a. New : Right Mouse Click then select New, functions to create a new Other Payment Form.
` b. Edit : Right Mouse Click then select Edit has the same function as if you clicked the Edit menu button on the List of Other Payment Forms (Other Payments), which functions to edit or change the contents of the highlighted Other Payment Forms.
c. Delete : Click the Right Mouse then select Delete. It has the same function as if you clicked the Delete menu button on the List of Other Payment Forms, which functions to delete the highlighted Other Payment Forms.
d. Filter Ctrl + F : Right Mouse Click then select Filter has the same function as if you clicked the Filter menu button on the Other Payment List, which functions to display the Filter column on the left side of the Other Payment List.
e. Sort by: Click the Right Mouse then select Sort by, functions to sort the display of Other Payment Lists according to the detailed column headings contained in the list.
f. Refresh F5 : Click the Right Mouse then select Refresh (F5). It has the same function as when you click the Refresh menu button on the Other Payment Form List, which functions to update/update the Other Payment List display according to the last input you made.
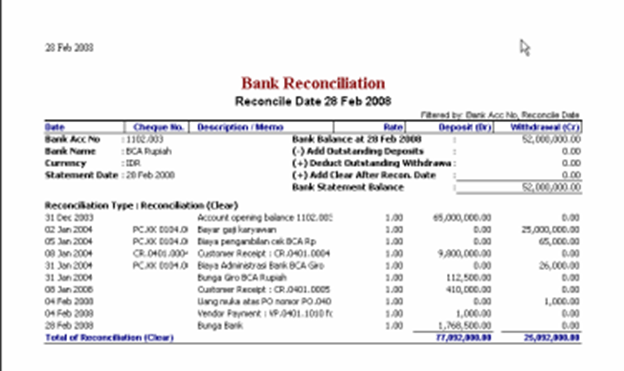
Bank Reconcile
[Bank Reconciliation]
The Bank Reconciliation Form is a form that functions as a tool to make it easier for you to carry out bank reconciliation activities.
The Bank Reconcile Form will automatically display every Bank transaction that has been recorded by the company, so you can quickly compare it with the recording of transactions according to the Bank Statement.
The difference between company records and checking account records is usually caused by the following transactions:
a. Checks in circulation (Outstanding Checks);
b. Deposits that have not been recorded by the Bank (Deposit In Transit);
c. Bank Administration Fee (Bank Charge);
d. Blank Check (Bad Check) that has been debited by the company; e. Bank Interest (Bank Interest)
f. Logging error
How to Conduct Bank Reconciliation Activities
1. Open the Bank Reconciliation Form by clicking the Activities main menu - Cash & Bank | -Bank Reconcile (Bank Reconciliation);
2. Or you can do it by clicking the Cash Bank button on the Explorer menu and then clicking Bank Reconcile | Bank Reconciliation
3. You can do Bank Reconciliation Activities by following the instructions below:
a. In the Bank Account column, select the Bank account that you want to reconcile. Note, when you select the Bank account that you want to reconcile, LEVERAGE automatically displays all transactions related to that Bank on the Bank Reconciliation Form Details.
b. In the New Statement Balance column, you can fill in the value of the Bank's balance according to the Bank's Statement of Account records. The value according to the Bank Statement record will be used as a basis (reference) in carrying out bank reconciliation activities. Fill in the Reconcile Date column according to the date of the reconciliation activity.
c. To calculate the value of the bank balance according to company records, you can do this by clicking the Clear All button. Notice, when you click the Clear All button, all the transactions on the form detail will be checked and LEVERAGE will automatically calculate the Bank balance according to company records and display it in the Calculated Statement Balance column.
d. The difference (difference) in the balance value according to company records and the balance value according to the Bank Statement will be displayed in the Out Of Balance column. If the difference (difference) in recording occurs as a result of a Bank acceptance transaction that has been recorded by the Bank but you have not recorded it, then you can adjust this transaction using the Other Deposit form by clicking the Other Deposit Button found on the Bank Reconciliation Form display. the.
e. If the difference (difference) in recording occurs as a result of a Bank expenditure transaction that has been recorded by the Bank but you have not recorded it, then you can adjust this transaction by using the Other Payment form by clicking the Other Payment Button found on the Bank Reconciliation Form view. the.
f. If the difference (difference) in recording occurs due to a transaction that you have recorded but the Bank has not recorded it, then to match the value of the Bank balance according to your recording with the Bank balance according to the recording of the Bank Account, you can do this by unchecking the clear column on the line of the transaction in question.
g. After you have finished adjusting the transaction that causes the difference in your recording with the bank, the last step is to check the balance value, make sure the Out Of Balance value is 0. Then click the Save & Close button to end the bank reconciliation activity.
BANK RECONCILIATION REPORT
BANK BOOK
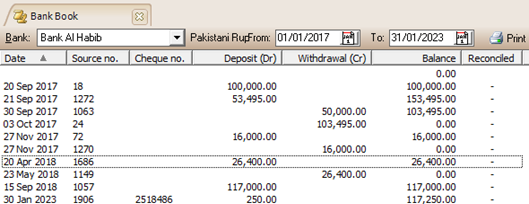
Bank Book (Bank Book) is a table that presents transaction transactions related to cash and bank accounts that you have.
Transaction movements displayed in the Bank Book consist of transactions that result in an increase in cash/bank account balances and transactions that result in a decrease in cash/bank account balances. In addition, the Bank Book also displays information on the balance of your cash/bank account.
You can open a Bank Book by:
1. Click on the main menu List – Cash & Bank (List – Cash & Bank)
2. Then select (click) Bank Book.