General Ledger activities include General Journal transactions only. But several things that need to be done before conducting a General Journal include: 1. Determine the Chart of Accounts 2. Determine Budget Account (if required) Usually this activity is more dominantly carried out by the accounting department, because it is the accounting department that knows more about the appropriate chart of accounts and the journals that will be made later which will affect any financial reports. JOURNAL VOUCHER [GENERAL JOURNAL EVIDENCE] Journal Voucher Form (Proof of General Journal Form) is a form that functions to record transactions that are normally recorded in the General Journal where these transactions cannot be recorded using forms in other modules that have been provided by LEVERAGE. Transactions that should be recorded on the Journal Voucher form (Journal Evidence form) are as follows: a. Cash deposit transactions to cash/banks; b. Fund transfer transactions from Cash/Bank to Cash/Bank; c. Cash withdrawal transactions from cash/banks; d. Adjustments to prepaid rental charges, prepaid insurance and other prepaid transaction charges; e. Calculation and recording of accrued expenses (Accrual Expense); f. Adjustment of equipment that has been used up; g. Purchase and sale of Foreign Exchange; The Journal Voucher form can be opened from the Activities – General Ledger – Journal Voucher main menu. Apart from the main menu, the Journal Voucher form can also be opened from the Explore menu (Explorer), by clicking the General Ledger button on the Explorer menu and then selecting Journal Voucher (Journal Evidence), pay attention to the following picture: Journal Voucher Form 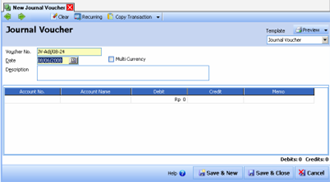
You can fill out the Journal Voucher form (Proof of General Journal) by following the instructions below: 1. Previous Button : With this button, you can view the appearance of the Journal Voucher Form that you created earlier. 2. Next button: With this button, you can see the next (next) display of the Journal Voucher Form. 3. Preview button: This button functions to preview the printed display of the Journal Voucher Form on your computer monitor screen. 4. Printer Button: This button functions to print the display of the Journal Voucher Form. 5. Clear button: This button functions to clear all account details that you have selected. 6. Recurring button: This button functions to store details of transaction information on the Journal Voucher form which will be used as a recurrence. With this button you can specify or set the number of times the Journal Voucher recording will be repeated within the time range you want. 7. Copy Transaction button: This button functions to copy transactions in the Journal Voucher form that you have previously memorized. If you create a Journal Voucher form with journal details the same as the journal details on the Journal Voucher Form that you created previously, then with this button you don't need to re-enter journal details on your new Journal Voucher Form, but simply copy the journal Transaction from the Journal Form Vouchers that you have previously created. Copy Transactions from the previous Journal Voucher Form can be done if you have memorized these details first. 8. Memorize Transaction button: This button functions to memorize (record) the detailed display of the Journal Voucher Form that you have created. The details that you have memorized can later be copied when you create a Journal Voucher Form with the same journal details. 9. Template Column: This column displays the type of Journal Voucher form design. By default LEVERAGE has provided one type of Journal Voucher Form design. You can design the Journal Voucher Form according to what you want from the main menu Setup – Form Template. With the choice of form design type, you can distinguish Journal Voucher prints for each transaction. 10.Column Voucher No : In this column, you can type the Form Voucher number. Entering the number in this column can be done up to 20 characters. This number will automatically increase by one digit (if the last digit is a number) every time you create a new Journal Voucher Form. 11.Date column : In this column, you can fill in the transaction date that you recorded. 12. Multi Currency Check Box: You can activate this check box, if the transaction you are recording is a transaction using a cash/bank account, account receivable, account payable in foreign currency. If this check box is checked, LEVERAGE will display the Prime Amount and Rate columns on the Journal Voucher form. 13. Column Description : In this column, you can type a brief description of the transaction that you recorded on the Journal Voucher Form. 14. Details of the Journal Voucher Form Table: a. Account No : In this column you can select the account number that you will use to record transactions by typing in the account number. If you don't know the account number you will use it, you can directly select it directly from the list of accounts by using the Ellipse key [...] or double clicking on the Account No column or you can also use the Ctrl + Enter key combination on your keyboard. b. Account Name : This column will automatically display the account description or account name of the account number you choose. c. Debit : In this column, you can fill in the transaction change value for the account you choose if it affects the Debit position. d. Credit : In this column, you can fill in the transaction change value for the account you choose if it affects the credit position. e. Memo : In this column, you can type a specific description of the account you choose other than the information you type in the Description column. f. Rate : This column will be automatically displayed if the Multi Currency check box is checked. In this column you can fill in the foreign currency exchange rate against the base currency that you use. g. Prime Amount : This column will also be automatically displayed if the Multi Currency check box is checked. In this column you can fill in changes in the principal value of the currency, whether it increases or decreases. If the Prime Amount (Positive) is multiplied by the Rate then LEVERAGE will record it in the Debit position. But if the Prime Amount Minus (Negative) is multiplied by the Rate, LEVERAGE will record it in the Credit position. h. Sub Ledger : This column will be automatically displayed if the account you select in recording transactions is an account receivable type and account payable type. If the account you choose is an account with the type of account receivable, then you can fill in this column with the name of the customer related to the accounts receivable transaction that you recorded and if the account you choose is an account with the type of account payable, then you can fill in this column with the name of the supplier (vendors) associated with the accounts payable transactions that you record. i. Dept : In this column you can fill in the Department number associated with the transaction you are recording. j. Project : In this column you can fill in the Project number associated with the transaction you recorded. 15. Save & New button: This button functions to save the displayed Journal Voucher form and simultaneously opens a new Journal Voucher Form view. 16.Save & Close button: This button functions to save the displayed Journal Voucher form and at the same time closes the display of the Journal Voucher Form. Journal Voucher – Base Currency This journal applies to journal transactions from accounts other than Cash/Bank, Account Receivable, and Account Payable types. All selected accounts use the Base Currency, meaning that all amounts entered in the Debit/Credit position will be multiplied by one. Journal Voucher – Multi Currency This journal applies to journal transactions from accounts of type Cash/Bank, Account Receivable, and Accounts Payable that use a Currency other than the Base Currency. The only way to fill it is by activating (checking) the Multi Currency field, then selecting the account in question. In the column display, the Prime Amount and Rate columns are added. Prime Amount : fill in a number in the amount of the currency in question. If Minus (negative) is entered, it will be multiplied by the Rate and placed in the Credit position. Journal Voucher – Sub Ledger This journal applies to journal transactions from accounts that are Account Receivable and Account Payable types. Every time you choose an Account No with an Account Receivable or Account Payable type, you will definitely ask who the Sub Ledger is. Without filling in the Sub ledger, you cannot fill in the next row and the transaction cannot be saved. Filling in the Sub ledger can use the Right Mouse Click on the account row with the Account Receivable/Account Payable type or by using the Ctrl+L key combination. If the Account No type of Account Receivable/Account Payable that you choose uses PKR currency, only Customers/Vendors with the same currency as the account currency will be displayed. Journal Voucher – Period End After every Period End activity, LEVERAGE automatically creates two types of journal vouchers: 1. Journal with Period End type (Realized/Unrealized Gain or Loss) 2. Journal with Depreciation & Amortization Asset type. You cannot edit the two period end activity journals manually. If something goes wrong then you can delete both journals from the main menu List – General Ledger – Journal Voucher, then do the Period End activity again. JOURNAL EVIDENCE LIST [LIST OF JOURNAL VOUCHER] All journal vouchers that you have created manually or automatically made by LEVERAGE will be recapitulated in a table called the List of Journal Vouchers. 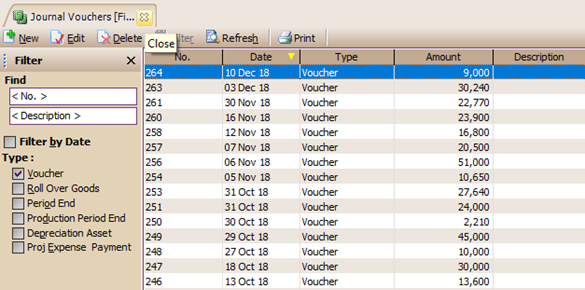
The Journal Voucher List table can be opened from the main menu List – General Ledger – Journal Voucher (List – Ledger – Journal Evidence). The Journal Voucher List table displays information consisting of several groups, namely: 1. Menu Button Group. The menu button on the Journal Voucher List Table consists of the following buttons: a. New button: This button functions to create a new Journal Voucher Form. b. Edit button: This button functions to change (edit) the highlighted Journal Voucher Form or just open the highlighted Journal Voucher form to simply see how it looks. c. Delete button: This button functions to delete (delete) the highlighted Journal Voucher Form. d. Filter Button: This button functions to display the Filter column on the side of the Journal Voucher Form List. With this filter, you can display only the Journal Voucher Form that you want. Filter Journal Voucher Form List (Job Costing) can be done based on: • Filter by Date: Filter the Journal Voucher List based on the date period you want. • Type : Filter Journal Voucher List based on the type of Journal Voucher Form. The form type filter has 4 options: 1. Voucher : Displays only the Journal Voucher form with the Voucher type, namely the form that you created manually from the Activities – General Ledger – Journal Voucher main menu and the Journal Voucher Form that was created automatically by LEVERAGE for recording the initial account balance. 2. Roll Over Goods: Displays only the Journal Voucher form with the Roll Over Goods type, namely the form that LEVERAGE automatically creates to record the completion of Job Costing activities with the Finishing To Account option. 3. Period End : Displays only the Journal Voucher form with the Period End Type, namely the form that is automatically created by LEVERAGE to record the calculation of exchange differences [Activity Processing Period End]. 4. Depreciation Asset: Displays only the Journal Voucher form with the Depreciation Asset Type, namely the form that LEVERAGE automatically creates to record the calculation of Fixed Asset depreciation expense [Period End Process Activity]. e. Refresh button: This button functions to update/update the display of the Journal Voucher List according to the last input you made. f. Print button: This button functions to print a printed display of the Journal Voucher List on your computer monitor screen, before printing it on paper. g. Find Journal Voucher Column: This column serves to make it easier for you to find the Journal Voucher Form you want in the Journal Voucher Form List table. You can do a quick search by simply typing the number of the Journal Voucher Form voucher you want in the <No> Field or typing the description of the Journal Voucher Form you want in the <Description> Field. 2. Columns in the Table Details of the Journal Voucher Form List The Journal Voucher list details table displays the columns that present the information contained in the Journal Voucher Form. These columns consist of: a. Column No : This column displays voucher number information on the Journal Voucher Form. b. Date Column : This column displays date information on the Journal Voucher Form. c. Column Type : This column displays information on the type of Journal Voucher Form. d. Amount Column: This column displays information on the total transaction value that you record on the Journal Voucher Form. e. Description column: This column displays a brief description that you type in the Description column on the Journal Voucher Form. 3. Right Mouse Click on Journal Voucher Form List. Some of the activities you can do with Right Mouse clicks include: a. New : Click the Right Mouse then select New, functions to create a new Journal Voucher Form. b. Edit : Right Mouse Click then select Edit, has the same function as if you clicked the Edit menu button on the Journal Voucher Form List, which functions to edit or change the contents of the highlighted Journal Voucher Form. c. Delete : Right Mouse Click then select Delete has the same function as if you clicked the Delete menu button on the Journal Voucher List, which functions to delete the highlighted Journal Voucher Form. d. Filter Ctrl+F : Right Mouse Click then select Filter has the same function as if you clicked the Filter menu button on the Journal Voucher List, which functions to display the Filter column on the left side of the Journal Voucher List. e. Sort by: Click the Right Mouse then select Sort by, serves to sort the display of the Journal Voucher List according to the column headings contained in the List. f. Refresh F5 : Click the Right Mouse then select Refresh (F5). ACCOUNT HISTORY Account History is a collection of effects from each transaction recording that results in a change in the company's financial position. Account History can also be referred to as a collection of general journals on debit and credit positions if sorted by date and reference number. But if it is sorted by Account No or Account Name it functions as a ledger of an account, and if it is sorted by project No or Department No then it functions as the history of a Project or Department. Account History can be opened from the main menu List – General Ledger – Account History. 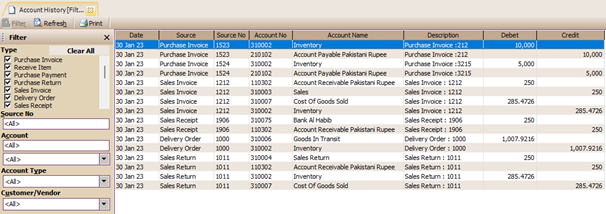
The columns displayed in this History consist of: Ø Date : Transaction Date Ø Source No : Reference number of a transaction Ø Account No : Account Number that changes as a result of the transaction Account Ø Name: Name of the account concerned. Ø Debit : The number of changes in an account in the Debit position. Ø Credit: The amount of change in an account in the Credit position. Ø Dept : Fill in the Department of a transaction (This feature is only available in LEVERAGE Deluxe and Enterprise Edition). Ø Project : Fill in the Project of a transaction (This feature is only available in LEVERAGE Deluxe and Enterprise Edition). Ø Description: Description of a transaction. Ø Source: What type of transaction comes from what menu activity. Field Filter options that can be used: Type : Can choose certain types of transactions that are displayed. There are 17 types of transaction types, namely: Purchase Invoice, Receive Item, Vendor Payment, Purchase Return, Sales Invoice, Delivery Order, Customer Receipt, Sales Return, Journal Voucher, Other Payment, Other Deposit, Fixed Assets (Acquistion), Fixed Assets (Dispossal), Job Costing, Inventory Adjustment, Material In Used, Project Ending. Source No: You can type a specific reference number. Account: You can type in a specific account number or choose a specific account name. Account type: Can choose to display only certain types of accounts. Customer/vendor: Displays only certain customers/vendors that appear. Project: You can type in certain Project numbers that appear. This feature is only available on LEVERAGE Deluxe and Enterprise Edition. Department: Only certain Department numbers can be typed to appear. This feature is only available on LEVERAGE Deluxe and Enterprise Edition. Filter by Date : Displays transactions on a certain date only (checked) or all dates (unchecked). Reset : Returns the Filter to its original (default) by displaying all transactions from the 1st of the month in question until the date the computer is active. ACCOUNT BUDGET Companies that have good planning will always make a budget that will be achieved at a certain date/period. All accounts can be filled with budgets except for accounts used as Parent by other accounts. Filling in this budget is useful for viewing actual comparison reports with the budget of an account in a period. 
CREATE A BUDGET ACCOUNT: 1. Open menu List – General Ledger – Account Budget 2. After the Budget Account List form appears, click New 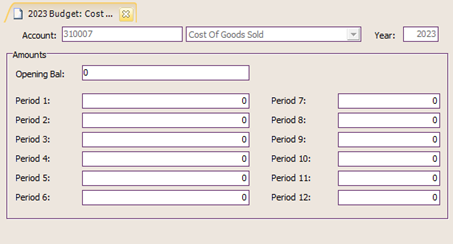
3. Select the Account that will be filled with the Budget 4. Fill in the fiscal year of the account. 5. Fill in the Opening Balance of a Budget 6. Fill in the change (increase/decrease) in the value of an account that is budgeted for the period in question. In the compare budget report, the value for a period will be calculated from the Opening Balance Budget, added/subtracted from the budget for the previous month's period and added/deducted from the budget for the period concerned. This Budget Account will later affect Financial Statement reports and Custom Financial Statement Reports. Filling in the Budget always starts in January (Period 1) and ends in December (Period 12). The Opening Balance must always be filled in for each new year, because the previous year's budget balance does not carry over to the next year's budget. ACCOUNT BALANCE This list displays changes in the balance of an account in period 1 to period 12 along with the initial balance. Each account can be displayed in 3 ways, namely displaying mutations in the base currency or in prime currency (only for cash/bank accounts, accounts receivable, accounts payable) or both. You can open the Account Balance List (account balance) from the main menu List – General Ledger – Account Balance (Activities – General Ledger – Account Balance). 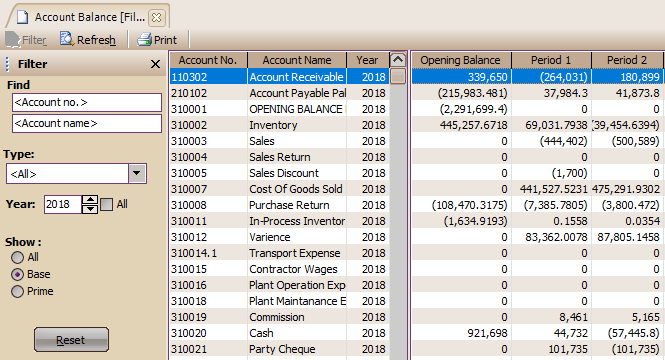
|