WAREHOUSE The create Warehouse menu will be active if you enable Feature (Multi Warehouse) in the Setup Preference menu. When creating a data warehouse, LEVERAGE by default already provides a default warehouse with the name CENTRE. HOW TO CREATE A NEW WAREHOUSE To make a Warehouse list, you can do this by: 1. Click on the main menu List – Inventory – Warehouses 2. In the warehouse list table, click the New button. 3. In the New Warehouse form, fill in the following information: a. Warehouse Name : In this column you can fill in the Warehouse name according to the Warehouse name you want. b. Description : In this column you can fill in a brief description of the Warehouse. c. Address: In this column you can fill in the address information where your Warehouse is located. d. Person In Charge: In this column you can fill in the name of the person in charge. 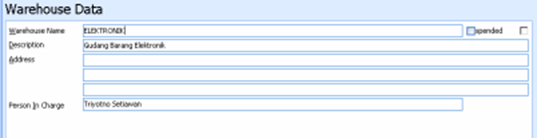
4. Click the OK button to close and save the new Data Warehouse that you have created or click the NEXT button to create the next new Data Warehouse. HOW TO DELETE WAREHOUSE DATA You can delete the data warehouse that you have created from the Warehouse list table by: 1. Open the Warehouse list table by clicking on the main menu List – Inventory – Warehouses. 2. Highlight the name of the Warehouse that you want to delete, then click the Delete button or right-click and select Delete. HOW TO MODIFY (EDIT) WAREHOUSE DATA You can change (edit) the data warehouse that you have created from the Warehouse list table by: 1. Open the Warehouse list table by clicking on the main menu List – Inventory – Warehouses; 2. Highlight the name of the Warehouse that you want to change, then click the Edit button or right-click and select Edit. List Of Items (List of Goods and Services) LEVERAGE Accounting Software provides a Table that you can use to record the Merchandise and Service data that you own. The Goods and Services List table displays item number information (item no), name of goods (description), the amount of goods (quantity), selling price (unit price) and item type information. The types of items that can be recorded in the Goods and Services List Table can be divided into 4 types of items, namely: 1. Items with Inventory Part type. You can record the items you own with the type of Inventory Part (Inventory) if the items you buy are merchandise intended for resale. Items that can be categorized as items with the Inventory Part type are items that have the following characteristics: a. Having inventory information, which includes: information on quantity, cost/unit and where goods are stored can be traced. b. These items are purchased for stock (stored) with the aim of reselling to customers. c. The history of these items can be traced. d. The recording of these items affects the account with the type of inventory. e. If the item is sold, then the Cost of Goods Sold of the item can be automatically calculated according to the method of calculating the cost of goods that you use, whether the FIFO or AVERAGE method. 2. Items with Non Inventory Part type. You can record the goods that you have with the type of Non-Inventory Part (Non-Inventory) if the goods you buy are goods that you will consume yourself or use yourself. Items that can be categorized as items with the Non Inventory Part type are items that have the following characteristics: a. Do not have inventory information because quantity information, cost/unit items are not available. b. These items are purchased for their own use (sold out immediately) and not for storage (dis stock). c. The history of these items cannot be traced. d. Because the goods are purchased for immediate use, the recording of the purchase of these goods will affect the expense account. e. If the goods are sold, the Cost of Goods Sold of goods with non-inventory types cannot be calculated automatically. 3. Service type items. A special Service Item type is used to record the types of Services you sell to your customers. Recording Service Items will automatically affect the revenue account that you have. 4. Items with Grouping type. A special grouping type is used to record the types of inventory items that you will sell as a package or as a group. You can open the Goods and Services List table from the List – Items main menu. The display of the Goods and Services List Table is divided into 3 groups, as follows: 1. Menu Button Group. The Menu button in the Goods and Services List Table consists of the following buttons: a. New Button: This button functions to create a New Item. b. Edit button: This button functions to edit item data. c. Delete button: This button functions to delete item data d. Filter Button: This button functions to display the Filter column on the left side of the Goods and Services List. With filters you can display only the Items you want on the Goods and Services List. Filter the List of Goods and Services can be done based on: • Item Type : Filter based on the type of goods and services. There are four types of items to choose from :Inventory Part, Non Inventory Part, Grouping and Service. • Suspended : Filter based on whether the item is active or not. There are three options: A. Yes : Only displays inactive items or suspended items on the Goods and Services List. B. No : Only displays active items or items that are not suspended on the Goods and Services List. C. All : Displays all items, both active (not suspended) and inactive (suspended) on the Goods and Services List. • Do Not Show Zero Qty Except Parent Item: If you check this option, then the List of Goods and Services will not display information on inventory part type item data whose quantity balance is zero (0). e. Refresh button: This button functions to update/update the Item List view according to the last data item input. f. Print button: This button functions to print the appearance of the List of Goods and Services on your computer monitor screen, before printing it on paper. g. Find Item Column: This column makes it easier for you to search for the item you want on the Goods and Services List. You can do a quick search by simply typing the item number you want in the <Item No> field or you can also do it by typing the item name you want in the <Item Description> field. 2. Table Detail Group, displays columns that present information on the Goods and Services that you own. These columns consist of: a. Item No : This column displays the item number information that you have. b. Description : This column displays information on the name of the Item that you have. c. Quantity : This column displays information on the balance of the Item quantity that you have as of the date of your computer system. This Quantity column only displays quantity balance information for items with the inventory part type. d. Unit Price: This column displays information on the default selling price of the items you own e. Type : This column displays information on the type of item you have. 3. Right Mouse Click on Goods and Services List. Some of the activities that can be done with the Right Mouse click include: a. New : Click the Right Mouse then select New, functions to create a new Item in the Goods and Services List. b. Edit: Right Mouse Click then select Edit has the same function as if you clicked the Edit menu button on the Goods and Services List, which functions to edit or change item data contained in the Goods and Services List. c. Delete : Right Mouse Click then select Delete has the same function as if you click the Delete menu button on the Goods and Services List, which functions to delete item data contained in the Goods and Services List. d. Filter: Right Mouse Click then select Filter has the same function as if you clicked the Filter menu button on the Goods and Services List, which functions to display the Filter column to the left of the Goods and Services List. e. Sort by: Click the Right Mouse then select Sort by function to sort the display of Items in the List of Goods and Services according to the column headings contained in the list. f. Refresh F5: Click the Right Mouse then select Refresh (F5). It has the same function as if you clicked the Refresh menu button on the Goods and Services List, which functions to update/update the appearance of the Goods and Services List according to the last item data input you did. g. Adjust Price: Click the Right Mouse then select Adjust Price, function to open the New Selling Price Adjustment activity. On the New Selling Price Adjustment form, you can make adjustments to the default selling price of the items you own. h. Adjust Quantity : Right Mouse Click then select Adjust Quantity on the highlighted Item row, serves to adjust the quantity of the highlighted item. When you click the Right Mouse on the highlighted Item row, LEVERAGE will automatically open a new Inventory Adjustment activity, on the Inventory Adjustment form you can adjust the quantity of the item you want. i. Item History : Right Click Mouse then select Item History on the highlighted Item row, serves to open the transaction history of that item. The history of an item is only available for items of type Inventory Part. With an item history, you can browse the transaction history related to an item (inventory part type). j. Warehouses : Click the Right Mouse then select Warehouses in the highlighted Item row, serves to see the total quantity of the highlighted Item per Warehouse that you have. HOW TO CREATE NEW ITEMS A. HOW TO MAKE NEW ITEMS INVENTORY PART TYPE You can create new items of Inventory Part type by: 1. First open the List of Goods and Services from the main menu List – Items. 2. In the Goods and Services List view, click the New button. 3. In the new item entry display (form new item), follow these steps: a. First Step: Filling in the GENERAL Tab. 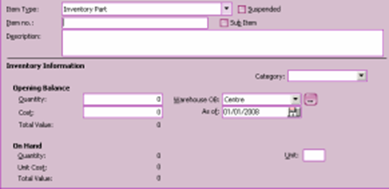
On the General tab, fill in your new Item information according to the instructions below: Item Type: Because the new item you want to create is an Inventory Part type item, in the Item Type column you can select the Inventory Part type. Item No : In this column, you can type the number of the new item that you have. Typing the item number in this column can be done max. 30 characters. Description : In this column, you can type the name of the new item that you have. Typing the item name in this column can be done max. 240 characters. Suspended: You do not need to check this check box. This check box can only be checked if you want to disable it Items that you own, so these items cannot be used again in transactions. Sub Item: You can activate this check box, if the new item you create is a Sub I tem from the Parent Item you previously created. Opening Balance : Ø Qty : In this column you can type the total quantity balance of the New Items that you have. If the new item you have has a balance of 0, you can fill this column with a value of 0. Ø Cost : In this column you can type the value of the cost per unit of the New Items that you have. This column can only be filled in if the New Item you input has a quantity balance of ≥ 1. Ø Total Value : Automatically displays the total quantity value multiplied by the cost price per unit of goods. Warehouse OB : In this column you can choose the name of the Warehouse where the item will be stored. If the items you have are stored in more than one Warehouse (Multi Warehouse), then you can record them in this way clicking on the Ellipsis button (dot button) located at the end of this Warehouse OB column. Category : If the new item you input As Of : This column will automatically display your database start date. Unit : In this column you can type the unit for the quantity of the item you input. Max typing item unit is 3 characters. b. Step Two: Filling in the SALES/PURCHASE Tab 
On the Sales/Purchase tab, fill in the new item information according to the instructions below: Sales Information : Ø Default Unit Price: In this column you can type the default selling price of the new item that you input. The selling price that you type in this column will automatically be displayed when you select this item in the Sales Quotation, Sales Order and Sales Invoice forms. You can set the default selling price of 1 item at 5 different price levels by clicking the ellipsis button (three dots) located at the end of the Default Unit Price column. Ø Default Discount: In this column you can type the default sales discount for the new item that you input. This discount will automatically appear when you select this item in the Sales Quotation, Sales Order and Sales Invoice forms. Ø Sales Tax Code: If the new item you input is a Taxable Goods, then you must fill in this column with the VAT code according to the list of VAT codes that you previously had to make in the List of Tax Codes (List – Other – Tax Code). Filling in the sales tax code on the new item form serves to display the VAT value when the new item is sold. VAT will appear on the Sales form with the record that the Customer (Customer) is also a Taxable Entrepreneur (Customer Is Taxable). Purchase Information : Ø Preferred Vendor : In this column, you can display information on the name of the supplier/supplier/vendor which is the main supplier of the new item that you input. This column can be filled in by clicking the drop down button (down arrow) and selecting the name of the supplier you want. Ø Min. Qty Reorder : In this column, you can type the minimum number of items for reordering from suppliers Ø Purch. Tax Code: If the new item you input is a Taxable Goods, then you must fill in this column with the VAT code according to the VAT code list that you previously had to make in the Tax Code List (main menu List – Other – Tax Code). Filling in the purchase tax code on the new item form works for displays the VAT value when you purchase the new item. VAT will appear on the Purchase form (Purchase) with the record that the Supplier (Vendor) of the item is also a Taxable Entrepreneur (Vendor Is Taxable). Import References (Not applicable in Pakistan): In the Import References section, you can set the tax code for calculating withholding tax for the activity of importing goods that you will do. With this setting, the withholding tax value on the import of goods that you will do can be calculated automatically on the Purchase Invoice form. Ø HS Code: In this column you can type the Postal/Sub-Post/Heading/Sub-Heading code for the imported goods that you input. You can fill in the HS Code based on the Postal/Sub Postal/Heading/Sub Heading codes found in the Pakistan Import Duty Tariff Book (See Preference). Filling in the code in this column is not mandatory because filling in the code in this column does not affect the calculation of withholding tax on the activity of importing the goods. Ø Import Duty Rate : In this column you can type in the import duty rate (import duty) on the import of said goods. Ø Excise Rate : In this column, you can type in the customs tariff for the imported goods. In order for the withholding tax calculation on imported goods to be carried out, you must also ensure that you have added the withholding tax rate to the Tax Code List in your LEVERAGE database (main menu List – Other – Tax Code). In addition, you have to make withholding tax settings on the Tax tab in Setup – Company Info. c. Third Step : Setting GL ACCOUNTS The GL Accounts settings must be done correctly, so that LEVERAGE can record every transaction for this Item to the right account, so LEVERAGE can produce the journal according to what you want. GL Accounts for Inventory Part Type Items consist of 8 Default Accounts that you must map according to the list of accounts that you have. If you have previously set Item Default Accounts in Setup Preferences, then when you create a new Item in the List of Goods and Services, the GL Accounts tab of this new Item will automatically be filled in according to the Item Default Account contained in the Setup Preferences. You can adjust the Default Account Item settings according to the new Items you input. The following are the default Account items that you must prepare: Ø Inventory Account: In this column, you can select an account with an inventory type. This account serves to record the activity of purchasing or acquiring Items (Goods) that you input. Ø Sales Account : In this column, you can select an account with a revenue type. This account functions to record sales activities for items (goods) that you input. Ø Sales Return Account : In this column, you can select an account with a revenue type. This account serves to record sales return activities made by customers for the Items (Goods) that you input. Ø Sales Disc Account : In this column, you can select an account with revenue type. This account functions to record if there is a discount on the sale of the item (goods) that you input. Ø Good In Transit (Unbilled Account): In this column, you can select an account with inventory type. This account functions to record the activity of sending goods to customers (Delivery Orders) where you have not sent invoices for shipping goods to customers. Ø COGS Account (HPP Account): In this column, you can select an account with the cost of good sold type. This account serves to record the calculation of the cost of good sold for the sale of items (goods) that you input. Ø Ret Account. Purchases : In this column, you can select an account with inventory type. This account serves to record the activity of returning purchases of goods to vendors (suppliers). To fill in the account in this column, it is recommended that you use the same account as the account that you filled in in the Inventory Account column. Ø Unbilled Goods Account: In this column, you can select accounts with other types of current debt. This account serves to record the activity of receiving goods from suppliers (vendors), where you have not received invoices for receiving these goods from suppliers (vendors) To facilitate your understanding of the Item Default Account setting for Inventory Part Type Items, the following image presents an example of filling in the Item Inventory Default Account at LEVERAGE: 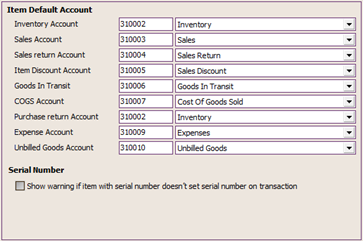
e. Step Four : Creating Custom Fields You can create additional columns or custom fields if there is information that you must add in connection with the new item that you input but the fields for recording this information have not been provided in LEVERAGE, for example: Information on item color, item brand and other additional information. You can create additional columns or custom fields on the Custom Fields Tab which is in the new item entry form. Steps you can take: 1. Click the Custom Fields tab on the new item entry form 2. Click the Custom Fields button, then type the column names you need, then click the OK button 3. For more details, see the picture below: 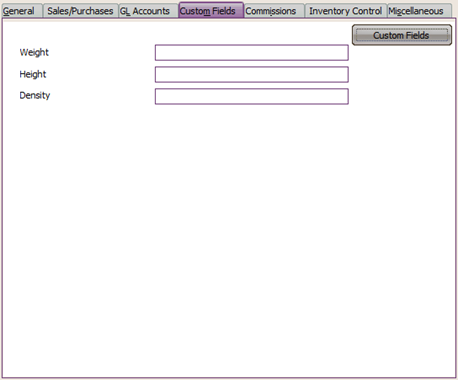
e. Step Five: Setting Commissions As with the fourth step, setting commissions for this item is not mandatory. You can set up Commissions (commissions) if you really need to calculate salesman commissions for sales of goods that occur within your company. Before setting up Commission Items, you are advised to fill in the Commission Limit List first. You can fill in the Commission Limit List from the main menu List – Other List – Commission Limit (List – Others – Commissions Range). 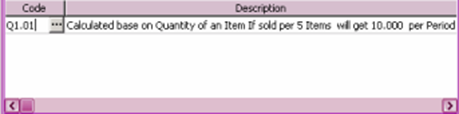
f. Sixth Step: Inventory Control Setting 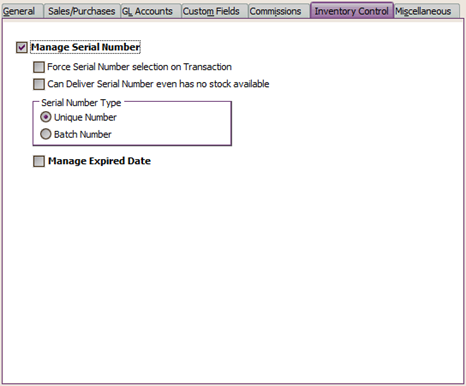
On the Inventory Control tab, you can determine whether the new item you input uses a Serial Number or not. Apart from setting the serial number, at this stage you can also determine whether the new item you input has an expiration date. To facilitate your understanding, pay attention to the brief explanation below: Ø Manage Serial Number : If the new item you input uses a Serial Number or Batch Number, then you can check the Manage Serial Number check box, otherwise if the new item you input does not use a Serial Number or Batch Number, then you don't need to check the i8590 check box Ø Force Serial Number Selection on Transaction : this check box will be automatically active if you have checked the Manage Serial Number check box. You can check this check box, so every time you input this item in the transaction form, you are required to fill in the serial number or batch number, if you do not fill in the serial/batch number of the item on the transaction form, LEVERAGE will not be able to save the form the transaction. Ø Can Deliver Serial Number even has no stock available : the same as check box Force Serial Number Selection, This check box will also automatically activate if you have checked the Manage Serial Number check box. You can check this check box, if the Serial Number of the Item can still be issued even though the item's stock in the Warehouse is zero (0). You can set the Serial Number Type according to your needs. For Number type, LEVERAGE provides 2 options, namely: • Unique Number : Often called Serial number, usually used for electronic goods. • Batch Number : Often called Batch number, usually used for food and drug products. ü Manage Expired Date: If the new item you input has an expiration date, then you can tick the Manage Expired Date check box, otherwise if the new item you input doesn't have an expiration date then you don't need to check this check box. You can set the expiration date of the new item that you input when you record the purchase of the item on the Purchase Invoice form. You can fill in the expiration date of the item when you enter the serial number on the Purchase Invoice Form. g. Miscellaneous Tab : In this tab you can type a short description or short information regarding the new item you input. Filling the Miscellaneous Tab is not mandatory but it depends on your needs. 4. The last step Click the OK button to save the new item data that you have created. B. HOW TO MAKE NON INVENTORY PART NEW ITEMS You can create new items of the Non Inventory Part type by: 1. First open the List of Goods and Services from the main menu List – Items; 2. In the Goods and Services List view, click the New button. 3. In the new item entry display (form new item), follow these steps: a. First Step: Filling the General Tab 
On the General tab, fill in the new Item information (Non Inventory Part) according to the instructions below: Item Type: Because the new item you want to create is an item with a Non Inventory Part type, then in the Item Type column you can select the Non Inventory Part type. Item No : In this column, you can type the number of the new item that you have. Typing the item number in this column can be done max. 30 characters. Description : In this column, you can type the name of the new item that you have. Typing the item name in this column can be done max. 240 characters. Suspended: You do not need to check this check box. This check box can only be checked if you want to deactivate the item that you own, so that the item can no longer be used in transactions. Sub Item: You can activate this check box, if the new item you create is your Item (Sub Item) from the Parent Item you previously created. Unit : In this column you can type the unit for the quantity of the item you input. Max typing item unit is 3 characters. Default Department : In this column you can select the Department number associated with the new item you are creating, if necessary. b. Step Two: Filling in the Sales/Purchase Tab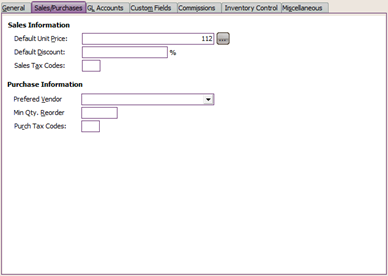 You can fill in this Sales/Purchase tab by following the instructions that have been described in the discussion of making items with the Inventory Part type (See the Second Step of Making Items with the Inventory Part type). c. Third Step : Setting GL Accounts The GL Accounts settings must be done correctly, so that LEVERAGE can record every transaction for this Item to the right account, so LEVERAGE can produce the journal according to what you want. GL Accounts for Non Inventory Part type items consist of 6 Default Accounts that you must map according to the list of accounts that you have. The following is the Default Account that you must prepare in making Items with Non Inventory Part Type: Ø Expense Account: Basically the account selected in this column serves to record the acquisition of the Non Inventory Part Items that you input. Account filling in this column can be adjusted to the purpose of inputting Non Inventory Part Items. Example: If the acquisition of Non Inventory Part Items that you enter are directly recorded as expenses, then you can fill in this column with an Expense type account. If the Non Inventory Part Item that you input is an Intermediary Item, for example a Fixed Asset Transaction Item, which is an intermediary item that functions to record the acquisition of Fixed Assets in a Purchase Invoice, then you can fill in this column with the account name Fixed Asset Transaction (Other Current Asset type). Ø Sales Account: In this column, you can select an account with an income type. This account functions to record sales transactions for Non Inventory Part Items that you input. If it turns out that the Non Inventory Part Item that you input is not intended for resale, then you can fill in this column with the same account as the account you selected in the Expense Account column. Ø Sales Return Account: In this column, you can select an account with an income type. This account functions to record sales return transactions for Non Inventory Part Items that you input. If it turns out that the Non Inventory Part Item that you input is not intended for resale, then you can fill in this column with the same account as the account you selected in the Expense Account column. Ø Sales Item Disc Account: In this column, you can select an account with an income type. This account functions to record if there is a discount on the sale of Non Inventory Part Items that you input. If it turns out that the Non Inventory Part Item that you input is not intended for resale, then you can fill in this column with the same account as the account you selected in the Expense Account column. Ø Purchase Ret. Account : In this column, you can choose the same account as the account you selected in the Expense Account column. Ø Unbilled Goods Account: In this column, you can select accounts with other types of current debt. This account serves to record the activity of receiving goods from suppliers (vendors), where you have not received invoices for receiving these goods from suppliers (vendors). To facilitate your understanding of the Item Default Account settings for Non Inventory Part type items, the following image presents an example of filling in a Non Inventory Default Account Item in LEVERAGE. 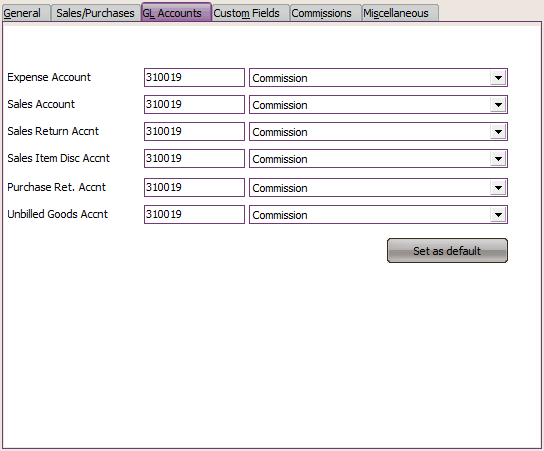
4. After you have finished inputting all the information related to Non Inventory Part Items, the next step is to click the OK button to save the new item data that you have created. C. HOW TO CREATE A NEW SERVICE TYPE ITEM You can create a new Service type item by: 1. First open the List of Goods and Services from the main menu List – Items. 2. In the Goods and Services List view, click the New button. 3. In the new item entry display (form new item), follow these steps: a. First Step: Filling in the GENERAL Tab 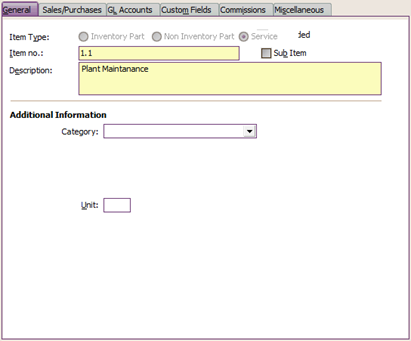
On the GENERAL tab, fill in your new Item information according to the instructions below: ü Item Type: Because the new item you want to create is an item with type Service, then in the Item Type column you can choose type: Service. ü Item No : In this column, you can type the number of the new item that you have. Typing the item number in this column can be done max. 30 characters. ü Description : In this column, you can type the name of the new item that you have. Typing the item name in this column can be done max. 240 characters. ü Suspended: You do not need to check this check box. This check box can only be checked if you want to deactivate the item that you own, so that the item can no longer be used in transactions. ü Sub Item Of: You can activate this check box (tick), if the new item you create is your Item (Sub Item) from the Parent Item you previously created. ü Unit : In this column you can type the unit for the quantity of the item you input. Max typing item unit is 3 characters. ü Default Department : In this column, you can choose the Department number associated with the new item you are creating, if necessary. b. Step Two: Filling in the SALES/PURCHASE Tab 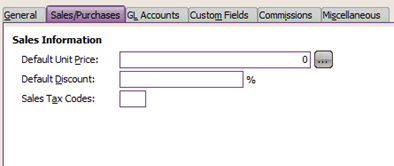
On the Sales/Purchase tab, fill in the new Item information according to the instructions below: ü Sales Information : Ø Default Unit Price: In this column you can type the default selling price of the Service Item that you input. The selling price that you type in this column automatically will automatically be displayed when you select this service item on the Sales Quotation Form, Sales Order, and Sales Invoice. You can set the default selling price of 1 item at 5 different price levels by clicking the ellipsis button (three dots) located at the end of the Default Unit Price column. Ø Default Discount : In this column you can type the default sales discount from the Item Service that you input. This Discount Default will automatically be displayed when you select this Service Item on the Sales Quotation Form, Sales Order and Sales Invoice. Ø Sales Tax Codes: If the service item you input is a Taxable Service, then you must fill in this column with the VAT code according to the list of VAT codes that you previously had to make in the List of Tax Codes (List – Other – Tax Code). Filling in the sales tax code on the New Item Form serves to display the VAT value when you sell the Service Item. VAT will appear on the Sales Form (Sales) with the record that the Customer (Customer) is also a Taxable Entrepreneur (Customer Is Taxable) c. Third Step : Setting GL ACCOUNTS The GL Account settings must be done correctly, so that LEVERAGE can record every Item Service transaction to the right account, so LEVERAGE can produce the journal according to what you want. GL Accounts for Service type Items consist of 2 Default Accounts that you must map according to the list of accounts that you have. Following are the Default Account Items that you must prepare when making Items with the service type: Ø Sales Account: In this column, you can select an account with an income type. This account functions to record sales activities for Service Items that you input. Ø Sales Item Disc. Account : In this column, you can select a sales discount account with revenue type. This account serves to record if there is a discount on the Service you are selling. To make it easier for you to understand the Item Default Account settings for service type items, the following picture shows presents an example of filling in Item Service Default Account in LEVERAGE: 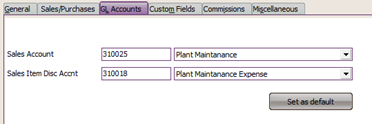
4. After you have finished inputting all the information regarding the creation of the service item, click the OK button to save the new item data that you have created. D. HOW TO MAKE A NEW GROUPING TYPE ITEM In contrast to the way of making the 3 types of items that we have discussed earlier which is made from the List of Goods and Services. Grouping type items are not made from the List of Goods and Services but are created from Grouping Activities using a special form called the Grouping Form. The Grouping Form functions to group several items into 1 (one) new package. This grouping of items serves to make it easier for you to carry out sales activities of goods packages consisting of several items without having to select one by one the items that are part of the package you are selling on the Sales Invoice Form view. This grouping activity does not affect your financial position. This activity only adds one new item with the Grouping type to the List of Goods and Services. Because it is a collection of several different items, items with this grouping type do not have stock so you cannot browse the history of these items. When you sell this grouping type item, the cost of goods sold for this item will be automatically calculated based on the accumulated cost per unit of the items that are part of the grouping item provided that the items that are part of the grouping are items with type Inventory Part. Here are the steps you can take to create an Item with the Grouping type: 1. Open the new Grouping Form from the main menu Activities – Goods and Services – Group (Activities – Inventory – Grouping) 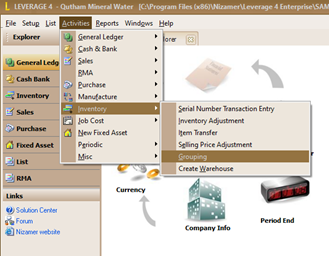
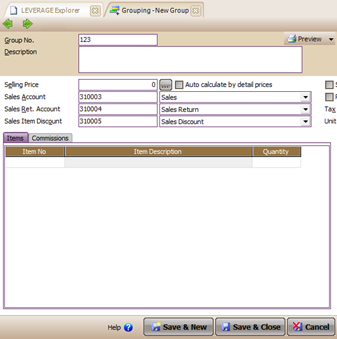
2. Fill out the Grouping form based on the instructions below: a. Column Group No (No Group): In this column you can type the number of the Grouping Form that you created. Typing numbers in this column can be done max. 20 characters. The number that you type in this column will later be displayed as the Grouping Item number in the List of Goods and Services (List Item). b. Check Box Print Items On Invoice : You can check this check box if you want to display the details of Item Grouping on the Sales Invoice view. c. Check Box Suspended (Inactive): You can activate this check box if at any time the Item Grouping that you have created is no longer used in transactions. By ticking this check box, it means that you have deactivated the Item from the Goods and Services List, so that when you record a sales transaction, the Grouping Item that you have suspended cannot be selected again on the Sales Invoice Form. d. Column Description (Description): In this column you can type the name of the Item Grouping that you created. Typing the item name in this column can be done up to 240 characters. e. Selling Price Column (Selling Price): In this column you can determine the default selling price (Default Price) of the Item Grouping that you create. You can set the Standard Selling Price (Default Price) up to 5 selling price levels by clicking the Ellipsis button (three dots button) located next to this column. f. Sales Account Column: In this column you can select the revenue type account that you will use to record sales transactions from the Item Grouping that you created. By default, this column will be automatically filled in with the Default Sales account according to the Default account in Setup – Preferences. g. Sales Return Account Column: In this column you can select the revenue type account that you will use to record sales return transactions for the Item Grouping that you create. By default, this column will also be automatically filled in with the Sales Return Default account in accordance with the Default account filling in Setup – Preferences. h. Sales Item Discount Column: In this column you can select the revenue type account that you will use to record sales discounts for the Item Grouping that you create. By default, this column will also be automatically filled in with the Sales Discount Default account in accordance with the Default account filling in Setup – Preferences. i. Grouping Item Details: In this table, you can select which items are part of the Grouping that you created along with the amount of each item. 3. After you have completed filling out the Grouping Form, click the Save & Close button to save the activities that you have done while closing the Grouping Form view. Serial Number Recording [Serial Number Transaction Entry] Serial Number Transaction Entry Form is a special form provided so that the Warehouse can easily input the serial number and expiration date of an item. Entering the serial number and expiration date of the goods purchased on this form is done because the Accounting section does not have information about the serial number and expiration date of the goods purchased or to be sold, where this information is only known by the Warehouse section. So the Warehouse section's task here is to input the serial number and expiration date of the goods purchased or sold on the Serial Number Transaction Entry form, where this activity is carried out after the Accounting section has finished recording purchase/sales transactions or other transactions related to goods that require serial number and expiration date. Before inputting the serial number and expired date of the item, make sure the options for the manage serial number and manage expired date boxes located on the inventory control tab on the item form are checked. You can input the serial number and expiration date of the purchased item by following these instructions: 1. Open the Serial Number Transaction Entry Form from the main menu Activities – Inventory – Serial Number Transaction Entry; 2. In the Transaction Type field, select the type of transaction that requires inputting the serial number; 3. In the Transaction No field, select the form number that requires inputting the serial number. Pay attention that automatically the item details on the form you choose will be displayed in the detail table for the Serial Number Entries form. 4. In the Entry No field, fill in the serial number of the Serial Number Entries form, in the Date field, fill in the date the activity for inputting the serial number and expired date was carried out and type the information on the name of the user who prepared the form in the Prepared By field. 5. Entering the serial number and expiration date is done per item detail by clicking the ellipsis button in the Serial No column. For more details, consider the following image: Figure 1: Example of inputting Serial Number and Expired Date of purchased goods, where the serial number for each quantity of goods is different and sequential (unique number). 
Click the Ellipsis button on the column Serial Number or Double Click to display the Select form Item Batch Number 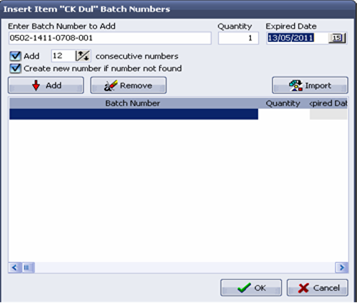
1. Fill in the serial number / batch no of the item you just purchased 2. Tick this option and fill with the number of items. You buy if the serial number for each quantity different stuff and message 3. Fill in this column with expired date goods 4. Click knob add 
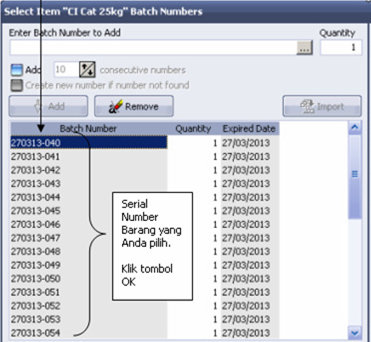
5. Display Form Insert them. Batch Number after inputting Serial Number and Expired Date. Click Button OK to save the input that has been made Figure 2: Example of inputting Serial Number and Expired Date of goods purchased, where the serial number/batch number for each quantity of goods is the same. 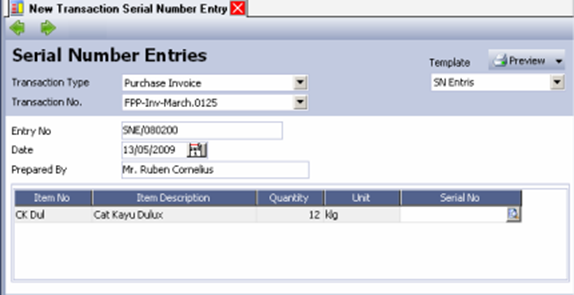

1. Type serial number/batch number of that stuff bought 2. Fill in the amount quantity of goods that you buy. 3. Fill in the expiration date of the item 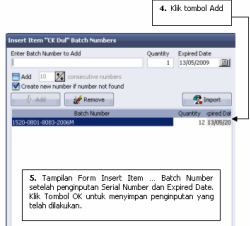
Figure 3: Example of inputting the Serial Number and Expired Date of the item purchased, how to import the file. With the import file you can easily input the serial number/batch number and the expiration date of the goods you buy. You can do this method if the serial number and expiration date that you want to input for each quantity of goods varies. 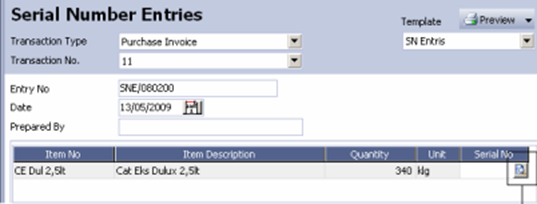

1. Click the Ellipsis button to displays insert form item batch number 2. Click the button Import 
3. Click Button Extract 
4. After Extract Data, step Next is define source columns to columns –column available in LEVERAGE. After Define data source is complete you do, click the Import button to import Serial Number and Expired Date of Your Source Data. Then click the OK button on the Insert form Item Batch Numbers for save Serial Number and Expired Date that has been imported. Figure 4: Example of inputting Serial Number and Expired Date of Goods sold to Customers. 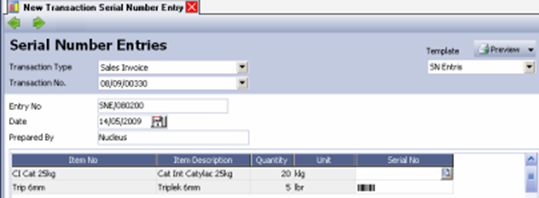
1. Click the ellipsis button 2. Click the Ellipsis button to display a list of serial numbers and Expired Date of Goods 3. Filter the Expired Dates match your item sell 4. Select the serial number of the items being sold by ticking the serial number. 5. Click the button This is for take Serial Number which is already you choose 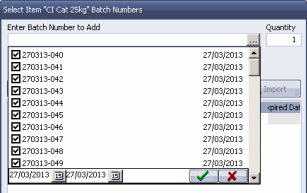
List of Serial Number Entries [Transaction Serial Number Entries] All Transaction Serial Number Entries Forms that you have created will be stored or recapitulated in one table called the List of Transaction Serial Number Entries. The List of Transaction Serial Number Entries can be accessed from the main menu List - Inventory - Transaction Serial Number Entries. 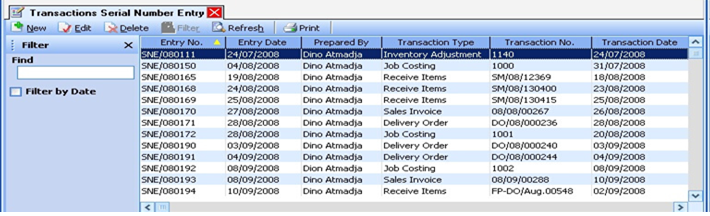
The list display for Serial Number Entries (Transaction Serial Number Entries) is divided into several sections: 1. The menu button on the Serial Number Entries List, consists of: a. New : This button functions to create a new Transaction Serial Number Entries Form. b. Edit : This button functions to open the highlighted Serial Number Entries Transaction Form view, so you can edit or change the contents of the form. Or to open the form to just check it. c. Delete : This button functions to delete the highlighted Transaction Serial Number Entries form. d. Filter: This button functions to display the Filter form in the Transaction Serial Number Entries Table. With Filter, you can display a List of Transaction Serial Numbers based on the date Filter, number filter and description filter you want. e .Refresh: This button functions to update the display of the Transaction Serial Number List according to the last data input you did. f. Print: This button functions to print a list of Transaction Serial Numbers 2. Transaction Serial Number Entries List Detail, consisting of: a. Entry No : This column displays information on the Transaction Serial Number Entries Form number b. Entry Date : This column displays the date of the Transaction Serial Number Entries Form c. Prepared By : This column displays the name of the person who performed the Serial Number Entries Transaction Activity d. Transaction Type : This column displays the type of transaction associated with the Transaction Serial Number Entries Activity e.Transaction No : This column displays the form number of the transaction associated with the Transaction Serial Number Entries Activity. f. Transaction Date : This column displays the transaction date associated with Transaction Serial Number Entries Activity. Inventory Adjustment [Setup Customization] Inventory Adjustment is a form that serves to record the activity of adjusting the amount of inventory (Inventory) between recording in LEVERAGE and the company's manual records (actual physical quantities in the Warehouse). The quantity of items that can be adjusted using the Inventory Adjustment Form is the quantity of items of the Inventory Part type only. When you input Inventory Part type Item balances through Quick Setup, or directly from the List – Item menu, LEVERAGE will automatically create an Inventory Adjustment Form to record the input of Item balances that you are doing. If in the current period it turns out that there is an error in recording the inventory balance, then you can make corrections by making adjustments (adjustments) on the Inventory Adjustment Form. The following are some activities that can be recorded on the Inventory Adjustment Form: 1. Beginning Inventory Balance (Opening Balance Equity Of Inventory) 2. Adjustment / Adjustment of lost or damaged goods 3. Adjustment / Adjustment receipt of goods that do not come from purchasing activities. For example: assistance, donations, or capital deposits in the form of merchandise. 4. Adjustment / Adjustment of goods out but not for sales activities. For example: Sample items that are given free of charge to customers in connection with the company's promotional activities. HOW TO MAKE INVENTORY ADJUSTMENTS Inventory Adjustment activities can be made by: 1. Click the main menu Activities – Inventory – Inventory Adjustment (Activities – Inventory – Inventory Adjustment) 2. The Inventory Adjustment form can also be opened from the Explore menu (Explorer), by clicking the Inventory button on the Explore menu (Explorer) and then selecting Inventory Adjustment. VIEW OF THE INVENTORY ADJUSTMENT FORM 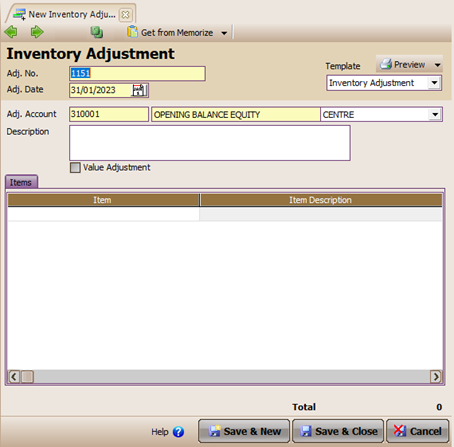
The display of the Inventory Adjustment Form consists of: 1. Previous button: This button functions to view the previous Inventory Adjustment Form display. 2. Next button: This button functions to see the next (next) Inventory Adjustment Form display 3. Preview button: This button functions to preview the printed Inventory Adjustment Form on the monitor screen before it is printed on paper. 4. Printer Button: This button functions to print the appearance of the Inventory Adjustment Form on paper. 5. Copy Transaction button: With this button you can fill in the details of the Inventory Adjustment that you are currently making by copying Transactions from the Inventory Adjustments that you have previously made. Details from the Inventory Adjustment form can be copied on the next Inventory Adjustment form with a note that you must first memorize the detailed view of the Inventory Adjustment that you will copy. 6. Memorize Transaction button: With this button you can memorize the detailed view of the Inventory Adjustment that you have made, so that you can copy the detailed view when you create a new Inventory Adjustment Form. 7. Template Column: This column displays the type of Inventory Adjustment form design. In this column you can select the type of form design you want. By default, this column displays only one type of Inventory Adjustment form design. To make the design of the Inventory Adjustment Form the way you want it,can be done from the main menu Setup – Form Template. 8. Column Adj. No : In this column you can fill in the Inventory Adjustment Form number. Typing numbers in this column can be done max. 30 characters. 9. Column Adj. Account : In this column you can select the account that you will use to record the inventory adjustment activities that you make. If the Value Adjustment check box is checked, LEVERAGE will automatically record this account in a credit position. Conversely, if the Value Adjustment check box is not checked, LEVERAGE will automatically record this account in a debit position. 10. Column Adj. Date : In this column, you can fill in the date of the inventory adjustment activity. 11. Warehouse Column : This column displays a list of Warehouse names that you have according to the Warehouse list that you created earlier. In this column you can select the Warehouse that is related to the inventory adjustment activity that you made. 12. Column Description : In this column you can type a brief description regarding the inventory adjustment activity that you made. 13.Check Box Value Adjustment: Check the Value Adjustment check box if the Inventory Adjustment Form you created is intended for recording adjustments to the quantity and value of goods. Example: When carrying out stock taking, it is found that the quantity of goods according to the accounting records (LEVERAGE) is less than the quantity according to the Warehouse records. To adjust accounting records with Warehouse records, you must make adjustments to increase the quantity of goods according to Accounting records. You can record this adjustment activity by ticking the Value Adjustment check box on the Inventory Adjustment Form. Conversely, you do not need to check the Value Adjustment check box, if the Inventory Adjustment Form that you created is intended to record adjustments to a reduction in the quantity of goods.Example: When carrying out stock taking, it is found that the quantity of goods according to accounting records (LEVERAGE) is greater than the quantity according to Warehouse records. To adjust accounting records with Warehouse records, you must make adjustments to reduce the quantity of goods according to Accounting records. You can record this adjustment activity directly on the Inventory Adjustment Form without checking the Value Adjustment Check Box. 14.Detail Form consists of: a. Item Column : In this column, you can type the number of the item that you want to customize. If you don't memorize the item number you want to adjust, then you can select it from the item list. A list of items can be displayed by double clicking on the item column or you can use the Ctrl+Enter key combination. The Item List can also be displayed by clicking on it Click the ellipsis button in the Item column. b. Item Description Column: This column will automatically display a description of the Item number you selected. c. Current Qty column: After you select the item to be adjusted, this column will automatically display the total quantity of the item. d. New Qty Column: You can fill in this column with the total quantity of the item after adjustments have been made. e. Current Value column: This column will appear if you check the check box on the Inventory Adjustment Form. This column will automatically display the Total Cost of the Item to be adjusted. f. New Value Column: You can fill in this column with the Total Cost Item after adjustments are made. g. Dept Column: In this column you can select the Department number associated with the goods adjustment activity, if necessary. h. SN Column : This column automatically displays the Serial Number of the Item that you adjusted. i. Total : Automatically displays the adjusted value. Cancel Inventory Adjustment Activity The Inventory Adjustment activity that you have made can be canceled by deleting the Inventory Adjustment Form that you want to cancel from the Inventory Adjustment List. Cancellation / Deletion of the Inventory Adjustment Form can be done by: 1. Open the Inventory Adjustment List by clicking on the main menu List – Inventory – Inventory Adjustment (List – Inventory – Inventory Adjustment); 2. In the Inventory Adjustment list, find the Inventory Adjustment Form that you want to delete. 3. After the Inventory Adjustment Form that you want to delete is found, highlight the form and then click the Delete menu button or right-click then select Delete to delete the Form. Edit Inventory Adjustment Activities You can change (edit) the Inventory Adjustment activity that you have created by: 1. Open the Inventory Adjustment List by clicking on the main menu List – Inventory – Inventory Adjustment (List – Inventory – Inventory Adjustment); 2. In the Inventory Adjustment list, find the Inventory Adjustment Form that you want to change (edit). 3. After the Inventory Adjustment Form that you want to delete is found, highlight the form and then click the Edit menu button or right-click then select Edit to delete the Form. DAFTAR INVENTORY ADJUSTMENT All Inventory Adjustment forms that you have made will be recapitulated in one table (table) called the Inventory Adjustment List. In the Inventory Adjustment list you can perform editing activities, deletion of the Inventory Adjustment Form. The Inventory Adjustment list can be opened by: 1. Click the main menu List – Inventory 2. Then click Inventory Adjustment. 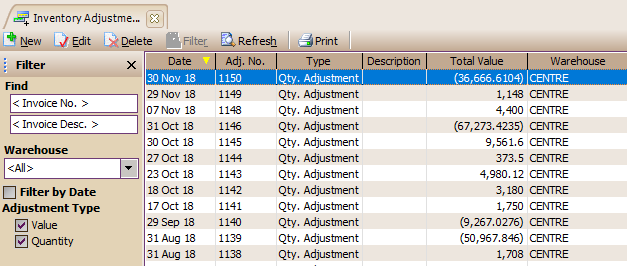
The Inventory Adjustment list displays information consisting of several groups, namely: 1. Menu Button Group. The Menu button on the Inventory Adjustment Form List table consists of the following buttons: a. New button: This button functions to create a new Inventory Adjustment Form. b. Edit button: This button functions to change (edit) the highlighted Inventory Adjustment Form. c. Delete button: This button functions to delete (delete) the highlighted Inventory Adjustment Form. d. Filter button: This button functions to display the Filter column on the left side of the Inventory Adjustment Form List. With this filter you can display only the Inventory Adjustment Form that you want on the Inventory Adjustment Form List. Inventory Adjustment List Form Filter, can be done based on: Ø Warehouse : Filter based on Warehouse name. Ø Filter by Date : Filter based on the date you want. Ø Adjustment Type: Filter based on adjustment type. There are two options: o Value : Displays only the Inventory Adjustment Form where the Value Adjustment check box is checked. o Quantity : Displays only the Inventory Adjustment Form where the Value Adjustment check box is unchecked. e. Refresh Button: This button functions to update/update the Inventory Form List view. The adjustment is in accordance with the most recent input of the Inventory Adjustment Form. f. Print button: This button functions to see the printed Inventory Adjustment List on your computer monitor screen, before printing it on paper. g. Find Inventory Adjustment Column: This column serves to make it easier for you to search for the Inventory Adjustment Form that you want on the Inventory Adjustment List. You can do a quick search simply by typing the Inventory Adjustment Form number you want in the <Invoice No> field or you can also do it by typing Inventory Adjustment Form Description in the <Invoice Desc> field. 2. Columns in the Table Details of the Inventory Adjustment Form List. Table Details The list of Inventory Adjustment Forms displays columns that present the information contained in the Inventory Adjustment Form. These columns consist of: a. Date Column : This column displays date information on the Inventory Adjustment Form. b. Adj column. No : This column displays information on the Inventory Adjustment Form number. c. Column Type: This column displays information on the type of Inventory Adjustment Form, whether Value Adjustment or Quantity Adjustment. d. Description column: This column displays the information that you type in the Description column on the Inventory Adjustment Form. e. Total Value column : This column displays the adjusted Total value. f. Warehouse Column : This column displays information on the Warehouse name you selected on the Inventory Adjustment Form. 3. Right Mouse Click on the Inventory Adjustment Form List. Some of the activities you can do with Right Mouse clicks include: a. New : Click the Right Mouse then select New, functions to create a new Inventory Adjustment Form in the List of Inventory Adjustment Forms. b. Edit: Clicking the Right Mouse then selecting Edit has the same function as if you clicked the Edit menu button on the Inventory Adjustment Form List, which functions to edit or change the contents of the highlighted Inventory Adjustment Form. c. Delete : Click the Right Mouse and select Delete has the same function as if you click the Delete menu button on the Register Inventory Adjustment Form, which functions to delete the highlighted Inventory Adjustment Form. d. Filter Ctrl+F : Right Mouse Click then select Filter has the same function as if you clicked the Filter menu button on the Inventory Adjustment Form List, which functions to display the Filter Column on the left side of the Inventory Adjustment Form List. e. Sort by: Click the Right Mouse then select Sort by, functions to sort the display of the Inventory Adjustment Form List according to the column headings contained in the List. f. Refresh F5 : Right Mouse Click then select Refresh (F5) has the same function as if you click the Refresh menu button on the Inventory Adjustment Form List, which functions to update/update the appearance of the Inventory Adjustment Form List according to the input of the Inventory Adjustment Form that you last did. . Item Transfer [Transfer of Goods] Item Transfer is an activity that functions to record changes in the position of the quantity of goods from one Warehouse to another. Item Transfer activity does not affect the company's financial position. This activity is related to the Multi Warehouse feature in the setup preference. If this feature has not been activated, Item Transfer cannot be performed. HOW TO MAKE A TRANSFER ITEM ACTIVITY Item Transfer activity can be made by: 1. Before carrying out the Item Transfer Activity, you must first ensure that the Multi Warehouse Feature in the Setup Preference has been activated. How a. Click the main menu Setup – Preferences – Features (Setup – Preferences – Features. b. Make sure the Multi Warehouse check box is checked. 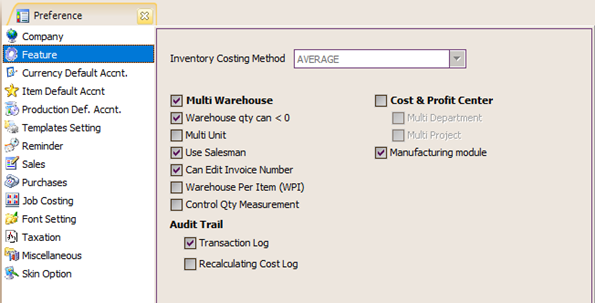
2. After the Multi Warehouse feature is active, you can create an Item Transfer Form by: a. Click the main menu Activities – Inventory – Transfer of Goods (Activities – Inventory – Item Transfer). b. Fill in the Item Transfer form, according to the instructions below: Ø Previous button: This button functions to view the display of the Item Transfer form that you previously created. Ø Next button: This button functions to see the display of the next Item Transfer form. Ø Preview button: This button functions to preview the printed display of the Item Transfer Form on the monitor screen before printing. Ø Printer Button: This button functions to print the Item Transfer Form that you have created. Ø Template Column : This column displays the design type of the Item Transfer form. Ø Column Transfer No: In this column you can type the number of the Item Transfer Form that you recorded. Ø Date Column: In this column you can fill in the date when the activity of transferring goods or moving goods was carried out. Ø Column Description : In this column you can type a brief description regarding the Item Transfer Form that you recorded. Ø Transfer From Column: In this column you can select the Warehouse where the Goods will be transferred (name of the Warehouse where the goods were taken). Ø Column From Address: In this column you can type the address of the Warehouse where the Goods will be moved (Address of the Warehouse where the goods were taken). Ø Transfer To Column: In this column you can select the name of the destination Warehouse (Warehouse where the goods will be moved). Ø Column To Address : In this column you can type the address of the Destination Warehouse (Address of the Warehouse where the goods will be moved). Ø Item Transfer Form Details, consisting of the following fields: • Item : Select the Item number to be moved. • Item Description : This column will automatically display the item name (description) from the item number you selected. • Quantity : In this column, you can fill in the quantity of the Item that you will move to the Destination Warehouse. • Unit : This column automatically displays the units of the Item you are moving. The following image shows an example of filling out the Item Transfer Form: 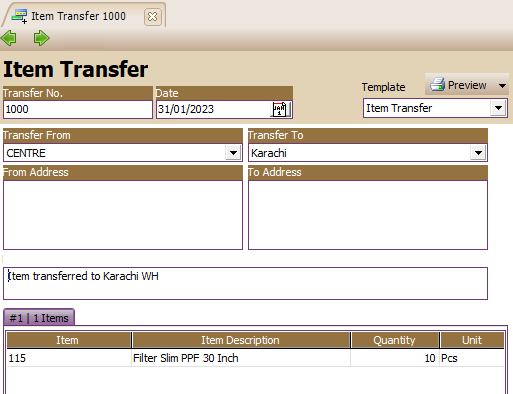
TRANSFER ITEM LIST TABLE 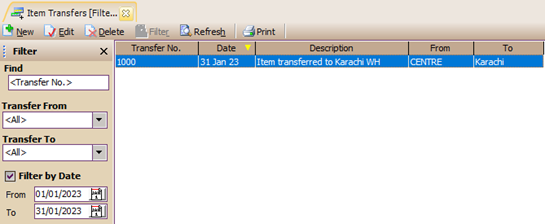
All Item Transfer forms that you have created will be recapitulated in a special table called List of Item Transfer Forms. You can open the Item Transfer Form List table from the main menu List – Inventory – Transfer of Goods [ List - Inventory - Item Transfers ]. The table display of the Item Transfer Form List is divided into 3 groups, as follows: 1. Menu Button Group. The Menu button on the Item Transfer Form Table consists of the following buttons: a. New Button : This button functions to create a new Item Transfer Form. b. Edit Button : This button functions to edit or change the highlighted Item Transfer Form. c. Delete button : This button functions to delete the highlighted Item Transfer Form. d. Filter Button: This button functions to display the Filter column on the left side of the Transfer Item Form List Table. With the filter you can display only the Item Transfer Forms that you want on the Item Transfer Form List. Filter Item Transfer Form List can be done based on: ü Transfer From: Filter based on the name of the Warehouse where the goods to be moved originate from. ü Transfer To : Filter based on the name of the destination Warehouse where the goods will be moved. ü Filter By Date : Filter based on the date limit you want. e. Refresh button: This button functions to update/update the display of the Item Transfer Form List table according to the last input you made. f. Print button: This button functions to print the display of the Item Transfer Form List table on your computer monitor screen, before printing it on paper. g. Find Item Transfer Column: This column makes it easier for you to search for the Item Transfer Form you want in the Item Transfer Form List table. You can do a quick search by simply typing the Item Transfer Form number you want in the <Transfer No> field. 2. Table Details group, displays the columns that present the information contained in the Item Transfer Form. Details The table consists of the following columns: a. Transfer No : This column displays information on the Item Transfer Form number that you have created. b. Date : This column displays the date of the Item Transfer Form c. Description : This column displays the information you type in the Description column on the Item Transfer Form. d. From : This column displays information on the name of the Warehouse where the goods being moved originate from. e. To : This column displays information on the name of the destination Warehouse where the goods will be moved. 3. Right Mouse Click on Goods and Services List. Some of the activities that can be performed with the Right Mouse click include: a. New : Right Mouse Click then select New, functions to create a new Item Transfer Form. b. Edit : Right Mouse Click then select Edit has the same function as if you clicked the Edit menu button on the Item Transfer Form List, which functions to edit or change the highlighted Item Transfer Form. c. Delete : Right Mouse Click then select Delete has the same function as if you clicked the Delete menu button on the Item Transfer Form List, which functions to delete the highlighted Item Transfer Form. d. Filter Ctrl+F : Right Mouse Click then select Filter has the same function as if you clicked the Filter menu button on the Item Transfer Form List, which functions to display the Filter column to the left of the Item Transfer Form List. e. Sort by: Click the Right Mouse then select Sort by function to sort the Display Item Transfer Form List according to the column headings contained in the list. f. Refresh F5 : Click the Right Mouse then select Refresh (F5). Set Selling Price Set Selling Price is a form that functions to make it easier for you to set the selling price of the Goods all at once, so that when you make a sales transaction the unit price column on the Sales Order/Sales Invoice form can be filled in automatically. With this menu, you can increase the price of goods according to your needs. The selling price of goods can be set up to a maximum of 5 levels. Sale price levels allow you to sell one item at different selling prices depending on which customer you are selling the item to. In this activity there is also no change in the financial position of the company. You can open the Set Selling Price form via the main menu Activities – Inventory – Selling Price Adjustment. You can fill out the New Selling Price Adjustment form by following the instructions below: 1. Previous button: This button functions to open the Selling Price Adjustment form display before the form appears. 2. Next button: This button functions to open the Selling Price Adjustment form display after the form appears. 3. Preview button: This button functions to preview the appearance of the Selling Price Adjustment form on your computer monitor before printing. 4. Printer Button: This button functions to print the Selling Price Adjustment form. 5. Import button: With this button you can easily import a file containing the new (updated) selling prices of your items. 6. Effective Date Column: Fill in the date when the new price will be used as the default price of your item. 7. Column Description: Type a description of the selling price adjustment that you have made. 8. Adjustment No: Type the serial number of the adjustment for the selling price of the goods. 9. Adjustment Date: Date of creation of the form set selling price 10. Adjust New Price: there are 3 ways of adjustment, namely: · Per Item : the price per item can be changed one by one by typing a new price directly into the New Price column. · Percentage : increase or decrease the price of all items at once based on a percentage of the old price. To lower the price, add a negative sign to the percent value, while to increase the price, fill in as usual. · Per Amount : increase or decrease the price of the item simultaneously for the number of values entered in the field. To decrease the price start with a negative sign. Adjust : in this field, you can choose a new price that you want to adjust, starting from level 1 – level 5 or all levels. To : in the empty field, fill in the value you want to adjust and in the combo box next to it, select the adjustment method. From: select the initial price level that will be used as the basis for calculating adjustments. Adjust: button to make price adjustments that have been made. Click after the Adjust, To and From fields are filled. 6. Filters: is a tool for sorting out what items you want to display on the set selling price list. Filter can be done in 2 ways based on Category or based on Unit Price before adjusting. 7. Details (Table) section: displays the columns for Item No, Item Description, and Last Price (this column only appears if Show Last Price is ticked) which are automatically filled in. The New Price column will be filled after the A button adjust clicked. The Actual Cost column will automatically display the hpp (actual cost) value of the goods you own. hp value. You can use the items displayed in the Actual Cost column to set the default selling price for new items. 8. Load from Default: this button functions to return the New Price that has been set to the default price (Last Price). 9. Save to Default: this button functions to save the New Price to be the item's default price setting. Image Example of Filling in the Selling Price Adjustment For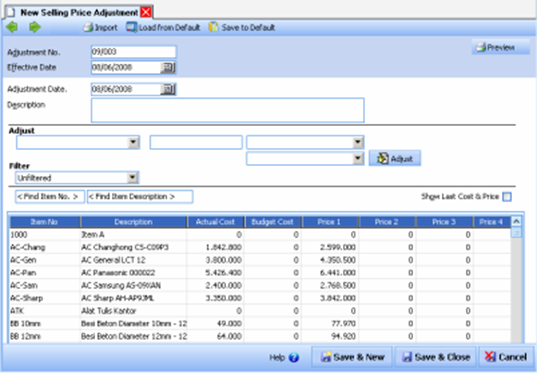 List of Transfer of Goods [List Of Item Transfer] All Item Transfer forms that you have created will be recapitulated in a special table called List of Item Transfer Forms. You can open the Item Transfer Form List table from the main menu List – Inventory – Transfer of Goods [ List - Inventory - Item Transfers ]. The table display of the Item Transfer Form List is divided into 3 groups, as follows: 1. Menu Button Group. The Menu button on the Item Transfer Form Table consists of the following buttons: a. New Button : This button functions to create a new Item Transfer Form. b. Edit Button : This button functions to edit or change the highlighted Item Transfer Form. c. Delete button : This button functions to delete the highlighted Item Transfer Form. d. Filter Button: This button functions to display the Filter column on the left side of the Transfer Item Form List Table. With a filter you can display only the Item Transfer Forms you want on the Item Transfer Form List. Filter Item Transfer Form List can be done based on: § Transfer From: Filter based on the name of the Warehouse where the goods to be moved originate from. § Transfer To : Filter based on the name of the destination Warehouse where the goods will be moved. § Filter By Date : Filter based on the date limit you want. e. Refresh button: This button functions to update/update the display of the Item Transfer Form List table according to the last input you made. f. Print button: This button functions to print the display of the Item Transfer Form List table on your computer monitor screen, before printing it on paper. g. Find Item Transfer Column: This column makes it easier for you to search for the Item Transfer Form you want in the Item Transfer Form List table. You can do a quick search by simply typing the Item Transfer Form number you want in the <Transfer No> field. 2. The Table Details group displays the columns that present the information contained in the Item Transfer Form. Details The table consists of the following columns: a. Transfer No : This column displays information on the Item Transfer Form number that you have created. b. Date : This column displays the date of the Item Transfer Form c. Description : This column displays the information you type in the Description column on the Item Transfer Form. d. From : This column displays information on the name of the Warehouse where the goods being moved originate from. e. To : This column displays information on the name of the destination Warehouse where the goods will be moved. 3. Right Mouse Click on Goods and Services List. Some of the activities that can be done with the Right Mouse click include: a. New : Right Mouse Click then select New, functions to create a new Item Transfer Form. b . Edit : Right Mouse Click then select Edit has the same function as if you clicked the Edit menu button on the Item Transfer Form List, which functions to edit or change the highlighted Item Transfer Form. c. Delete : Right Mouse Click then select Delete has the same function as if you clicked the Delete menu button on the Item Transfer Form List, which functions to delete the highlighted Item Transfer Form. d. Filter Ctrl+F : Right Mouse Click then select Filter has the same function as if you clicked the Filter menu button on the Item Transfer Form List, which functions to display the Filter column to the left of the Item Transfer Form List. e.Sort by: Click the Right Mouse then select Sort by function to sort the Display Item Transfer Form List according to the column headings contained in the list. f. Refresh F5 : Click the Right Mouse then select Refresh (F5). Item Category [Item Category List] List of Item Categories (List Of Item Categories) is a table that displays information on the Category of Goods that you have. 
With the Import From File button, you can fill in This table by importing File Item Categories that you have. Files that can be imported are files with type: csv (*.csv), excel (*.xls), Dbase (*.dbf), paradox (*.db), Interbase (*.gdb), LEVERAGE Import Log (*.Log) HOW TO CREATE ITEM CATEGORIES 1. Click the New Button located on the List of Goods Categories 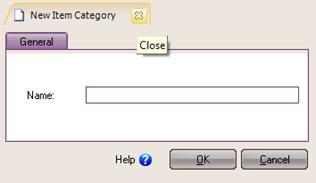
2. In the Name field, type the name of the item category that you own 3. Click the OK button to save the Category List of goods that you have created. Item By Warehouse [List of Goods Per Warehouse] List of Goods Per Warehouse (List Of Items By Warehouse) is a table that displays information on the quantity of inventory that you have per Warehouse. With this table you can easily see the quantity of goods per Warehouse. List of Items By Warehouse can be opened from the main menu List - Inventory - Item By Warehouse (List - Inventory - Items per Warehouse). 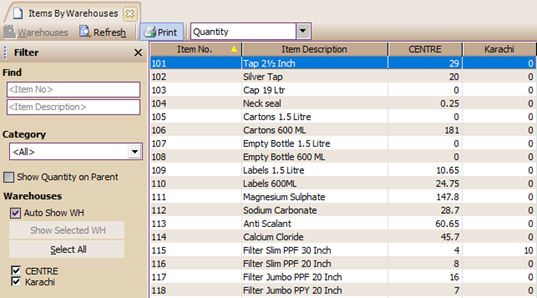
|