This chapter will discuss the sales module which is very closely related to Trade Receivables or Customers, starting from the occurrence of Offers to Payment of Receivables or Returns for cancellation of sales. To open the form contained in this Module, please click the Sales button from the Explorer menu on the left or click the Activities – Sales menu. 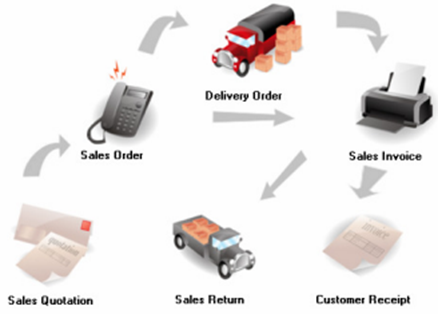
The figure above shows the sales cycle at LEVERAGE, the sales activity starts from the Sales Quotation to the Sales Receipt. Before starting Sales activities, there are some data and setups that must be prepared. The following data and setup required: 1. Customer data [Customer] has been made by choosing the correct currency, terms, taxes and other information. 2. Data Items [Inventory Parts and Non Inventory Parts] have been provided and created with the correct GL account settings. 3. Tax Code [Tax Code] that is linked to customer and item data and correct Tax account settings. 4. Template form that has been designed according to the desired conditions. SALES QUOTATION SALE OFFER Sales Quotation Form is a sales offer form that functions to record various types of goods that you want and can sell to customers (customers). Sales Quotation Form 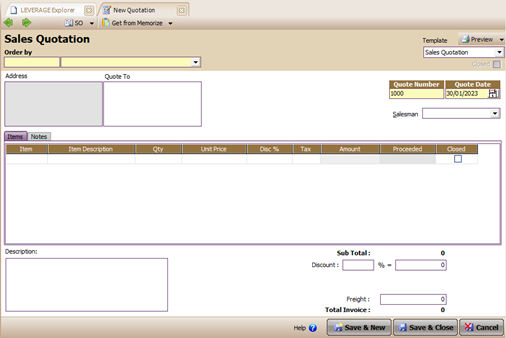 Buttons On Sales Quotation Form Buttons On Sales Quotation Form
a. Previous : Open the previous Sales Quotation form. b. Next : Opens the next Sales Quotation form. c. Preview: View the appearance of the Sales Quotation before it is printed. d. The Short Cut button consists of: Ø SO : Short cut button that functions to enter directly into the sales order form view if you want to directly create a sales order from the Sales Quotation without closing the sales quotation view that you are currently making. Ø DO : Short cut button that functions to enter directly into the Delivery order form display if you want to directly make a Delivery Order from the Sales Quotation without closing the Sales Quotation view that you are currently making. Ø Sales Inv. : Short cut button that functions to go directly to the Sales Invoice form view if you want to directly create a Sales Invoice from the Sales Quotation that you are currently making. f. Template: A list down menu that displays a selection of templates (designs) from the Sales Quotation Form. g. Save & New: The button used to save the Sales Quotation that appears and simultaneously opens a new Sales Quotation view. h. Save & Close: Button used to save Sales Quotation that appears and exits the Sales Quotation display. Columns on the Sales Quotation Form 1. Order By: Fill in the field to select the name of the customer ordering goods/services 2. Cust. is Taxable : This option box will be checked automatically if the customer you have chosen has tax settings set. 3. Inclusive Tax: This option box will automatically activate if the option box is Custom. Is Taxable is checked. You can tick Inclusive Tax if the unit price (selling price) of goods/services includes VAT. 4. Quote Number : By default, this field is automatically filled with the number 1000. You can change it according to your company's quotation number. The default for this number is to add one number from the last input. If there are double (same) numbers, LEVERAGE will automatically give a warning that the number already exists and you are welcome to use another number. 5. Quote Date : Field that functions to record the quotation date. 6. Quote To: You can fill in this field with the name of your customer's contact person. 7. Salesman: Menu list down that contains the name of the salesman. Item Table Details on the Sales Quotation Form 1. Item : Select the item number to be offered to the customer 2. Item Description: By default this column will be filled with Item Description (item name) according to the item number you selected. You can change this Item Description field to any other description you want by typing directly into that field. 3. Qty : Fill in this column with the quantity (amount) of goods to be offered. By default this field will always be filled with the number 1 (one) and this column cannot be filled with minus numbers (numbers below ZERO). 4. Unit : Select the type of unit for the quantity offered 5. Unit Price: Fill in the selling price of the goods offered per unit quantity of goods 6. Disc %: Fill in the item discount given to the customer/ 7. Tax : This field will be automatically filled in with the tax code if the Sales Tax Code of the item you selected has been set ( List | Item). If this column is not filled in automatically, you can type the tax code according to the Customer tax settings. 8. Amount : Automatically calculates the net selling price of the items offered, namely Qty x Unit Price – Disc %. 9. Dept. : Selection of Departments related to the Offer. 10.Proceeded: Column that is automatically filled with the number of items that have been made in the SO, DO or Sales Invoice. 11.Closed : Check this column, if you want to cancel the offer. Other Information on the Sales Quotation Form 1. Description : Fill in the description of the item offer 2. Sub Total : The sum of the Amount in the Invoice details 3. Discount: consists of two fields in the form of a discount percentage (multi discount) and discount amount (in the amount of money) 4. Closed : Option box to cancel the offer. Works the same as the Closed column in Details. 5. Freight: Fill in the estimated amount of transportation costs that must be borne by the customer for the sale of these goods. 6. Total Invoice: Total bid value (Subtotal – Discount + Tax + Freight). HOW TO MAKE A SALES QUOTATION FORM You can record sales offer activities to customers on the Sales Quotation Form by following the instructions below: 1. Open the new Sales Quotation form by clicking the Activities – Sales – Sales Quotation main menu. 2. Fill in the Sales Quotation form based on the image below: 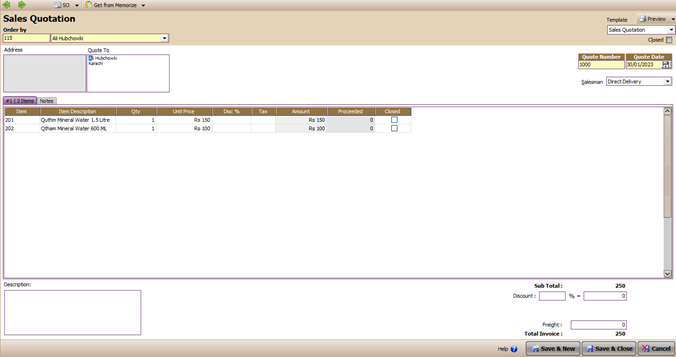
1. Select the Customer's name 2. Fill in the serial number of the form and the date of the offer Sale 3. Select an item with how to double click on column Item 3. After all of your Sales Quotation information has been inputted, the next step is to click the Save & Close button to save the input that you have made as well as close the Sales Quotation form display that you have created. LIST OF SALES QUOTATION The Sales Quotation List is a table that displays all the sales quotation forms that you have created in the LEVERAGE Database. You can open the Sales Quotation list from the main menu List – Sales – Sales Quotation. 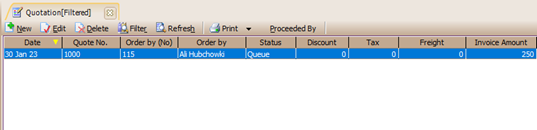
The Sales Quotation List display is divided into several sections: 1. Menu Button On the Sales Quotation List, consisting of: a. New : To create a new Sales Quotation b. Edit : To open the highlighted Sales Quotation form c. Delete : To delete the highlighted Sales Quotation. SQ that can be deleted is a Quotation that has not been processed into a Sales Order, Delivery Order or Sales Invoice. d. Filter: To bring up the filter menu beside. Filters function to make it easier for you to display Sales Quotation based on Customer, Currency, Date and Status. e. Refresh : This button works to update the display of the SQ List according to the last input, when there are changes made to the SQ. f. Print : there are 2 options, Print List to print the SQ list and Print Selected Order to print the highlighted SQ. g. Proceeded by: Displays the next process from the highlighted SQ in the form of SO, DO or SI that has been made based on that SQ. h. Find : This field functions to search for the desired SQ based on Number or Description. 2. Detailed Sales Quotation List, consisting of: a. Date : The date the Quotation was created b. Quote No. : Offer No specified by the company c. Order by: Name of Customer (order) d. Status : Status SQ, divided into 4 : · Proceeded: the goods have all been sent · Closed: some / all of the items that are canceled. · Waiting: some of the items have already been sent. · Queue: no goods have been sent at all. e. Discount: The amount of the discount stated in the offer. f. Tax : Output tax value g. Freight: Transportation costs billed to customers h. Invoice Amount : The total value of the sales offer. i. Description: Information in the Sales Quotation. How to Delete/Change The Sales Quotation Form The Sales Quotation Form that you have deleted or modified in the Sales Quotation Form List by following the instructions below: 1. Open the Sales Quotation List form by clicking the List – Sales – Sales Quotation main menu; 2. In the Sales Quotation Form List, find the form you want to delete or change by typing the form number or a description of the form you want to edit or delete in the FIND column. 3. After the form you want to delete or edit is highlighted, the next step is to right-click Delete (Click the Delete button) to delete the form or right-click Edit (Click the Edit button) to change the form. Note: The Sales Quotation Form can be deleted/changed provided that the form has not been processed in a Sales Order/Delivery Order or Sales Invoice transaction. If the Sales Quotation form has been processed in a transaction, you must first cancel the transaction related to the form and then delete the form. Sales Order Sales Order form is a form that is used to record orders received from Customers, these orders are usually in the form of a Purchase Order (PO). Here are some possibilities that can occur when placing a sales order: 1. Orders in Base Currency [Rupees] or Foreign currency. This order will automatically follow the settings of the Customer Currency set in the Terms, etc section. in the Currency field. 2. Orders accompanied by receipt of advance payment. In this transaction, recording the down payment is done in 2 steps. The first is through the Sales Invoice form to issue the down payment and then proceed with the Sales Receipt when the money is received. 3. Cancellation of Sales Order [Close] A sales order that has been made but canceled due to something such as a lack of stock or other matters, the Order [SO] that has been made must be closed so that the status of the SO is not outstanding and also so that the number of items ordered does not enter the Item on reminder Sales. Sales Order Form 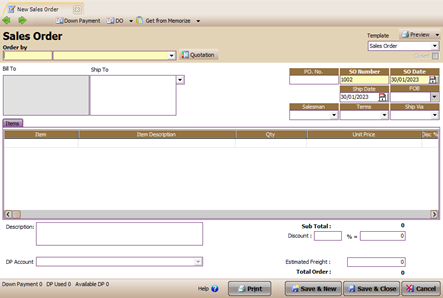
Buttons On Sales Order Form 1. Previous : Opens the previous Sales Order form. 2. Next : Opens the next Sales Order form. 3. Preview: View the appearance of the Sales Order before it is printed. 4. Quotation : Displays the Sales Quotation that was created before, check the Sales Quotation that is intended to display the details. 5. Down Payment: The button to enter this down payment will be linked to the Sales Invoice. Enter the amount of advance received in item details. 6. DO : Short Cut button that connects to DO and Sales Invoice. 7. Copy Transaction: The function of this button is to copy Transactions from items that have been inputted to the Sales Order. To Copy this Transaction, you must first Memorize Transaction. 8. Memorize Transaction: Store item details that have been inputted in a Sales Order to facilitate input if there are repeated items ordered in other Sales Orders. 9. Help ? : Button to open the help menu 10.Save & New: Button to save the Sales Order as well as open a new view of the Sales Order. 11.Save & Close: Button to save the Sales Order while closing the view. Columns on the Purchase Order Form 1. DP Account: Down Payment / Down Payment Account field, contains a list down menu in the form of a selection of accounts with the Account Payable type [Debt]. 2. Salesman: Field to select and determine Salesmen 3. Order by: Field to select Customers who order goods/services. 4. SO Number: Field to fill in the SO number. The number will automatically sequence from before. 5. SO Date: Field to fill in the date from SO, by default it will be filled following the system date of the computer. 6. P.O. No. : Field to fill in No. PO [Purchase Order] from the customer. 7. FOB : Field to select the type of delivery of goods. There are 2 types: Shipping Point or Destination. 8. Terms : Filled with payment terms, usually it will be filled in automatically according to what has been set on the Customer. 9. Rate : Field to fill in the exchange rate used in the transaction. For the base currency (rupiah) it will be filled with 1, but for foreign currencies please input according to the applicable exchange rate. 10.Ship to : Column to fill in the delivery destination. Usually it will be automatically filled according to customer data. 11.Ship Date : Field to fill in the date of delivery of goods. 12.Ship Via : Field to fill in the type of shipping used. 13. Cust. is Taxable : This option box will be checked automatically if the customer you have chosen has tax settings set. 14. Inclusive Tax: This option box will automatically activate if the Custom option box. Is Taxable is checked. You can tick Inclusive Tax if the unit price (selling price) of goods/services includes VAT. Sales Order Form Table Details 1. Item : Select the item number ordered by the customer 2. Item Description: This column will automatically be filled with the Item Name according to the selected item number. This field can be changed with another description by double clicking on the field and typing the desired new name. 3. Qty : Fill in this column with the quantity (amount) of goods to be ordered. By default this field will always be filled with the number 1 (one) and this column cannot be filled with minus numbers (numbers below ZERO). 4. Unit: Normally this column will be automatically filled according to the type of unit that has been set for the item. If it hasn't been set, then to add it you have to enter the item list. 5. Unit Price: Fill in the order price per unit of goods. This column will be automatically filled if the selling price of the item has been set previously. 6. Disc % : Column to fill in discount on goods (if any) 7. Tax : This column will be automatically filled in with the tax code if the Sales Tax Code field on the Item has been filled in. If it has not been set, then this column will not be filled in, but you can directly type the tax code according to the Customer Tax settings. 8. Amount : Automatically filled in with the net selling price by calculating the Qty multiplied by the Unit Price minus the Disc. 9. Shipped : This column appears only on SO that has been saved and does not appear on new OS. This column cannot be filled manually and will be filled in automatically with the number of items that have been sent with a Delivery Order [DO] or a Sales Invoice [SI] has been created for. 10.Dept : This column will appear if you are using the Deluxe and Enterprise versions of LEVERAGE and have activated the Multi Department feature in Preferences. This column serves to record the department related to sales made. 11.Quote No : Automatically filled in with the No from the Sales Quotation that was made before if this SO is made based on that Quotation. But if there is no previous Quotation, then this column will be empty. 12.Closed : If the number of Shipped is equal to or exceeds the Qty ordered, this column will automatically be checked in the row of the item in question, which means that all items have been sent. But for items that have not been sent, they can be closed manually by clicking on the row of the item in question one by one if the item is not sent or is cancelled. If you want to cancel all items at once, then you can immediately click the Close check box in the lower right corner. Other Information on the Sales Order Form 1. Description : Field to fill in the description of the Order. 2. Sub Total : Automatically filled with the amount from the Amount column in the Details section. 3. Close: This option box functions to cancel orders that have been made. Usually this is caused by a lack of stock or it can also be due to a cancellation from the customer before the item is shipped. 4. Disc : This field is to accommodate the discount from Sub Total, can be filled in as a percentage or in total amount. Fields in percentages can be filled with multilevel discounts such as 5+2+3, while fields in amounts are usually used for rounding off discounts. 5. Sales Tax: This tax information will appear under Discount if this sales order is taxed (Customer and Item have their tax code set). 6. Estimated Freight: Field to fill in the estimate of the freight costs that will be charged to the customer. 7. Total Order: Automatically calculates from Subtotal minus Discount plus Tax and Estimated Freight. Specifically for Tax, if the Inclusive Tax option box is checked, then Tax will be calculated inclusively and behind the total number will appear the words Tax Included. CREATE A SALES ORDER FORM You can record customer order acceptance activities on the Sales Order Form by following these instructions: 4. Open the new Sales Order Form by clicking on the main menu Activities – Sales – Sales Order. 5. Fill in the sales order form based on the image below: 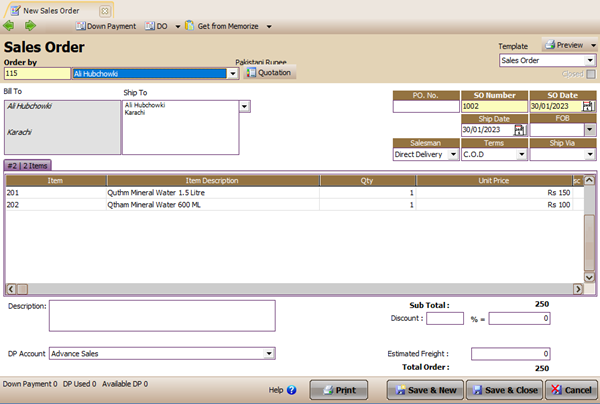
1. Select the Customer's name 2. Fill in this column with the PO Customer number 3. Fill in the SO number, SO date and the delivery date of the ordered goods 4. Select the items ordered by the customer double click on the Item column. If your SO create based on Quotation then item details can be. You fill in by clicking the Quotation button or use the Copy Transaction button if SO details the one you made is the same as the previous SO details. You memorized before. 6. After inputting the sales order form is complete, click the Save & Close button to save the transaction input that you have made as well as to close the Sales Order form. CREATING A SALES ORDER FORM WITH SALES ADVANCES To record receipt of orders from customers/customers accompanied by receipt of sales advances from customers/customers can be done by: 1. Open the new Sales Order Form by clicking on the main menu Activities – Sales – Sales Order (Activities – Sales – Sales Orders) 2. On the Sales Order form display, select the name of the customer/customer who made the order, the date of the customer's order, the customer's PO number, and the details of the item the customer ordered. 3. After you have finished entering the order information, make sure that the DP Account column has been filled in with the Sales Advance account (account type “Account Payable”) found in the header of the Sales Order form. Pay attention when you CLICK the Down Payment button, LEVERAGE will automatically display the Sales Invoice form. 4. Pay attention, the details of the Sales Invoice Form automatically display Down Payment items with a unit price equal to the total order you made. Change the value of the unit price according to the amount of sales advances you receive from your customers/customers. 5. The next step is to click the PAY button found on the Sales Invoice form to record cash/bank receipts for receiving customer sales advances on the Sales Receipt Form. 6. Click the Save & Close button 7. For more details, consider the following picture: 
2.Click the Down Payment button. Pay attention when you click the Down Payment button, LEVERAGE automatically displays a Sales Invoice form with Item Down Payment details 3. Ensure that the DP Account column displays Sales Advance Payment Account 
4.Change the value in the unit column price according to money your advance sales receive from customers 5.Click the cust button receipt When you click on the Cust button. Receipt, LEVERAGE will automatically display the Sales Receipt form, pay attention to the following image: 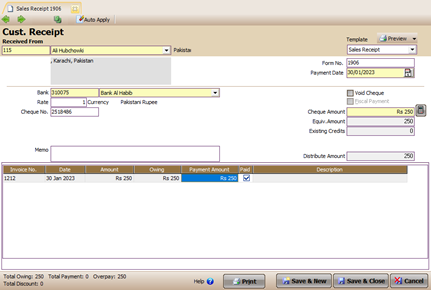
Select a cash/bank account dp recipient Customer List of Sales Orders (Sales Order) All Sales Order forms that you have created in the LEVERAGE Database will be stored or recapitulated in one table called the List of Sales Orders. The List Of Sales Orders can be opened from the main menu List – Sales – Sales Order. 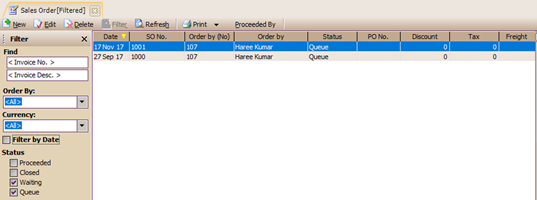
The display of the Sales Order list is divided into several sections, namely 1. The menu button on the Sales Order List, consists of: a. New : To create a new SO b. Edit : To open the highlighted SO form c. Delete : To delete the highlighted OS. SO that can be deleted is SO that has not been processed into DO or SI. d. Filter: To bring up the filter menu beside. The filter serves to make it easier for you to display SO based on Customer, Date, Status or Currency. e. Refresh : This button functions to refresh the OS List display according to the last input, if changes are made to SO. f. Print: there are 2 options, Print List to print the SO list and Print Selected Order to print the highlighted SO. g. Proceeded by : Displays the next process from the highlighted SO in the form of DO or SI that has been made based on that SO. h. Find : This field functions to find the desired SO based on SO No. or Descriptions. 2. Detailed Sales Order List, consisting of: a. Date : The date the SO was created b. SO No. : No SO determined by the company c. Order by: Name of Customer (order) d. Status: SO status, divided into 4: Ø Proceeded: the goods have all been sent Ø Closed: some / all items that are canceled Ø Waiting: some items have already been sent. Ø Queue: no goods have been sent at all. e. PO No. : No PO from Customer f. Discount: The amount of the discount listed in the SO. g. Tax : Output tax value h. Freight: Transportation costs billed to Customer i. Invoice Amount : Total sales order value. j. Down Payment : The down payment that has been received from this Order. k. DP Used: Down payment that has been used (settlement) l. Description: Information contained in the Sales Order. How to Delete/Modify the Sales Order Form You can delete or edit the Sales Order Form that you have saved in the Sales Order Form List by following these instructions: 1. Open the Sales Order Form List by clicking on the main menu List – Sales – Sales Order (List – Sales – Sales Orders) 2. In the Sales Order Form List, find the form you want to delete or change by typing the form number or a description of the form you want to edit or delete in the FIND column. 3. After the form you want to delete or change is highlighted, the next step is to right-click Delete (click the Delete button) to delete the form or right-click Edit (click the Edit button) to change the form. Note: The Sales Order form can be deleted/modified provided that the form has not been processed or used in a Delivery Order or Sales Invoice transaction. If the form you want to delete is already used in a transaction, you must first delete the DO or SI transaction that uses the SO and then you can delete or change the SO Form you want. How to Cancel a Sales Order Transaction The cancellation of a sales order transaction referred to here has a different meaning from the deletion of a sales order transaction. Canceled means making the form no longer usable for DO or SI transactions without deleting the canceled SO, so the canceled SO can still be traced to the Sales Order List. You can cancel Sales Order transactions by following these instructions: 1. Open the Sales Order List from the main menu List – Sales – Sales Order 2. FIND the Sales Order form that you want to cancel, then double click to open the Sales Order view. 3. Click the Closed option box located on the display of the Sales Order Form 4. Click the Save & Closed button to save and close the SO Form that you just canceled. 5. The Sales Order form that you have canceled will be displayed on the Sales Order List with a Closed status. Delivery Order The Delivery Order (DO) form, also known as the Delivery Order, is a form that you can use to record the activity of delivering goods ordered by your customer, where the activity of sending goods is not accompanied by a bill that must be paid by the customer. When you record the delivery of goods ordered by the customer on the Delivery Order Form, LEVERAGE will automatically record the Goods in Transit (Debit) Account and record the release of goods from the Warehouse – Inventory Account (Credit) where revenue recognition and cost of good sold from goods that you send will only be made after you record the invoice for the delivery of the goods on the Sales Invoice Form. Note: The Goods in Transit account is a cross account with the Inventory Part type, this account functions as a temporary storage account for the value of the items sold, until the issuance of a Sales Invoice. Delivery Order Form 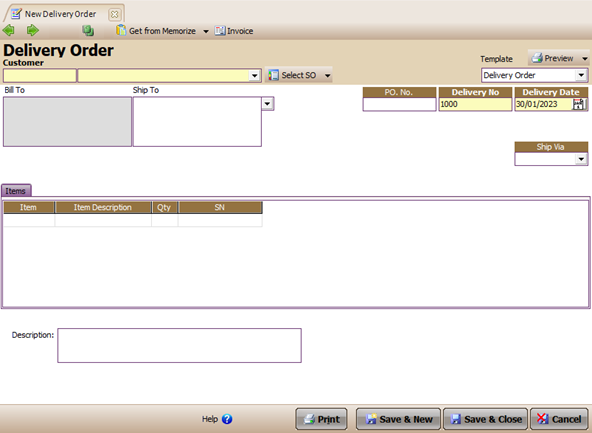
Buttons on the Delivery Order Form: 1. Previous : Opens the previous DO form 2. Next : Opens the next DO form 3. Preview: Opens the DO view before printing 4. Select SO : Draws the SO that was created before. On this button, apart from SO, there is also an option to select Sales Quotation and RMA. 5. Copy Transaction: Copy Transactions from items that have been inputted into the Sales Order. To Copy this Transaction, you must first Memorize Transaction. 6. Memorize Transaction: Store item details that have been inputted in a Sales Order to facilitate input if there are repeated items ordered in other Sales Orders. 7. Invoice: Shortcut button to directly create a Sales Invoice. 8. Save & New: Button to save the Sales Order as well as open a new view of the Sales Order. 9. Save & Close: Button to save the Sales Order as well as close the display. Columns on the Delivery Order Form: 1. Customer : Field to define Customer 2. PO No. : Filled with PO number from the Customer 3. Delivery No: No DO / Travel Letter made. 4. Delivery Date: Date the DO was made 5. Ship to : Automatically filled in with Customer Name & Address according to Customer data, but this field can be changed if there is a change in shipping address. 6. Ship Via: Choice of shipping type. Table Details on the Delivery Order Form: 1. Item : Code of the item to be sent 2. Item Description: Information on the name of the item sent 3. Qty: Number of items sent 4. Item Unit: Unit of goods shipped 5. Qty Control : Quantity based on warehouse unit 6. Dept. : Choice of department sending goods (if any) 7. SN: Serial Number of goods sent 8. Qty used: This column only appears for DOs that have been stored, the number that appears shows the number of items for which an invoice has been made. 9. SO No. : Column containing SO No. This column only appears when this DO originates from SO. 10. Quote No. : Column containing No. Offer, when DO is taken from Sales Quotation. 11.Description : Description of Goods Delivery. How to Create a Delivery Order Form: You can record the delivery activity of customer orders on the Delivery Order Form by following the instructions below: 1. Open the new Delivery Order form by clicking on the Activities – Sales – Delivery Order main menu. 2. Fill in the Delivery Order form based on the following image: 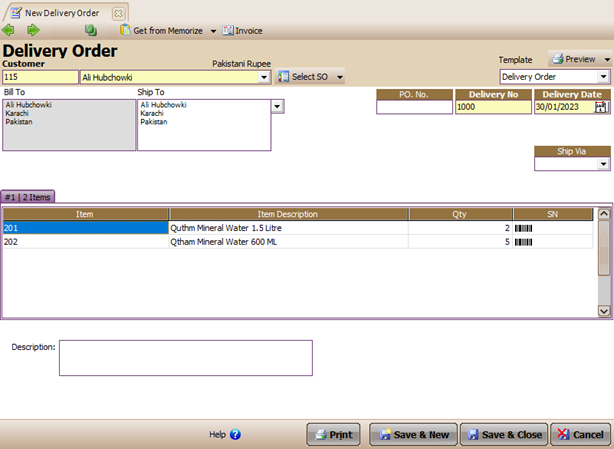
1. Select the Customer's name 2. Fill in the PO Customer number, number DO form and delivery date goods to the Customer 3. Fill in this table with details of the items you send to customers. You can fill in the details of this table by clicking the Select button SO or Select SQ. You can also fill in the details of this item for free manually by double clicking on the Item column Some of the possibilities for recording a Delivery Order include: 1. Delivery Order from Sales Quotation Making DOs originating from SQ can directly use the shortcut key by dragging the details of the item you want to send originating from the previously created SQ. By clicking the Select Quote button, the item details will be automatically filled in and if there is an adjustment in the Qty of the item, you can just edit it directly on the item in question. 2. Delivery Order from Sales Order Making DOs originating from SO can directly use the shortcut keys by dragging the details of the item you want to send originating from the SO that was created previously. By clicking on the Select SO button, the item details will be automatically filled in and if there is an adjustment in the Qty of the goods, you can just edit the item in question. 3. Delivery Order from RMA [Return Merchandise Authorization] Making DOs originating from RMA can directly use the shortcut keys by dragging the details of the item you want to send originating from the SO that was created previously. By clicking on the Select SO button, the item details will be automatically filled in and if there is an adjustment in the Qty of the goods, you can just edit the item in question. 4. Delivery Order not from SO / SQ / RMA Making DO doesn't always have to be preceded by SO. DO can be made directly by filling in item details in the available fields. The item you want to send can be selected directly from the Item No column. List of Delivery Orders All Delivery Order forms that you have created will be stored or recapitulated in a table called the Delivery Order List. The Delivery Order list can be opened from the main menu List – Sales – Delivery Order. 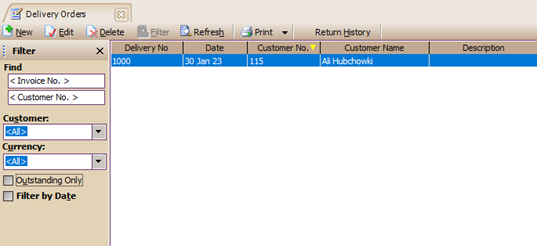
The Delivery Order list display is divided into several sections: 1. Menu button on the Delivery Order List a. New : Creates a new DO b. Edit : Changed the highlighted DO c. Delete: Deletes the highlighted DO, provided that the DO has never been used as an invoice and has never been highlighted. d. Filter: Selects a conditional display based on Customer, Currency, Outstanding Only and Date. e. Refresh : Displays the last data that has been input. f. Print : Prints a list of DOs or prints the highlighted DOs. g. Return History : Displays the history of goods returns that have been made based on the highlighted DO. h. Find: Search for DO based on No DO or No Customer 2. Detail Table Delivery Order a. Delivery No : No DO b. Date : Date of manufacture DO c. Customer Name : The name of the customer receiving the goods d. Description: Description of the DO e. Printed: Status of the DO, whether it has been printed or not. 3. Right Click Mouse Menu – DO list a. New : Creates a new DO b. Edit : Changed the highlighted DO c. Delete: Deletes the highlighted DO, provided that the DO has never been used as an invoice and has never been highlighted. d. Outstanding Only: when activated ( ) will display DOs for which Sales Invoices have not been made. e. Filter: Selects a conditional display based on Customer, Currency, Outstanding Only and Date. f. Sort by : Displays DO sequentially based on the available column choices. g. Refresh : Displays the last data that has been input. h. Email : Shortcut for sending DO printouts to email. i. Bill – to : Displays highlighted Customer DO data j. Returns : Displays a list of returns for the DO. How to Delete/Change the Delivery Order Form You can delete or change the Delivery Order Form that you have saved in the Delivery Order Form List by following the instructions below: 1. Open the Delivery Order List from the main menu List – Sales – Delivery Order 2. In the Delivery Order Form List, find the form you want to delete or change by typing the form number or description of the form you want to delete/change in the FIND column. 3. After the form you want to delete or edit is highlighted, the next step is to right-click Delete (click the Delete button) to delete the form or right-click Edit (click the Edit button) to change the form. Note: The Delivery Order form can be deleted/changed provided that the form has not been processed in the Sales Invoice transaction. If the Delivery Order form has been processed in a Sales Invoice transaction, you must first cancel the Sales Invoice transaction that uses DO only then can you delete the DO Forms you want. Sales Invoice Sales Invoice (SI) is a sales invoice to the customer, where in this activity there is an acknowledgment of Customer Receivables. SI is usually made based on a Sales Quotation, Sales Order or Delivery Order, but can also be made directly by filling in the items to be sold. Sales invoice form 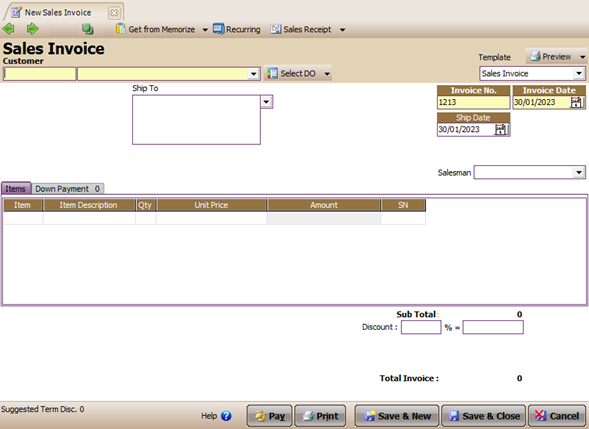
Buttons on the Sales Invoice Form: a. Previous : Opens the previous DO form b. Next : Opens the next DO form c. Preview: Opens the DO view before printing d. Select DO : Draws the DO that was made before. Besides DO, SI can also be made by selecting Quote or SO or RMA. e. Select DP : To add DP, when there is more than one DP payment. f. Copy Transaction: Copy Transactions from items that have been inputted in the Sales Order. To Copy this Transaction, you must first Memorize Transaction. g. Memorize Transaction: Stores details of items that have been input on a Sales Order to make it easier to input if there are repeated items ordered on other Sales Orders. h. Recurring : Serves to set the reprinting of invoices that are being opened. Making recurring invoices can be done weekly, 2 weeks, monthly or quarterly, semester and yearly. i. cust. Receipt : Shortcut to make acceptance from customers of open invoices. j. Fiscal Receipt: Shortcut to create a Sales Receipt form for receiving tax payments from customers on open invoices. k. Save & New: Button to save the Sales Invoice as well as open a new view of the Sales Invoice. l. Save & Close: Button to save the Sales Invoice as well as close the view. Columns on the Sales Invoice Form: a. Customer : Field to define Customer b. PO No. : Filled with PO number from the Customer c. Invoice No: No Invoice created. d. Invoice Date: The date the SI was made e. Ship to : Automatically filled in with Customer Name & Address according to Customer data, but this field can be changed if there is a change in shipping address. f. Rate: the exchange rate in effect at the time of making the invoice g. FOB : Choice of how to receive goods via FOB destination or shipping point. h. Terms : Terms of payment i. Fiscal Rate : The tax rate that applies when making an invoice j. Ship Date: The date of delivery of goods, usually following the DO if previously made, or the same as the date of the invoice. k. Ship Via: Choice of shipping type. l. Receivable Account : A field that holds receivable accounts for created invoices. m. Salesman : Field to enter the name of the Salesman who sells n. Warehouse : To determine the warehouse where the goods will be taken Item Table Details on the Sales Invoice Form a. Item : No item sold b. item Desc : The name of the item being sold c. Qty : The number of goods sold d. Unit: Usually this column will be automatically filled according to the type of unit that has been set for the item. e. Unit Price: Price per unit of goods. This column will be automatically filled if the selling price of the item has been set previously. f. Disc % : Column to fill in discount on goods (if any) g. Tax : This column will be automatically filled in with the tax code if the Sales Tax Code field on the item is filled in. If it has not been set, then this column will not be filled in, but you can directly type the tax code according to the Customer Tax settings. h. Amount : Automatically filled with the net selling price by calculating the Qty multiplied by the Unit Price minus the Disc. i. Qty Control: Column to enter the total quantity in other units, which serves to facilitate stock counting. j. Dept : Department that issues Sales Invoice (if any) k. SN: Serial Number of the item being sold DP Use Table Details on the Sales Invoice Form a. Description : If your Sales Invoice form is based on SO (Select SO) where the SO is accompanied by a down payment, this column will automatically display a description of the down payment. b. Tax : Tax code for down payment. c. Total DP: The amount of down payment you want to use. Usually it will be filled in automatically with the amount of money received, but if you want to change it, please type the desired amount directly in the column. d. SO No. : No. SO, the origin of the down payment e. Inclusive Tax: This column will be checked if the down payment used includes tax. Other Information on the Sales Invoice Form: a. Inv. Tax No. : Field to enter the tax invoice code and will appear automatically if the customer concerned is subject to tax. b. Description: Description of the Sales Invoice created. c. Sub Total : Automatically filled with the amount from the Amount column in the Details section. d. Disc : This field is to accommodate the discount from Sub Total, can be filled in as a percentage or in total amount. Fields in percentages can be filled with multilevel discounts such as 5+2+3, while fields in amounts are usually used for rounding off discounts. e. Sales Tax: This tax information will appear under the Discount if the Sales Invoice is taxed (Customer and Item have their tax codes set). f. Freight : Field to fill in the transportation costs that will be charged to the customer. g. Freight Account : Field to determine the account that will accommodate shipping costs. h. Total Invoice : Automatically calculates from Subtotal less Discount plus Tax and Freight. Specifically for Tax, if the Inclusive Tax option box is checked, then Tax will be calculated inclusively and behind the total number will appear the words Tax Included. CREATE A SALES INVOICE FORM 1. Sales Invoice preceded by the previous Sales Quotation / Sales Order. a. Open the new Sales Invoice form from the Activities – Sales – Sales Invoice main menu. b. Select the Customer name, then fill in information such as invoice number, invoice date and other information. c. Because the Sales Invoice form is created based on a Sales Quotation/Sales Order, to fill in the form table details, you can click the Select SQ button if it was created based on a Sales Quotation or click the select SO button if the sales invoice was created based on a Sales Order, then tick the SQ form number/ SO to be billed. d. Automatically the Sales Invoice table details will be filled in according to the detailed form created. If there is a change in Qty or Unit Price, it can be edited directly in the column concerned. e. If this sale is subject to tax, then fill in the tax invoice no. in the provided field, along with the date. f. After all data is filled in correctly, click Save & Close or Save & New. g. An example image of making a Sales Invoice based on a Sales Order 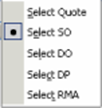

1. Select the Customer name 2. Click the Select SO button, then select the SO number will be billed. 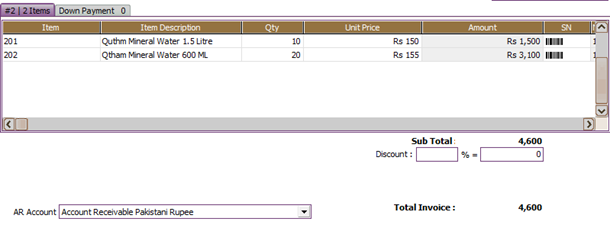
After you click the Select SO button, LEVERAGE will automatically display details of SO items to be invoiced in the SI Table details. If the quantity and unit price are billed differently from the quantity/unit price order, then you can edit the column the quantity and unit price column corresponds to the invoiced quantity/unit price. 2. Sales Invoice preceded by the previous Delivery Order a. Open the new Sales Invoice form from the Activities – Sales – Sales Invoice main menu. b. Select Customer, then fill in the invoice number (usually filled in automatically from the previous number). c. Click Select DO, then check the DO that will be billed, then click OK. d. SI will automatically be filled according to the details of the form made. If there is a change in Qty or Unit Price, it can be edited directly in the column concerned. e. If this sale is subject to tax, then fill in the tax invoice no. in the provided field, along with the date. f. After all data is filled in correctly, click Save & Close or Save & New. g. The following is an example of making a Sales Invoice based on DO: 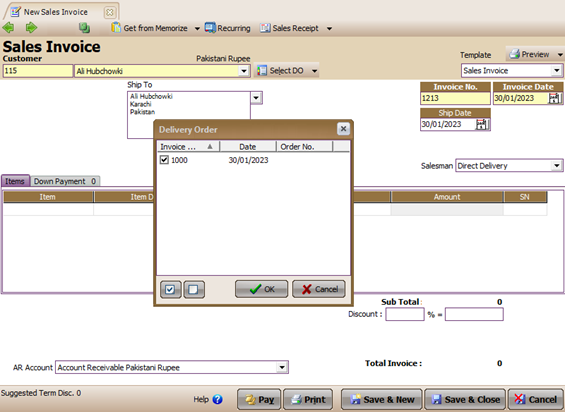
1.Select the customer name 2. Click the Select DO button then select (tick) DO number to be billed. 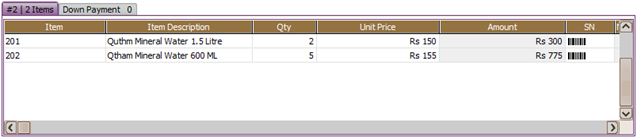
After you click the Select DO button, LEVERAGE will automatically display details of DO items to be invoiced in the SI Table details. Multiple DO forms can be invoiced on one invoice. 3. Making SI directly without being preceded by SQ, SO and DO (Direct Sales Invoice) Making SI directly without prior Quotation / SO / DO is a sales model that is often found in supermarkets or shops. Customers come instantly to buy and pick up the goods and even immediately pay for them too. Usually, for sales like this, customers are grouped under one name, namely Customer Cash. The following are the steps for making Direct SI: a. Open the Sales Invoice form from Menu Explorer or Activities – Sales – Sales Invoice b. Select Customer, then fill in the invoice number (usually filled in automatically from the previous number) and the date of sale. c. Fill in item details by directly clicking on the Item column, select the item being sold then fill in the Qty and unit price. d. If this sale is subject to tax, then fill in the tax invoice no. in the provided field, along with the date. e. After all data is filled in correctly, click Save & Close or Save & New. f. The following is an example of creating a Sales Invoice: 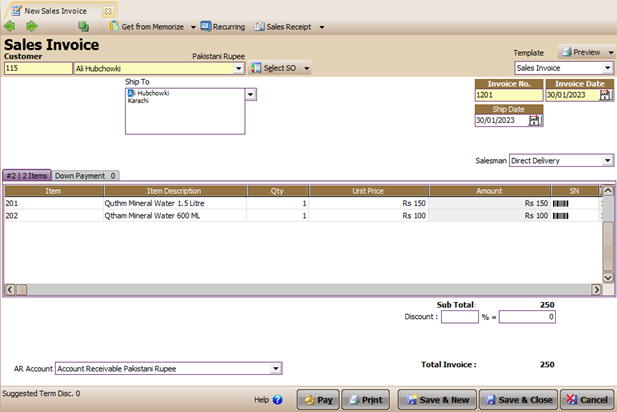
1. Select the customer 2. Isi invoice no, invoice date, ship date and terms of sale 3. Head the quantity and unit price ot that item you sell 4. If the sales transaction that you record is cash sales, then you can click a button cust. Receipt to record customer payments 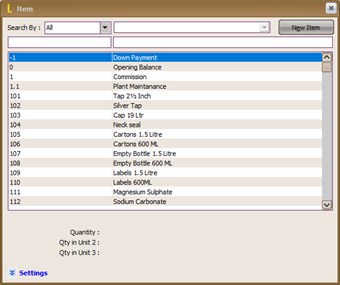
Click the ellipsis button to open the item list form, then select the item you want to sell List of Sales Invoices All Sales Invoice forms that you have created, both those that have been paid off and those that are still outstanding, will be stored or recapitulated in one table called List of Sales Invoices (List of Sales Invoices). The list of Sales Invoices can be opened from the main menu List – Sales – Sales Invoice (Register – Sales – Sales Invoice) 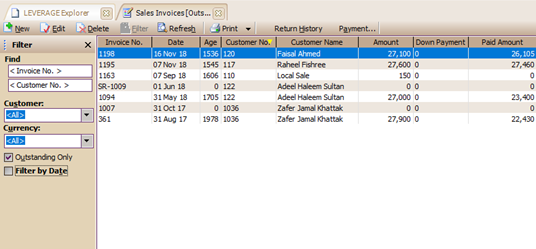 The display of the Sales Invoice list is divided into several sections: The display of the Sales Invoice list is divided into several sections:
1. The menu button on the Sales Invoice List consists of: a. New : Creates a new SI b. Edit : Changed the highlighted SI c. Delete: Delete the highlighted SI, provided that there has been no payment for the SI d. Filter: Selects a conditional display based on Customer, Currency, Outstanding Only and Date. e. Refresh : Displays the last data that has been input. f. Print : Prints a list of SI or prints the highlighted SI. g. Return History : Displays the history of goods returns that have been made based on the highlighted SI. h. Payments : Displays the history of payments that have been made based on the highlighted SI i. Find: Search for SI based on SI No or No Customer 2. Detailed Sales Invoice List, consisting of: a. Invoice No : No Sales Invoice b. Date : Date of manufacture DO c. Age : The age of accounts receivable for each invoice calculated from the due date according to the calculation of the terms. d. Customer Name : Name Customer e. Amount : Total Sales Invoice f. Down Payment: Down payment originating from the SO recorded on the invoice. g. Paid Amount: Column that records the amount that has been paid for the invoice through the Sales Receipt form. The history can be seen by clicking the Payment button from the menu button h. Discount : The number of discounts received when filling out the Sales Receipt form which is filled in through Discount Info (right mouse click) on each Invoice line. i. Deductions : Amount of tax deduction entered via Sales Receipt j. Return: Total amount of Sales Returns made. The history can be viewed by clicking the Return button on the menu. k. Owing : Amount still to be invoiced for the SI l. Description : Description of the SI m. Printed: Status of the SI, whether it has been printed or not 3. Mouse Right Click Menu – SI List e. New : Creates a new SI f. Edit : Changed the highlighted SI g. Delete: Delete the highlighted SI, provided that there has been no payment or return for the SI. h. Outstanding Only: When activated ( ) will display SIs whose payments have not been completed. i. Filter: Selects a conditional display based on Customer, Currency, Outstanding Only and Date. j. Sort by: Displays SI in sequence based on the available column options. k. Refresh : Displays the last data that has been input. l. Email : Shortcut for sending SI printouts to email. m. Bill – to : Displays the highlighted Customer SI data n. Returns : Displays a list of returns (Sales Return) for the SI. o. Payments: Displays a list of payments (Sales Receipt) for the SI. Sales Return Sales Return Form (Sales Return Form) serves to record the activity of receiving goods - goods returned by the customer / customer due to defects / damage or the goods - the goods are not in accordance with the PO of the customer / customer. Before recording sales return activities on the Sales Return form, you should first set preferences – sales returns via Setup – Preferences – Sales (read the explanation about preferences). SALES RETURN FROM DELIVERY ORDER Sales returns originating from DO have the following limitations: a. DOs whose item quantities have been billed are all no longer displayed in the invoice no. DOs that have been partly billed but still have remaining invoices can still be displayed in the Invoice No option. which will be returned. b. DOs that have not all been billed, can still be selected in the Invoice No option. but the quantity that can be returned is only the remaining quantity of items that have not been billed. c. Unit price on Sales Return from DO is 0 (zero) and cannot be edited. Steps to make Sales Return from DO: a. Open the Sales Return form from the Activities – Sales – Sales Return main menu. b. Select Customer, Warehouse then fill in the date and No form. c. Then click the Sales Inv field. No and select the form with the description DO. d. Then select the item to be returned by double clicking on the Item column Description. Fill in the Qty that will be returned, and the Unit Price column will only be filled with 0 (zero). e. After all data is filled in correctly, then click Save & New or Save & Close to save the form. f. The following is an example image of making a sales return form to record goods returns from DO transactions: 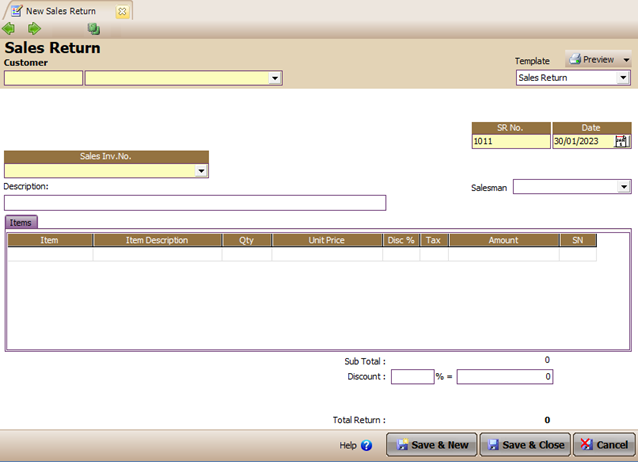
1. Select the name of the returning customer goods. 2. Fill in the return number and item return date. 3. In this column select the returned DO number by customers 4. Double click on the Item column Description to display details items from the returned DO form. 

5. If your customer only returns a portion of the number of items that you sent, then you can edit this Qty field accordingly by the number of items your customer returns. SALES RETURN FROM SALES INVOICE Steps to make Sales Return from Sales Invoice: a. Open the Sales Return form from the Activities – Sales – Sales Return main menu. b. Select Customer, Warehouse then fill in the date and No form. c. Then click the Sales Inv field. No and select No Invoice to be returned. d. Then select the item to be returned by double clicking on the Item column Description when the item comes from the selected SI. e. Then fill in the Qty to be returned, and Unit Price. f. After all data is filled in correctly, then click Save & New or Save & Close to save the form. g. The following is an example image of making a sales return form to record goods returns from SI transactions: 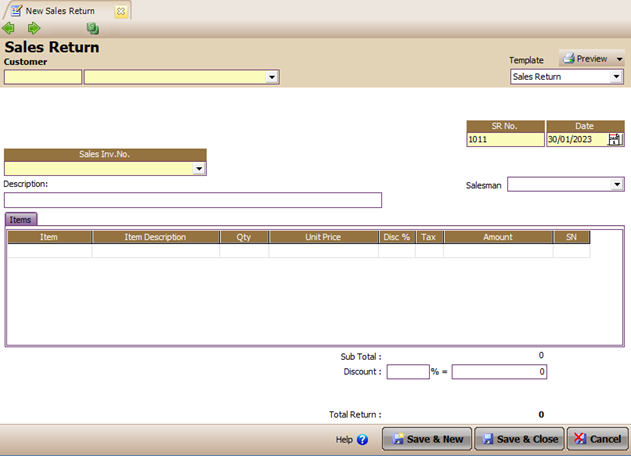
1. Choose a name customers who deserves a goods 2. In the Sales field Inv. No. Choose a number returned invoice customer. 3. Fill in the form number and date sales returns form 4. Double click on the column Item Description for display item details 5. Select the item that the customer returns. 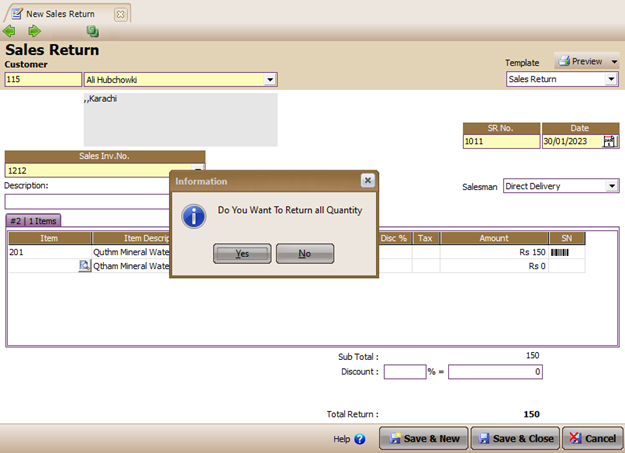

5. If your customer only returns a portion of the number of items that you sent, then you can edit this Qty field accordingly by the number of items your customer returns. Steps to make Sales Returns for items whose Sales Invoices are not recorded in LEVERAGE: So that you can record sales return activity for goods whose invoices are not recorded in LEVERAGE, you must first activate the option“Can Enter Any Item in Sales Return”, through setup – preference – sales. Pay attention to the following picture: Activate options this box 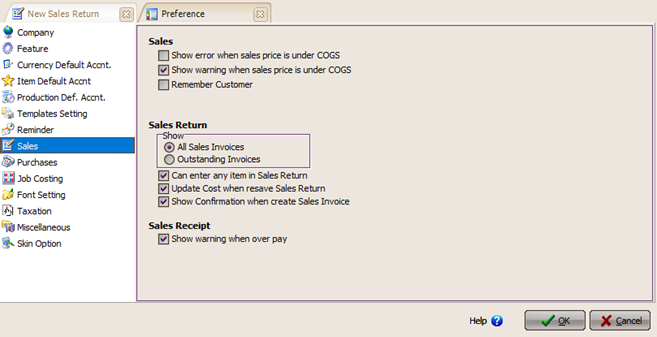
After you activate the option box“Can enter any item in Sales Return”, The next step is to record sales return activity by following these instructions: 1. Click the main menu Activities – Sales – Sales Return 2. . Fill in the Sales Return form based on the image below: 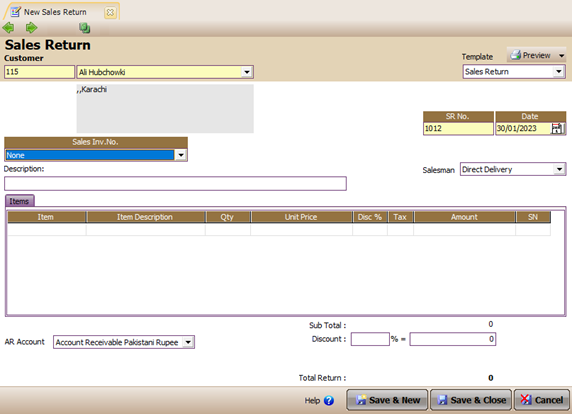
1. Select the Customer's name 2. In this field select None 3. Fill in the return number and date sales returns 
4. Double click on the Item column or click the ellipsis button to display the list of Item you have your customers 5. In the list of items select directed item 3. After you select the item to be returned, fill in the quantity column according to the quantity of goods returned by your customer and fill in the unit price column according to the selling price per unit of item returned. You can see the history of selling prices per unit of goods by double clicking on the Unit Price column then select the unit price of the returned item. Pay attention to the picture below: 
Double click on the unit column price then select the unit price what do you want. 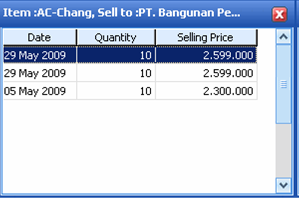
4. Determine the warehouse where the returned goods are stored. After you have filled out all the return information on the Sales Return form, the next step is to click the Save and Close button. List Of Sales Return All sales return activities that you have recorded in LEVERAGE will be stored in the List of Sales Returns. The Sales Return List (List Of Sales Return) can be opened from the main menu List – Sales – Sales Return. 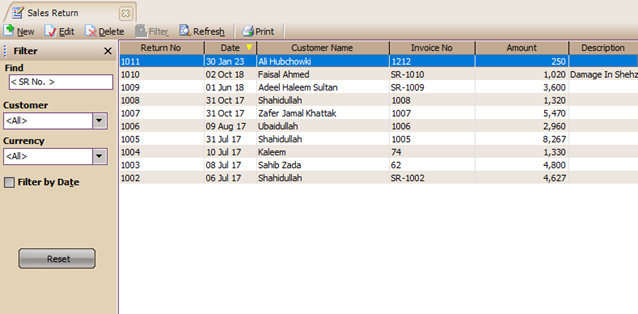
The menu button on the Sales Return List Table consists of: 1. New : This button functions to create a new Sales Return Form. 2. Edit : This button functions to open the highlighted Sales Return Form view, so you can easily edit/change the contents of the form. Or open the form to just check it. 3. Delete : This button functions to delete the highlighted Sales Return Form. 4. Filter: This button functions to display the filter column in the Sales Return List Table. With Filter, you can display Sales Return List based on date filter, currency filter, customer name filter. And with this filter you can also easily find the Sales Return form you want by simply typing the form number in the Find <SR field. No>. Detail Table of Sales Return List consists of: 1. Return No : This column displays the Sales Return form number that you have created. 2. Date : This column displays the date of the Sales Return Form 3. Customer Name : This column displays the customer name information associated with the Sales Return form that you created. 4. Invoice No : This column displays information on the DO number or SI number that the customer returns. 5. Amount : This column displays information on the value of sales returns recorded on the Sales Return Form. 6. Description : This column displays a brief description of the Sales Return Form that you have created. Sales Receipt Sales Receipt Form is a form that serves to record the activities of receiving payment of sales invoices payable from Customers/Customers. Sales Receipt Form 
Buttons on the Sales Receipt Form: 1. Previous : Button that functions to open the Sales Receipt form view before the sales return form appears. 2. Next: The button that functions to open the Sales Receipt form view after which the sales return appears. 3. Print: Button that functions to print the appearance of the Sales Return form. 4. Auto Apply: A button that functions to automatically allocate the amount of payment received (check amount) on the invoice that is payable. 5. Help? : Button that works to open the help menu 6. Save & Close: Button that functions to save the display of the Sales Receipt Form that you have created and at the same time closes the display of the Sales Receipt Form. 7. Save & New: This button functions to save the Sales Receipt Form view that you have created as well as to open a new Sales Receipt Form view. Columns on the Sales Receipt Form: 1. Received From: The customer who made the payment 2. Form No: Voucher No from customer acceptance, automatically sequential from the previous no. 3. Payment Date: Date of receipt of payment from the Customer 4. Bank: Account with the type of Cash / Bank that is used to record receipt of Customer payments. 5. Rate: The exchange rate used at the time of payment, if the customer uses a foreign currency. 6. Check no. : Customer Check Number used for payment 7. Check Date : Check date used for payment. 8. Dept. : Selection of departments related to customer acceptance page. This field only appears in LEVERAGE Deluxe edition 9. Memo: Information on customer acceptance 10. Void Check : Option to mark when the check paid turns out to be a blank check or a canceled check. 11.Fiscal Payment: Activate this option, to record special tax payments for customers in foreign currency. 12. Check Amount: The amount of money received is in accordance with the currency of the bank used. 13. Equiv. Amount : The automatic equivalent value of the amount of money received when using a different currency. 14.Existing Credits : The amount of overpayment (overpay) from the previous customer acceptance form. 15.Distribute Amount : Amount distributed to pay off outstanding invoices with the Equiv formula. Amount plus Existing Credit (Apply from Credit is ticked). 16.Recalc: This button fills in the Check Amount according to the invoice to be paid. Sales Receipt Form Table Details 1. Pay : Check this column, on the invoice line to be paid 2. Invoice No. : No. outstanding invoices 3. Date: The date of the invoice that is payable 4. Discount Date: Date of discount invoice payable in accordance with the terms of payment on the invoice (terms) 5. Amount : The total value of the invoice. 6. Owing: The outstanding value of invoices that have not been paid 7. Payment Amount: The value to be paid on the outstanding invoice. This column can be directly filled in if the value paid is different from the value owed. 8. Sales Tax Withheld : Sales tax withheld 100% Click the Right Mouse on the Payment Amount Column: 1. Discount/Write off – Info : Functions to enter a discount on an invoice or fine and determine the account to cover the discount or fine given. 2. Sales Tax Withheld : Sales tax withheld 100% 3. Show Invoice : Displays the highlighted Sales Invoice. Other Information on the Sales Receipt Form: 1. Total Owing: The total value of the column owed or the amount still owed 2. Total Payment: The total value of the payment 3. Overpay : Value of overpayment (if any) 4. Total Discount: The total value of the Discount/Write off – Info HOW TO RECORD CUSTOMER ACCEPTANCE 1. Sales Receipt For Sales Invoice Recording of the activity of receiving Sales Invoice payments payable from customers can be done by: a. Open the Sales Receipt Form from the Activities – Sales – Sales Receipt main menu. b. Fill in the Sales Receipt form by following the instructions in the following image: 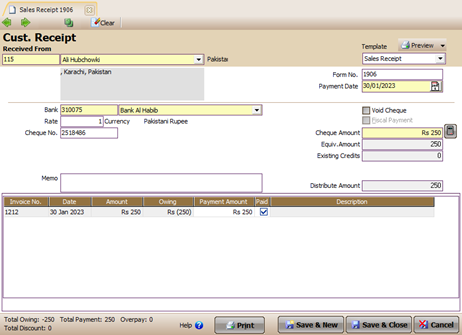
1. In this field select the customer's name make a payment. 2. Fill in the order number of the form and the date of customer payment 3. Select a cash/bank account for record receipt of payment 4. Fill in this field with customer check information if payment is made by check 5. Check Pay on the invoice detail line that was paid 6. Automatically displays the total amount owed to be paid. If your customer only pays part of the amount owed, you can change the value of this column according to the payment you received then click the Recalc button. c. After you have finished inputting all the information on the Sales Receipt form, click the Save and Close button to save the input that you have done as well as to close the Sales Receipt Form display. 2. Sales Receipt With Discount When paying an invoice, sometimes there is an additional discount other than the discount originating from the invoice, for example the discount originating from the Payment Terms (Terms) 2/10,n/30. To enter this discount, follow these steps: a. Open the Sales Receipt form from the Activities – Sales – Sales Receipts menu or from the Explorer – Sales menu. b. Select Customer and fill in all the required fields such as form number, date, bank, check number and date of check and memo. c. Check the invoice that you want to pay off in the Pay column, or fill in the amount to be paid in the Payment Amount column. d. Then right-click on the invoice line that will be discounted, then click Discount/Write off – Info. After that, the Discount Information window will appear. 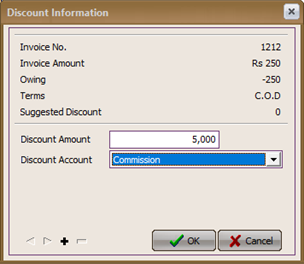
Pay attention to Suggested Discount displays term discount value according to the terms of payment. To record deductions this term, you can fill in Suggested amount Discount on fields Discount Amount and Choose a Discount Account on field Discount Account. e. Fill in the discount amount in the Discount Amount field, then select Discount Account by clicking the drop down button, and enter the Department if any. This discount can be entered more than once by clicking the (+) button, while the ( -- ) button deletes the discount that has been entered. f. After all the data is filled in completely, don't forget to click the Recalc button to make sure the payment amount is correct. g. Then click Save & New or Save & Close. 3. Sales Receipt With Late Charge This transaction is the reverse of the previous transaction. In this transaction, the Customer is subject to fines for late payments or other matters. Here are the steps for doing it: a. This activity is the same as Sales Receipt with discount, namely by right-clicking Discount / Write – off Info. b. But the numbers entered in the Discount Amount field are marked MINUS (-) so that the treatment is the opposite of Discount. And for Discount Accounts it is usually filled with an Income type account. 4. Sales Receipt For Fiscal Special tax payments for customers in foreign currency (foreign currency) are usually made separately, because the tax is calculated directly in the base currency. To do this activity, the method is almost the same as CR for SI, namely: a. Open the Sales Receipt form, then select Customer, then complete all the required fields. b. Before checking the invoice that you want to pay, first activate (check) the Fiscal Payment option box located on the top right. Then tick the Pay column on the taxable Invoice row. Then it can be seen in the Payment Amount column the value of the Tax Invoice that will be paid. c. After all data is filled in completely, click the Recalc button and then Save the form. Fiscal Payment is only active for Customers with Foreign Currency and does not apply to Customers with Base Currency (Rupiah). The Pay and Payment Amount columns can only be filled in the Invoice line that is subject to Tax or has a Tax value in the Base Currency (Rupiah). 5. Sales Receipt With Other Foreign Bank Currency When receiving an invoice payment from a customer, it is not limited to the type of currency. Invoices using Foreign Currency can be paid using the Base Currency and vice versa. Here are the steps for making it: a. Open the Sales Receipt form, then select Customer, fill in the form number & date. b. Select the bank that accepts the payment. If the customer uses Foreign Currency, they can also choose Bank Base Currency (Rupiah) or vice versa. Invoices in Rupiah are paid in foreign currency. c. Then fill in the Rate according to the transaction rate, and complete the check number and date. Then tick the invoice that you want to pay. d. After everything is filled in correctly, click the Recalc button, then you will see in the Check Amount field the amount to be paid and in the Equiv field. Amount in foreign currency. e. Then click the Save & Close or Save & New button to save the form. Payment in foreign currency can only be made from Base Currency to Foreign Currency or vice versa. It cannot be done from Foreign to Foreign such as from USD to SGD or vice versa. 6. Sales Receipt With Overpay Sometimes when receiving payments from customers there can be overpayments. The amount of money received is more than the value of the invoice you want to pay. If that happens, LEVERAGE can still save the overpayment to be used for the next transaction. Here are the steps for using overpay: a. Open the Sales Receipt form, then select Customer, fill in the form number & date. b. If the Customer has an Overpay, the amount will appear in the Existing Credits field. Under that field there is an option box Apply from Credit, check the box to use the Existing Credit. c. After the Apply from Credit box is checked, the Return Overpay option box will appear. This box functions to return the overpayment to the Customer concerned. But if you want to use this Overpay to pay other invoices, then don't check the Return Overpay Option box. d. Then select the invoice you want to pay off. After all the data has been filled in completely, Save the form. List Of Sales Receipt All Customer Receipts or Sales Receipts transactions can be viewed from the List menu – Sales – Sales Receipts. Knob Menu Sales Receipt List a. New : Creates a new CR b. Edit : Changed the highlighted CR c. Delete : Deletes the highlighted CR d. Filter : Select conditional views based on Customer, Currency, and Date. e. Refresh : Displays the last data that has been input. f. Print : Prints a list of CRs or prints the highlighted CR. g. Find : Search for CR based on CR No or Check No. Sales Receipt Details a. Payment Date: The date the Sales Receipt was made b. Form No : No Sales Receipts c. Bill-to No : Code Customer d. Name : Name Customer e. Check No: Check No received f. Check Date: The date the check was received. LEVERAGE uses these check dates for journalizing. This field is provided specifically because there is a possibility that the date the check was issued differs from the date it was received. g. Amount : The amount received from the Customer. h. Reconciled : Automatically filled with True or False. This column relates to Bank Reconciliation. If the Bank reconciliation has been reconciled it will be filled with True, otherwise if not it will be filled with False. By default this list will only show Un-reconciled CRs. i. Description: Description of the form j. Discount Amount: The amount of discount entered on the Sales Receipt. k. Overpay: The amount of overpay or overpayment. l. Overpay Used : The amount of overpay used. |