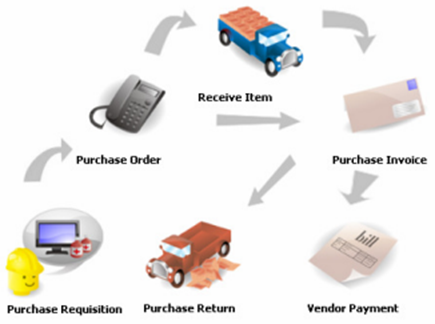
This chapter discusses the forms contained in the LEVERAGE AccountingSoftware purchasing module.
Some of the data and setup that you must prepare before making a purchase activity are:
1. Customize the Purchase Form Design that you will use. If you don't have a standard form design, then you can use the default template which is automatically available in LEVERAGE.
2. Prepare a Vendor List.
3. Prepare a list of items (inventory parts and non-inventory parts) and set (setting) the GL account of these items to the right account.
4. Setting the tax code for Items and Vendors.
Purchase Requisition
[Purchase Request]
Purchase Requisition (Purchase Request) is a form for internal companies, which functions to record requests for the purchase of goods to the purchasing department. The recording of this activity has not affected the financial position.
How to Make a Purchase Requisition Form
a. Open a new Purchase Requisition Form by clicking on the main menu Activities – Purchase – Purchase Requisition or you can open it from the Explore menu (Explorer), by clicking the Purchase button and then clicking Purchase Requisition ( Purchase Request).
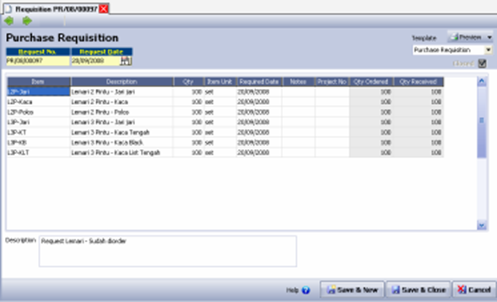
b. Fill out the Purchase Requisition form with the following instructions:
ü Request No : In this column you can fill in the serial number of the Purchase Requisition form. By default, this column is immediately filled with the number 1000. You can replace the default number according to the form numbering in your company.
ü Request Date : In this column you can fill in the date the Purchase Requisition form was created.
ü Item : In this column you can type the item number you want to buy, or if you don't memorize the item number, you can select the item directly from the item list by double clicking on the item column or clicking the ellipsis button.
ü Description : This column automatically displays the name of the item that matches the item number you selected (fill in)
ü Qty : In this column you can type the number of items you want to buy.
ü Item Unit : This column will be filled in automatically with the unit for indicating the quantity of goods.
ü Required Date: In this column you can fill in the date of submission of requests for purchase of goods (the date of submission of requests for each item may vary).
ü Note: In this column you can type a brief note regarding the item you purchased.
ü Qty Ordered : This column will automatically display the total quantity of items ordered to the supplier. So this column will be filled in automatically after you create a Purchase Order for the Purchase Requisition.
ü Project No : In this column you can select the project number associated with the activity of purchasing the item.
ü Qty Receive : This column will automatically display the total quantity of items received from suppliers that are recorded on the Receive Item or Purchase Invoice form.
ü Description : In this column you can type a description regarding the Purchase Requisition form that you created.
ü Save & New: This button functions to save the Purchase Requisition form that appears as well as open a new form view.
ü Save & Close: Button that functions to save the Purchase Requisition form as well as exit the Purchase Requisition activity.
How to Delete/Change the Purchase Requisition Form
You can delete or change the Purchase Requisition Form that you have saved in the Purchase Requisition Form List by following the instructions below:
1. Open the Purchase Requisition Form List by clicking the List – Purchase – Purchase Requisition main menu;
2. In the List of Purchase Requisition Forms, find the Form that you want to delete or change by typing the Form number or description of the form that you want to edit or delete in the FIND column.
3. After the form you want to delete or edit is highlighted, the next step is to right-click Delete (Click the Delete button) to delete the form or right-click Edit (Click the Edit button) to change the Form.
Purchase Requisition List
All Purchase Requisition forms that you have created will be recapitulated in one table called the Purchase Requisition (List Of Purchase Requisition).
Purchase Requisition List (List Of Purchase Requisition) you can open from the main menu List – Purchase – Purchase Requisition.
Menu on Display Purchase Requisition Form List:
1. New : Button that functions to create a new Purchase Requisition Form.
2. Edit : Button that functions to open the highlighted Purchase Requisition Form view, so you can edit/change the appearance of the form, or open the form to just check. Editing the appearance of the Purchase Requisition Form can be done provided that the form has not been processed into a purchase order.
3. Delete : Button that functions to delete the highlighted Purchase Requisition Form. Purchase Requisition form can be deleted provided that the form has not been processed into a purchase order.
4. Filter: Button that functions to display the filter column on the left side of the Purchase Requisition List.
5. Refresh: Button that functions to update the appearance of the Purchase Requisition List in accordance with the last input of data.
6. Print: Button that functions to print the Purchase Requisition List view
7. Find : Column that functions to make it easier for you to find the Purchase Requisition Form that you want to edit, delete, or check. Quick Find is done based on <No> and <Description>.
Purchase Requisition List Column Details:
1. No : Column displaying the Purchase Requisition Form number.
2. Date : Column that displays the date of the Purchase Requisition Form.
3. Description : Column that displays information on the Purchase Requisition Form
Right Mouse Click On Purchase Requisition List
1. New : Create a new Purchase Requisition form
2. Edit : Change or open the view of the highlighted Purchase Requisition Form.
3. Delete : Deletes the view of the highlighted Purchase Requisition Form
4. Filter Ctrl + F : Displays the Filter column to the left of the List
5. Sort by : Sorts the display of the Purchase Requisition list based on column no, date and description.
6. Refresh F5 : Updates the display of the Purchase Requisition list according to the last input of data.
Purchase Order
[Purchase order]
Purchase Order (PO) is a form that you can use to record the activities of ordering goods to Vendors.
The recording of Purchase Order activities has basically not affected the company's financial position. This activity only changes the status of the ordered item to On purchase.
Although basically this activity does not affect the company's financial position, if this activity is accompanied by recording advance payments to vendors, then this activity will automatically affect the company's financial position.
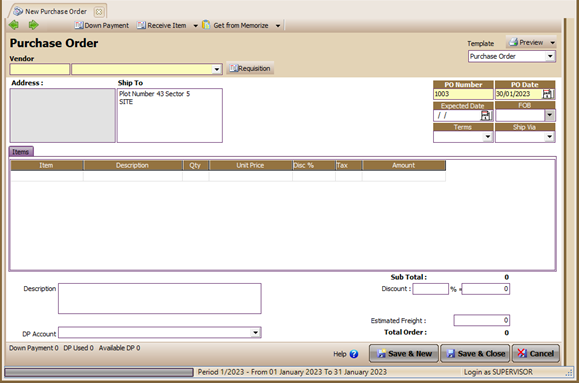
Purchaser Order Form
Buttons on the Purchase Order Form:
1. Previous : Button that functions to view the previous Purchase Order Form display.
2. Next: Button that functions to see the next Purchase Order Form display.
3. Preview: Button that functions to preview the display of the Purchase Order Form next.
4. Printer: A button that functions to print a view of the Purchase Order form on paper.
5. Down Payment: Button that functions to open a Purchase Invoice Form for recording down payment bills from Vendors.
6. Requisition: Button that functions to display a list of Purchase Request Forms that have not been processed into purchase orders.
7. Receive Item: Button that functions to directly create a Receive Item form for an order that you make without leaving the Purchase Order form.
8. Purchase Invoice: A button that functions to directly create a Purchase Invoice form for an order that you make without leaving the Purchase Order form.
9. Copy Transaction: This button functions to copy Transaction orders that have been memorized to new purchase order details.
10.Memorize Transaction: This button functions to save a detailed view of the Purchase Order. So that the order details that have been saved can be copied in the next purchase order.
11.Template : Field that contains the type of form design. In this column you can select the type of form design you want. By default this column displays the Purchase Order template. If you don't have a custom template for this form yet, you can use the default template to print the Purchase Order view you created.
12.Help ? : Button to open the help menu.
13.Save & Close: This button functions to save the view of the Purchase Order Form that you have created as well as close the view of the Purchase Order Form.
14.Save & New: This button functions to save the view of the Purchase Order Form that you have created as well as to open a new view of the Purchase Order Form.
15.Cancel: This button functions to close the Purchase Order Form view or exit the Purchase Order Form without saving.
Columns in the Purchase Order Form:
1. Vendor Column: This field automatically displays a list of vendor names (suppliers) according to the Vendor List that you created earlier. Click the drop down button in this field then select the Vendor name of the item you ordered. If the Vendor you want is not listed in the Vendor List, you can create one directly on this form by clicking <New Vendor>.
2. PO Number Column: In this field you can fill in the Purchase Order Form number according to the numbering in your company.
3. PO Date: In this field you can fill in the date the item was ordered from the Vendor.
4. FOB : In this field there are two options for Terms of Delivery of Goods, namely FOB Shipping Point (Free On Board Shipping Point) dan FOB Destination Point (Free On Board Destination Point).
5. Terms : In this field, you can select payment terms (Terms). Use the drop down button to select the terms of payment (Terms) you want. If it turns out that the list of payment terms (Terms) does not yet exist, you can create one directly from the Purchase Order form by selecting <New Term>
6. Ship Via : In this field you can select the type of shipping that will be used to send the goods you ordered. If you find that the list of shipping types does not exist, you can create one directly from the Purchase Order Form by selecting <New Shipment>.
7. Ship To : In this field you can type the delivery address for the goods to be sent. By default, this field will be filled according to the company address in Setup Company Info, you can change it according to the shipping address you want.
8. Rate : This field automatically appears when you select a Vendor with a Foreign currency. You can fill in this column according to the exchange rate (rate) that was in effect at the time the order was made.
9. Expected Date: In this field you can fill in the estimated date the ordered item will be received.
10.Description : In this column you can type a brief description regarding the purchase order activity that you recorded.
11.DP Account : This field will automatically display accounts with Account Receivable type. In this field you can select the account that you will use to record Purchase Advances.
12.Est. Freight : In this column you can fill in the estimated freight costs that must be borne by the company for these purchasing activities.
13. Freight Account : In this column you can select a Cost Of Good Sold type account which will later be used to record the amount of freight costs that you record (this account will record purchase freight costs when the PO you made has been billed/invoiced).
14.Discount : If % discount is entered in this field, it immediately calculates the amount of discount, but this field can also be filled in manually by typing the number. Usually this manual typing will calculate rounding pieces (difficult to percentage).
15.Total : Automatically calculates Subtotal – Discount + Est Freight. If Option Inclusive Tax above is activated, then VAT is calculated inclusively, meaning that the total includes VAT, then the word [Tax Included] is added behind the total.
Check Box On Purchase Order Form
1. √ Vendor Is Taxable: This option field will be checked automatically, if the supplier (vendor) you choose is a PKP (Tax/VAT for that supplier has already been set).
2. √ Inclusive Tax : Activate this option box if the order price includes VAT in it. This field will appear active if the Vendor is Taxable field above it is active.
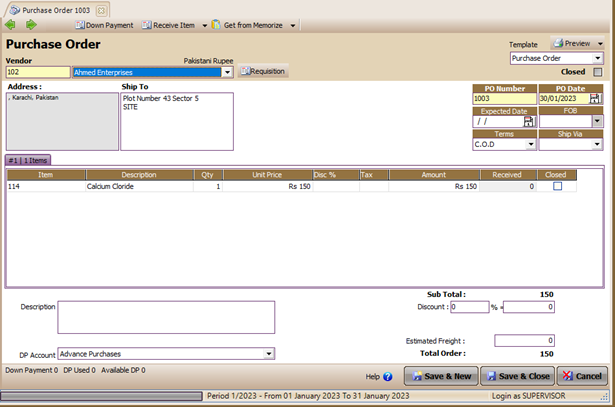
3. √ Closed : If the number of Received columns is equal to or exceeds the quantity ordered, the Closed check box will be checked automatically, this informs that all the items ordered have been received. But if it turns out that there are some items that have not been received, and the items that have not been received will be canceled or you want to cancel the items that you ordered, then you can check this check box manually. Manually checking the Closed check box will change the status of the Purchase Order to Closed.
Detail Table Form Purchase Order
1. Item : In this column select the type of item to be ordered. Use the Ctrl + Enter key combination or click the ellipsis icon to select an item from the list of items.
2. Description : This column automatically displays a description of the item number you selected. You can change the description of the goods in this column with other, more specific information.
3. Qty : In this column you can fill in the number of items ordered.
4. Unit : This column will be filled in automatically with the unit for indicating the quantity of goods. The choice of unit type can consist of more than one by activating the Multi Unit feature in Preferences.
5. Unit Price: In this column you can fill in the order price per unit of goods
6. Disc % : In this column you can fill in discount item items
7. Tax : In this column you can fill in the VAT tax code
8. Amount : This column will be automatically filled with the Qty value of the item ordered multiplied by the unit price.
9. Received : This column displays the number of items that have been received.
10.Closed : This column will be checked automatically if the Purchase Order that you created has been processed in a receive item transaction or purchase invoice.
CREATE A PURCHASE ORDER FORM
You can record Purchase Order Activities to Vendors on the Purchase Order Form by following the instructions below:
1. Open a new Purchase Order Form by clicking on the main menu Activities – Purchase – Purchase Order.
2. On the display of the Purchase Order form, fill in the Vendor's name, Order date, PO number, and details of the item to be ordered.
3. After all the order information has been entered by you on the Purchase Order form, you can save and close the form by clicking the Save & Close button
CREATE A PURCHASE ORDER FORM WITH PURCHASE ADVANCES
To record a purchase order accompanied by an advance payment to the Vendor/supplier can be done by:
1. Open a new Purchase Order Form by clicking on the main menu Activities – Purchase – Purchase Order;
2. On the display of the Purchase Order form, fill in the Vendor's name, Order date, PO number and details of the item to be ordered to the Vendor;
3. After you have finished entering the order information, make sure the DP Account column has been filled in with the purchase down payment account (account receivable account type), the next step is to CLICK the Down Payment button found in the header of the Purchase Order form. Pay attention when you CLICK the Down Payment button, LEVERAGE will automatically display the Purchase Invoice form.
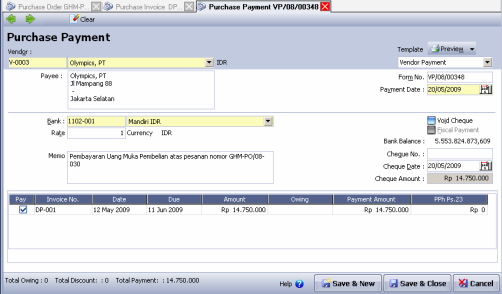
4. Pay attention, the details of the Purchase Invoice form automatically display Down Payment items with a unit price equal to the total Order that you made. Change the value of the unit price in accordance with the amount of the purchase advance that you paid to the Vendor, then click the Recalc button then click the Pay Vendor button to record the cash/bank disbursement for the purchase advance payment on the Purchase Payment form.
5. Click the Save & Close button.
6. For more details, consider the following picture:
Make sure the DP Account column is correctly displaying Advance Account Purchase
When you click the Down Payment button, LEVERAGE will automatically display a Purchase Invoice Form like the form below:
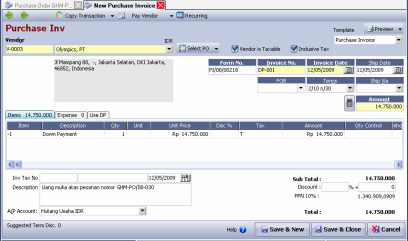
Change the value in the column Unit Price accordingly down payment that you pay for
Choose the name of the cash or bank paying the down payment
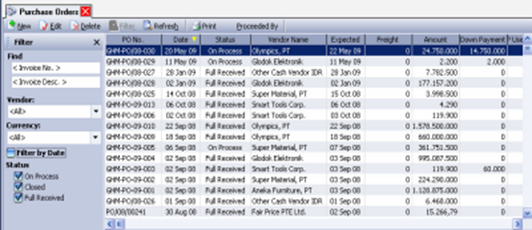
The display of the Purchase Order list is divided into several sections:
1. Menu button on the Purchase Order List, consisting of:
a. New : This button functions to create a Purchase Order Form (Purchase Order) the new one.
b. Edit: This button functions to open a highlighted view of the Purchase Order
Form, so you can edit/modify the contents of the form. Or Open the form just to
Check just. Purchase Order view editing can be done with the record of the
form yet processed on the Received Item Form or Form Purchase Invoice.
c. Delete : This button functions to delete the highlighted Purchase Order Form.
Form Deletion Purchase Order can be done with a note form has not been
processed on the Received Item Form or Purchase Invoice Form.
d. Filter: Button that functions to display the filter column on the left side of the
Purchase Order List view .With Filter, you can show Purchase List Order by date
filter, currency filter, filter vendor name and by status filter.
e. Find : Serves to make it easier for you to find the Purchase Order Form that
you want to edit, delete or check. Form searches are performed based on
<Invoice No> and based on <Invoice Desc>.
f. Refresh: This button functions to update the display of the Purchase Order
List according to the data input final.
g. Print: This button functions to print a Purchase Order List.
h. Proceeded by: This button functions to display activities that have processed
the highlighted form. In this case, there are two activities in question, namely
Activity Received Items and Purchase Invoice Activities.
2. Purchase Order List Details, consisting of:
a. PO No : This column displays the number of the Purchase Order Form that
has been created.
b. Date : This column displays the date the Purchase Order Form was created.
c. Status : This column displays the status of the Purchase Order Form. This list contains three statuses Purchase Order Form (Purchase Orders), namely:
• On Process : Forms with On Process status are order forms where the goods ordered have not been accepted or already accepted but only a portion of the total order.
• Closed : A form with status Closed is an order form where the ordered item is cancelled
wholly or partially.
• Full Received : A form with Full Received status is an order form in which all items are received order has been received.
d. Vendor Name : This column displays the name of the Vendor (Supplier).
e. Expected : Column that displays the expected date of receipt of goods.
f. Freight : Column that displays the estimated freight costs .
g. Amount : This column displays the amount of the order value.
h. Deposit : This column displays the amount of advance that has been paid from the highlighted Purchase Order.
i. Deposit Used : This column displays the deposit amount from the highlighted Purchase Order that has been used for Reduce Purchase Invoice payable.
j. Description : This column displays the information you typed on the Purchase Order Form.
k. Currency : This column displays information on the currency of the goods vendor.
3. Click Mouse Right
a. New : To create a new PO.
b. Edit : Opens (changes) the highlighted (active) PO
c. Delete : Deletes the highlighted PO. Highlighted POs can be deleted provided they have not been processed be RI or PI.
d. Filter Ctrl + F : Button that functions to display the filter column on the left side of the Purchase Order List view. With Filter, you can show Purchase List Order by date filter, currency filter, filter vendor name and by status filter.
e. Sort by: Selection of the order in ascending (click once) or in descending (click again), based on the column headings provided.
f. Proceeded by: This button functions to display activities that have processed the highlighted form. In this case there are two activities in question, namely Received Activities Purchase Invoice Items and Activities.
Receive Item
[Goods receipt]
When you order goods from a vendor/supplier, there are times when the vendor/supplier first sends the goods you ordered, while the bill will be sent after the goods ordered arrive at your Warehouse. In this condition, you should be able to record an increase in inventory, but one problem arises, namely the uncertainty of the value of the goods you received and the amount owed for receiving the goods because you still have to wait for invoices from vendors/suppliers.
So that you can immediately record the activities of receiving goods from vendors without having to wait for bills from vendors, LEVERAGE provides a special form in the purchasing module, namely the Received Item form.
By using the Received Item Form, you can freely record receipt of goods from vendors (DO vendors) without having to wait for bills from vendors.
The Received Item Form can be opened by:
Click the main menu Activities – Purchase – Received Item (Activity – Purchase – Receive Goods); Or it can be opened by clicking the Purchase button on the Explorer menu;
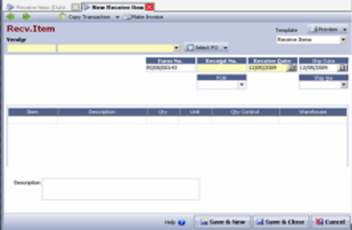
Received Item Form
Buttons On Receive Item Form
1. Previous : Button that functions to open the previous Receive Item form view.
2. Next: Button that functions to open the next Receive Item form display.
3. Preview: Button that functions to preview the printout of the Receive Item Form on the monitor screen before it is printed on paper.
4. Print: Button that functions to print the View of the Receive Item Form on paper.
5. Select PO: The function button displays a list of Purchase Orders with On process status for the Vendor you choose.
6. Copy Transaction: This button functions to copy Transactions of the Receive Item form from Memorized Transactions that have been saved.
7. Memorize Transaction: This button functions to save the details of the Receive Item form, where the details that have been memorized can be copied to the next Receive Item Form.
8. Make Invoice: This button functions to directly create invoices (invoices) from the activity of receiving goods that you record without having to leave the Receive Item form view.
9. Template : In this column you can choose the type of form design you want. You can set the type of form design from the main menu Setup – Form Template.
10.Save & New: This button functions to save the goods receipt form that appears as well as to open a new goods receipt form display.
11.Save & Close: This button functions to save the goods receipt form that appears as well as to close the goods receipt form display (exit the goods receipt activity).
Columns on the Receive Item Form
1. Form No : Serial number of the Received Item form
2. Warehouse : In this column you can choose the name of the Warehouse where the goods received will be stored. By default LEVERAGE has provided a Warehouse name, namely Centre, you can change this Warehouse name according to your Warehouse name from the List-Inventory menu
Warehouses. You can also directly add a new Warehouse name from this Form by selecting <New Warehouse>.
3. Vendor : This field automatically displays a list of vendor names (suppliers) according to the Vendor List that you created earlier. Click the drop down button in this field then select the Vendor name of the item you ordered. If the Vendor you want is not listed in the Vendor List, you can create one directly on this form by clicking <New Vendor>.
4. Receipt No : In this column you can fill in the number of the travel document that you received from the Vendor.
5. FOB : In this field there are two options for Terms of Delivery of Goods, namely FOB Shipping Point (Free On Board Shipping Point) dan FOB Destination Point (Free On Board Destination Point). If your goods receipt form is based on a PO (Select PO), then this field will be filled in automatically according to what you filled in on the Purchase Order (PO) form display.
6. Receive Date : You can fill in this column with the date according to the date the goods were received from the vendor (the date the goods arrived at your Warehouse).
7. Ship Date : You can fill in this field according to the date of the Delivery Order Form that you received from the Vendor.
8. Ship Via: If your goods receipt form is based on a goods order form (PO), this field will automatically be filled in according to the Ship Via information contained in the goods order form (PO). If you do not fill in the Ship Via information on the form, then you can fill in the information directly in the field by selecting the type of goods delivery used by the vendor to send the goods you receive. If it turns out that the list of shipping types does not yet exist, You can create it directly from this Form by selecting <New Shipment>
9. Description: In this column you can type a brief description regarding the activity of receiving goods that you recorded.
Details of the Receive Item Form Table
1. Item : If the goods receipt form that you recorded was made based on a Purchase Order that you previously made, then you can fill in the details of the item you received by clicking the Select PO button located in the header of the form. If the goods receipt form that you record is not based on a Purchase Order, then to fill in the item field you can directly type the item number that you received in the item field or you can select an item from the item list by using the Ctrl + Enter key combination (double click on the item field ) or by clicking the ellipsis icon.
2. Description : This column will automatically display a description of the item number you select in the item field. You can change or add item descriptions in this column manually by typing the description you want in that column.
3. Qty : In this column you can type the number of items you receive from the Vendor. If your goods receipt form is recorded based on a Purchase Order (Select PO), then this column will automatically display the number of items you ordered, if the quantity received is less than the amount you ordered or vice versa then you can edit the amount in this column according to the amount the actual goods you receive from the Vendor.
4. Unit : This column will be filled in automatically with the unit for indicating the quantity of goods. The choice of unit type can consist of more than one by activating the Multi Unit feature in Preferences.
5. Department: In this column you can select the number of the department related to the activity of receiving goods that you record if necessary.
6. Project: In this column you can select a project number related to the activity of receiving goods that you record if necessary.
7. SN : This column will display the serial number of the item you selected.
8. P.O. No. : If the goods receipt form that you recorded was made based on a purchase order (Select PO), this column will automatically display information on the purchase order number that you selected.
Receive Item List
All receipt of goods transactions that you have recorded will be recapitulated in a list which can be accessed by:
Click the main menu List – Purchase - Receive Items.
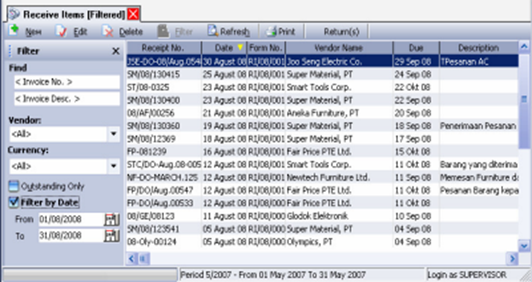
The Goods Receipt List displays information divided into several groups:
1. Menu button on Goods Receipt List
a. New: Button that functions to open a new Goods Receipt form.
b. Edit: This button functions to open the Goods Receipt Form view (Receive Item) that is highlighted, so you can edit/modify the contents of the form. Or open the form to just check it. Editing the Receive Item display can be done with a note that the form has not been processed on the Purchase Invoice Form.
c. Delete: This button functions to delete the Goods Receipt form (Receive Item) is highlighted. The Receive Item form can be deleted provided that the form has not been processed on the Purchase Invoice Form.
d. Filter: Button that functions to display the filter column on the left side of the Purchase Order List view. With Filter, you can display Purchase Order List by date filter, currency filter, vendor name filter and by status filter.
e. Refresh: This button functions to update the Receive Item List display according to the last input of data.
f. Print: This button functions to print the Goods Receipt List (List Of Receive Item).
g. Return(s): This button functions to display a table containing information on the return form list for the Receive Item.
h. Find : Serves to make it easier for you to find the Goods Receipt Form (Receive Item) that you want to edit, delete or check. Form search is performed based on.
2. Details of Goods Acceptance List
a. Receipt No : Passport number Vendor (Receipt No)
b. Date: Date of receipt of goods
c. Form No : Sequential number of goods receipt form d. Vendor Name: The name of the vendor sending the goods
e. Due: The due date is in accordance with the agreed payment terms.
f. Description : Information that you type on the Receive Item form.
3. Right Mouse Click on Goods Receiving List
a. New : Create a new Receipt Item Form
b. Edit : Opens/modifies the highlighted Receive Item Form.
c. Delete : Deletes the highlighted Receive Item Form.
d. Outstanding Only: The Goods Receipt List only displays the Goods Receipt form (Receive Items) that have not been invoiced only (unprocessed become Purchase Invoice).
e. Sort by: Choice of sequence in ascending (click once) or in descending (click once more), based on the title column provided.
f. Filter: Button that functions to display the filter column on the left side of the Acceptance List view Goods. With this filter, you can display Goods Receipt List (Receive Item) based on: Vendor name filter, status filter, and form date filter.
g. Refresh: update the display of the Receive Item List according to the last input of data.
h. Vendor : Open detailed information regarding the vendor from the Receive Item Form highlighted.
i. Return (s) : Displays a table containing information listing the return form from the Goods Receipt Form (Receive Item) is highlighted.
Purchase Invoice
Purchase Invoice/Purchase Invoice (PI) is a form used to record invoices sent by vendors/suppliers for items that you have purchased/received items. If the vendor/supplier sends the goods you bought together with the invoice, you can immediately record these activities using the Purchase Invoice form without having to make a Receive Item form first.
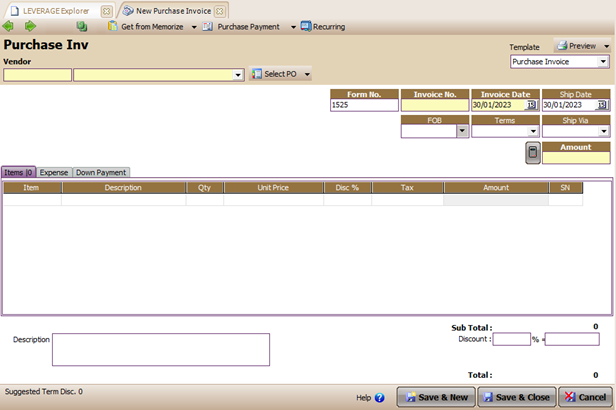
Purchase Invoice form
 Buttons on the Purchase Invoice Form:
1. Previous : Opens the view of the previous Purchase Invoice Form.
2. Next : Opens the next (next) Purchase Invoice Form view.
3. Preview : View the appearance of the Purchase Invoice Form on the monitor screen before it is printed on paper.
4. Print: Print the Purchase Invoice Form on paper.
5. Select PO : Displays a list of Purchase Order Forms that have not been processed for the selected Vendor.
6. Select RI : Displays a list of Goods Receipt Forms that have not been invoiced for the selected Vendor.
7. Copy Transaction: Copy Transaction orders that have been memorized to the new purchase order details
8. Memorize Transaction : Save the details of the Receive Item form, where the details that have been memorized can be copied to the next Receive Item Form.
9. Recurring: Create a Reminder that the purchase transaction that you recorded is a recurring transaction.
10. Template : This column displays a choice of the type of form design that you can use when printing the Purchase Invoice form. You can add and change the choice of form design type from the Setup | menu Form Templates.
11.Save & New: This button functions to save the Purchase Invoice Form that appears and simultaneously opens a new Purchase Invoice Form view.
12.Save & Close: This button functions to save the Purchase Invoice Form that appears and at the same time closes the Purchase Invoice view.
13.Help ? : Button to open the help menu.
14.Cancel: This button functions to close the display of the Purchase Invoice Form or exit the Purchase Invoice Form without saving it first.
Columns on the Purchase Invoice Form
1. Form No : Serial number of the purchase form (purchase voucher number) according to your company number.
2. A/P Account: This field contains a payable account that will be used to record purchase transactions on the Purchase form invoices. This field will be displayed on the Purchase Invoice form if in your account list there is more than one account with the account payable type with the same currency, so you can choose the account to use.
3. Warehouse : Field to determine the Warehouse where the goods you buy will be stored. If the Warehouse name you want has not been recorded in the Warehouse list, then you can directly add the Warehouse from this form by clicking the <New Warehouse> button.
4. Vendor : Enter the Vendor name of the item you purchased. If the Vendor name you want has not been recorded in the vendor list, then you can directly add the Vendor name from the Purchase Invoice form by clicking the <New Vendor>button.
5. Vendor DO No: Delivery Order Number (travel letter) from Vendor. If you record the Purchase Invoice form based on the Goods Receipt activity that you previously recorded, then this column will automatically display a letter of passage from the Vendor for receipt of the goods.
6. Invoice No: Billing number from the Vendor according to the Sales Invoice you received from the Vendor.
7. Invoice Date: Vendor billing date according to the Sales Invoice you received from the Vendor.
8. Ship Date: Date of delivery of goods. If you have previously recorded goods receipt activities, then this column will automatically be filled in according to the ship date contained in the goods receipt form that you previously recorded (Create PI by selecting RI).
9. Rate : Rate against the Vendor's currency exchange rate. If the vendor uses the base currency rate, it will automatically display an exchange rate of 1.
10.FOB : In this column there are two options for Terms of Delivery of Goods, namely FOB Shipping Point (Free On Board Shipping Point) dan FOB Destination Point (Free On Board Destination Point).
11.Term : This field will display the choice of Payment Terms according to what was previously made. If you find that you haven't made a list of payment terms, then you can make one directly from this form by clicking <New Term>.
12.Ship Via : Choice of shipping type used to deliver the goods you buy. If the type of shipment you want is not available, you can add it directly from this form by clicking <New Shipment>
13.Amount: The amount of the bill that you receive is in accordance with the Vendor Bill. Or fill in this column by clicking the Recalc button available on the Purchase Invoice form.
Check Box On Purchase Invoice Form
1. √ Vendor Is Taxable: Activate this field option box if the Vendor of the goods purchased is a PKP and the purchase made is subject to tax. The default will be active if in the Vendor entry data (List|Vendor) in the Purchase Tax section.
2. √ Inclusive Tax : If the purchase price of the goods that you record on the Purchase Invoice form includes tax, then you can activate this field option box.
Item Table Details on the Purchase Invoice Form
1. Item : If you created the Purchase Invoice form based on a Purchase Order, then to fill in item details you can click the Select PO button. If you created a Purchase Invoice form based on Goods Receipt, then to fill in item details you can click the Select RI button. If the Purchase Invoice form you created is not based on a Purchase Order or Goods Receipt, then to fill in the item column you can do it directly by typing the number of the item you purchased, or to select an item number from the list of items you can do by double clicking in the item column or using the Ctrl + Enter key combination or by clicking the ellipsis button in the column.
2. Description : This column will automatically display a description of the item number you selected. You can change the description of the item in this column according to what you want by typing directly the description you want in this column.
3. Qty : Fill in the quantity of goods that you buy according to the invoice that you receive from the Vendor.
4. Unit : This column will be filled in automatically with the unit for indicating the quantity of goods. The choice of unit type can consist of more than one by activating the Multi Unit feature in Preferences.
5. Unit Price: The value per unit quantity of the item you buy is in accordance with the invoice you receive from the Vendor.
6. Disc % : In this column you can fill in the per-item discount given by the Vendor for the purchase activity that you have made.
7. Tax : In this column you can enter a tax code if the purchase activity is subject to VAT.
8. Amount : This column will automatically display the nominal which is the result of calculating Qty x Unit Price – Disc%.
9. Department : In this column you can select the Department number associated with the Purchase Invoice that you recorded if necessary.
10.Project : In this column you can select the Project number associated with the Purchase Invoice that you recorded if necessary.
11.SN : Enter the Serial Number of the item purchased in this column.
Expense Table Details on the Purchase Invoice Form
1. Account No : Enter the Account number that will accommodate the expenses for this purchase, by typing directly or using the ellipsis button to select it from the Account List.
2. Account Name : This column will automatically display a description of the account number you selected.
3. Amount: In this column you can enter the nominal value recorded in the account you choose.
4. Notes: In this column you can type a short note regarding the account recording that you are doing.
5. Department: In this column you can enter the Department number associated with the Activity you are recording if necessary.
6. Project : In this column you can fill in the Project number associated with the Activity that you recorded if necessary.
7. Apply to Items : You can tick this column, if the nominal value of the account you record will be allocated to add to the acquisition value of the items (goods) you buy.
8. To Other Vendor : This column is to enter other Vendors who charge other fees for this purchase.
Detail Table Use DP
The Use DP table details will display information on the down payment for your order to the Vendor. If you make a Purchase Invoice based on a purchase order (Select PO) where the purchase order is accompanied by a recording of a purchase advance, then this Use DP detail table will automatically display information on a purchase advance in accordance with the input of the Purchase Advance that you have made at the time of recording purchase order through the Purchase Order (PO) Form. The following is a detailed explanation of the use DP table:
1. Description : This column automatically displays a description of item no -1, namely items with the type of non-inventory part used to record transaction of down payment (Down Payment) on Purchase Order form. You can change the description in the Description column according to the description you want by clicking the F2 button in the column and then typing the description you want.
2. Tax: If the purchase order that records this down payment is subject to VAT, the Tax column will automatically display the VAT code.
3. Total DP: The Total DP column shows the amount of down payment that you have paid to the Vendor.
4. Invoice No: This column displays the Purchase Invoice number which records the acknowledgment of the purchase advance.
5. PO No : This column displays the Purchase Order number which records the acknowledgment of the purchase advance.
6. Inclusive Tax : If the purchase order activity that records the down payment is a purchase order with the price per unit including tax (inclusive tax), then this column will automatically be filled with the statement YES.
Other Information on the Purchase Invoice Form
1. Sub Total: The sum of the amount in the detailed item table + detailed expense table.
2. Inv Tax No : In this column you can fill in the information on the serial number of the tax invoice according to the standard tax invoice numbering that you receive from the Vendor (Supplier).
3. Description : In this column you can type a brief description regarding the Purchase Invoice that you recorded.
4. Discount : Consists of two fields in the form of percent discount and discount amount.
5. Purchase Tax: The tax value of the purchase will automatically appear if the Vendor and the goods purchased have set the tax code on this purchase.
6. Total : This field will automatically display the total value of your purchase to the Vendor.
CREATE A PURCHASE INVOICE FORM
You can record the bill that you receive for purchasing Goods from Vendors by following these instructions:
1. Open a new Purchase Invoice Form by clicking on the main menu Activities – Purchase – Purchase Invoice (Activity – Purchase – Purchase Invoice)
2. On the Purchase Invoice display, fill in the vendor name, vendor invoice date, and details of the items you purchased.
3. After all the order information has been entered by you on the Purchase Invoice form, you can save and close the form by clicking the Save & Close button.
List of Purchase Invoices
All Purchase Invoice forms that you have created will be recapitulated (summarized) in a Purchase Invoice List table. You can open a list of Purchase Invoices by clicking on the main menu List – Purchase – Purchase Invoice.
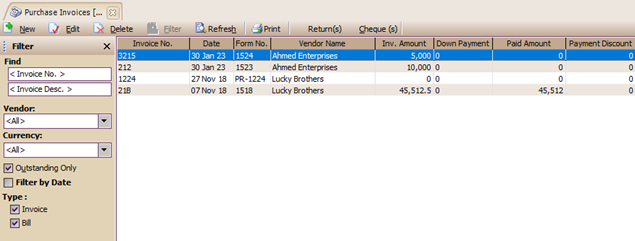
The Purchase Invoice list displays information that is divided into several groups:
1. Purchase Invoice menu button
a. New : A button that works to create a new Purchase Invoice (PI).
b. Edit : The button that functions to open and change the PI that is currently highlighted.
c. Delete : The button that functions to delete the highlighted PI. The PI form can be deleted provided that the PI has not been processed into a purchase return or Purchase Payment
d. Filter: Button that functions to filter the Purchase Invoice list view based on Vendor, Currency, Outstanding Invoice, and Filter by Date.
e. Refresh: Button that functions to update (refresh) the display of the Purchase Invoice list according to the last Purchase Invoice input.
f. Print: This button functions to print the Purchase Invoice List display on the monitor screen before printing it on paper. To print this view on paper, you can click the Print button which is in the preview view of the Purchase Invoice List.
g. Return(s) : This button functions to display a table that lists the Purchase Return Form associated with the highlighted Purchase Inovice Form. To see the return display from the highlighted Purchase Invoice Form, you can simply click on the Purchase Return line in the Return table.
h. Check(s): This button functions to display a table that lists the Purchase Payment Form associated with the highlighted Purchase Invoice Form. To see the Purchase Payment display from the highlighted Purchase Invoice Form, you can simply click on the Purchase Payment line in the Purchase Payment table.
i. Find : This field functions to make it easier for you to find the Purchase Invoice that you want to delete or edit. Quick search is performed based on <Invoice No> or <Invoice Desc>
j. Filter : You can filter the Purchase Invoice list view based on the filter options as follows:
Ø Vendor : Filter Purchase Invoice list view based on Vendor name.
Ø Currency : Filter Purchase Invoice list view based on Currency name.
Ø Outstanding Only: If this option is checked, the Purchase Invoice list display will only display Purchase Invoice Forms that are still not paid off, while Invoices that have already been paid are not displayed. If you want to display all paid or unpaid Purchase Invoice Forms, you can uncheck this option.
Ø Filter by Date: With a date filter you can display the Purchase Invoice Form on the Purchase Invoice list according to the date period you want.
Ø Type: Purchase Invoice list type filter consists of two types, namely Invoice and Bill. Filter Invoice only displays List of Purchase Invoices that do not originate from Receive Item activity while Filter Bill only displays a List of Purchase Invoices that originate from Receive Item activity. If you want to display all Purchase Invoice Lists, both Invoice and Bill types, then you can check both types of options.
2. Purchase Invoice List Detail
a. Invoice No: Details of this column displays information on the Billing Number from the Vendor, which is the number you fill in the Invoice No field on the Purchase Invoice form.
b. Date : Details of this column displays information on the Purchase Invoice date.
c. Form No: Details of this column displays information on the order number of the Purchase Invoice Form, which is the number that you fill in the Form No field found on the Purchase Invoice form.
d. Vendor Name : Details of this column displays information on the name of the Vendor
e. Inv. Amount : Details of this column displays the Purchase Total information contained in the total field of the Purchase Invoice Form.
f. Down Payment: Details of this column displays information on Purchase Down Payment from Purchase Invoice with a note that you made a Purchase Invoice based on a Purchase Order that has a Purchase Down Payment.
g. Paid Amount: Details of this column displays information on the amount of payment that you have paid to the Vendor, where you record the payment via the Purchase Payment form.
h. Payment Disc: This column details displays information on the amount of payment discount you received from the Vendor. This payment discount is recorded on the Purchase Payment form by using the info discount facility.
i. Sales Tax: Details of this column displays Sales Tax information that you deduct from the Vendor's invoice thereby reducing the amount of your payment to the Vendor.
j. Return : Details of this column displays information on the number of returns that you have made to Vendors.
k. Outstanding : Details of this column displays information on the outstanding amount of the Purchase Invoice.
l. Due: Details of this column displays information on the payment due date of the outstanding Purchase Invoice.
m. Description: Details of this column displays the Purchase Invoice description.
3. Click the Right Mouse on the Purchase Invoice List
a. New : Create a New Purchase Invoice
b. Edit : Opens the highlighted Purchase Invoice view, so you can change (edit) the contents of the Purchase Invoice view. Change (Edit) the contents of the Purchase Invoice can only be done if the Purchase Invoice has not been processed by the Purchase Payment activity (Purchase Payment).
c. Delete : Deletes the highlighted Purchase Invoice view. Purchase Invoice deletion can only be done if the Purchase Invoice has not been processed by the Purchase Payment activity or Purchase Return activity (Purchase Return).
d. Outstanding Only : Only displays Purchase Invoices that are still not paid off.
e. Sort by : Displays a list of Purchase Invoices based on the column headings listed in the Purchase Invoice list details.
f. Filter: Displays the Filter column located on the left side of the Purchase Invoice list.
g. Refresh: Update (Refresh) the Purchase Invoice list view according to the last data that has been input.
h. Vendor : Displays the vendor identity data from the highlighted Purchase Invoice.
i. Check (s) : Displays a list of payments that you have recorded on the highlighted Purchase Invoice line.
j. Return (s) : Displays a list of purchase returns for the highlighted Purchase Invoice.
Purchase Return
After the company receives the ordered goods along with the receipt from the vendor/supplier, the company will usually match the goods receipt with the Purchase Order (PO) that was made before, after which the company will check the condition of the goods received. If it turns out that the goods received are damaged or of poor quality, the company can submit a purchase return (debit memo), of course, after an agreement has been made with the vendor/supplier.
To record purchase return activities, LEVERAGE provides a special form, namely the Purchase Return form.
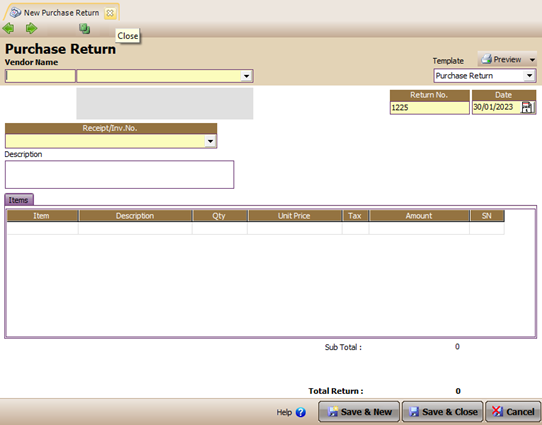
Display Purchase Return Form
Buttons on the Purchase Return Form
1. Previous : This button functions to open the view of the previous Purchase Return form.
2. Next : This button functions to open the display of the next Purchase Return form.
3. Preview : This button functions to preview the appearance of the printed Purchase Return form on the monitor screen before you print it on paper.
4. Template : Column that displays the choice of Purchase Return form template type.
5. Save & New: This button functions to save the Purchase Invoice Form that appears and at the same time opens a new Purchase Return Form view.
6. Save & Close: This button functions to save the Purchase Return Form that appears and at the same time closes the display of the Purchase Return form.
7. Help? : Button to open the help menu. Check Box On Purchase Return Form
1. √ Vendor Is Taxable : This field option box will automatically be active and checked automatically if the invoice you return is subject to VAT.
2. √ Inclusive Tax : This field option box will be active if the Vendor is taxable option box is checked. If this option box is checked, it means that the value of the goods you are returning includes VAT.
Columns on the Purchase Return Form
1. Vendor Name : In this column, you can choose the name of the Vendor of the item you want to return.
2. Receipt/Inv. No. : In this column, you can select the Purchase Invoice number or the Receive Item number that you are returning.
3. Rate : Automatically displays the exchange rate of the Purchase Invoice that you return.
4. Return No : In this column, you can fill in the Purchase Return form number according to the numbering format that applies to your company. The default of this number is to add one number from the last entered form number.
5. Date : In this column you can fill in the Purchase Return date. By default this column displays the same date as your computer's date.
6. Fiscal Rate : Automatically filled in the same as the Purchase Invoice display that you return.
7. Fiscal Date : Automatically filled in the same as the appearance of the Purchase Invoice that you return.
Item Table Details on the Purchase Return Form
1. Item : This column displays the number of the item you are returning. You can select the items you want to return from this column if the Purchase Invoice for the item you are returning cannot be traced (the invoice is not recorded in LEVERAGE). To be able to perform zero invoice return activities, you can select items from this column, by first activating the Can Enter Any Item In Purchase Return option from the Setup – Preference – Purchase main menu.
2. Description : Double click on this column, to fill in the details of the item you will return, if the invoice you are returning is in LEVERAGE. Selecting an item from this column will automatically display the items in accordance with the Purchase Invoice/Receive Item that you returned along with information on the quantity and unit price.
3. Qty : In this column you can fill in the quantity of the goods you are returning.
4. Unit : This column will be filled in automatically with the unit for indicating the quantity of goods. The choice of unit type can consist of more than one by activating the Multi Unit feature in Preferences.
5. Unit Price: If you select the item to be returned from the Description column, this column will automatically be filled in with the purchase price that corresponds to the purchase price on the Purchase Invoice Form that you are returning.
6. Tax : If the Purchase Invoice Form that you return has a tax code (the invoice is subject to tax), then this column will automatically displays the same tax code (VAT) as it appears on the display of the returned Purchase Invoice Form.
7. Amount : This column automatically displays the total value of the item you are returning.
8. Dept : In this column you can select the Department number associated with the purchase return activity that you record if needed.
9. Project : In this column you can select the Project number associated with the purchase return activity that you record if needed.
10. Warehouse : This column will automatically display the name of the Warehouse that is the same as the Warehouse on the Purchase Invoice/Receive Item Form that you return.
11. Sub Total : The sum of the amount in the table of contents (details) of the purchase return form.
HOW TO MAKE A PURCHASE RETURN FORM
You can record the activity of returning goods to Vendors on the Purchase Return Form by following these instructions:
1. Open a new Purchase Return Form by clicking on the main menu Activities - Purchase – Purchase Return.
2. On the display of the Purchase Return form, fill in the name of the vendor of the goods you are returning, then fill in the date of return of goods, and the number of
the return form.
3. In the Invoice/Receipt No field, select the invoice number or goods receipt number for the item you are returning.
4. Look at the following picture to fill in the details of the item being returned:
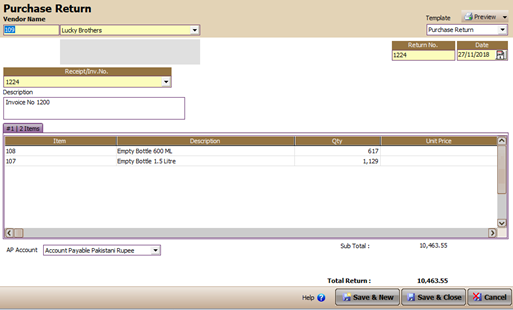
1. Choose a name vendors from item you return
2. Fill in the return number and date
3. Select the Receipt or Invoice number of the returned item.
4. Double click on the description column to displays the item details of the invoice you selected. Then click the returned item
5. Click Yes if you want the whole quantity is deserved item you select or Click No if you just want just partially
5. After you fill in the details of the items to be returned, the next step is to click the Save & Close button to save the activities that you have created as well as to close the Purchase Return form display.
List of Purchase Return
All Purchase Return Forms that you have created will be stored in a list (table) called Purchase Return List.
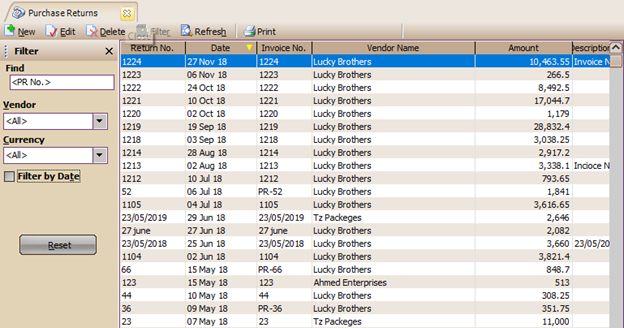
The Purchase Return list displays information that is divided into several groups:
1. Menu button on the Purchase Return List
a. New : Create a new Purchase Return Form.
b. Edit : Opens a highlighted view of the Purchase Return Form, so you can make edits to the Purchase Form.
c. Filter : Filter Purchase Return list view based on Vendor, Currency, and Filter by Date.
d. Refresh : Update (refresh) the display of the Purchase Return List according to the input of the last Purchase Return activity.
e. Print : Prints the Purchase Return List on the monitor screen before it is printed on paper. To print a Purchase Return List on paper, you can do this by clicking the Print button in the preview view of the Purchase Return List.
f. Find : Makes it easier for you to find the Purchase Return Form that you want to Edit or Delete. A quick search of the Purchase Return Form through this field is carried out based on the return number: <PR No>.
2. Purchase Return List Detail
a. Filter : You can filter the Purchase Return list view based on filter options as follows:
• Vendor : Filter the Purchase Return list view based on the name of the Vendor you want.
• Currency : Filter the Purchase Return list view based on the name of the Currency you want.
• Filter by Date : With date filter you can display Purchase Invoice Form on list Purchase Return in accordance with the date period You want.
b. Return No : Form Number Purchase Return.
c. Date: Purchase return date.
d. Invoice No: Number of Purchase Invoice / Receive Item that is returned.
e. Vendor Name : Vendor name of the Purchase Invoice/Receive Item being returned.
f. Amount : Amount (total) return.
g. Description : Information contained in the Purchase Return Form.
3. Right Mouse Click on the Purchase Return Form
a. New : Create a new Purchase Return Form.
b. Edit : Replaces (changes) the contents of the highlighted Purchase Return Form.
c. Delete : Deletes the highlighted Purchase Return Form.
d. Filter : Displays the Filter column to the left of the Purchase Return List
e. Sort By: Sorts the display of the Purchase Return List based on the column title names contained in the Purchase Return List.
f. Refresh: Updates the appearance of the Purchase Return List in accordance with the input of the last purchase return activity.
Purchase Payment
The Purchase Payment form is one of the forms available in the purchase module at LEVERAGE. This form serves to record debt payment transactions for the purchase of goods to vendors that are recorded through the Purchase Invoice Form. Apart from recording debt payments to Vendors, this form also functions to record cash/bank disbursements for purchase advance payments to Vendors.
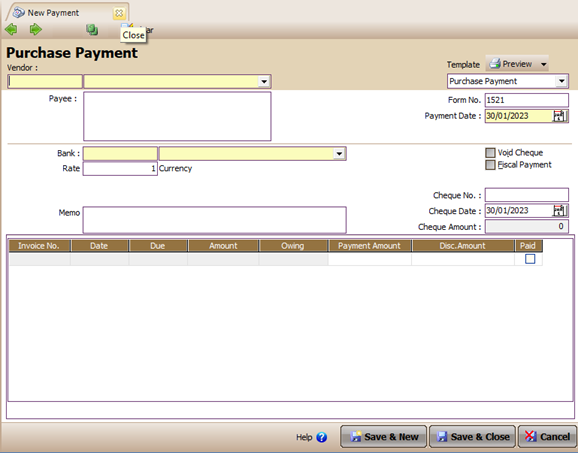
Purchase Payment Form
Buttons on the Purchase Payment Form
1. Previous : View the display of the Purchase Payment form that you made earlier.
2. Next: View the display of the next Purchase Payment form.
3. Preview : View the appearance of the printed Purchase Payment form on the monitor screen before it is printed on paper.
4. Printer: Prints the view of the Purchase Payment form.
5. Sales Tax: Prints the display of deducted sales tax.
6. Clear: Cancels all invoices that you want to pay on the Purchase Payment form (removes the checkmark in the Pay column for the invoices that you want to pay).
7. Template: Choice of the type of Purchase Payment form design you want.
8. Save & New : To save the Purchase Payment form that appears and simultaneously open a new Purchase Payment form view.
9.Save & Close : To save the Purchase Payment form that appears while simultaneously closing the Purchase Payment form display and exiting the Purchase Payment recording activity.
Column - column on the Purchase Payment Form
1. Vendor: Choose the Vendor name according to the list of vendors that you have. In this column you can select the name of the Vendor from the invoice that you will pay off.
2. Payee : Information on the name of the payee you made.
3. Form No: Voucher Number for your Cash/Bank disbursement.
4. Payment Date: Payment date.
5. Bank: Choice of cash and bank accounts according to the list of accounts you have. In this column you can select the cash or bank account that you use to record your cash/bank disbursements for payments to Vendors.
6. Rate: Exchange rate at the time of payment in accordance with the currency of the Vendor concerned.
7. Dept: Name of the Department related to payment activities to Vendors if necessary.
8. Memo: A brief description regarding the payment activity that you are doing.
9. Void Check : You can activate this option box if you want to cancel the check for the payment you have made. The Void Check activity will automatically cancel the payment transaction, provided that you can still track the number and memo from the check in your Bank Book.
10.Fiscal Payment : You can activate this option box, if the payment activity you are making is a fiscal payment (Purchase VAT) to Vendors in foreign currency.
11.Check No: The number of the check that you used to pay the outstanding invoice.
12. Check Date: Date of liquidation of the check that you use in payment. The check date will be used as the basis for recording purchase transactions in the journal.
13. Check Amount : Total payment (Payment Amount) of the outstanding invoice that you pay.
Invoice Table Details on the Purchase Payment Form
The detail section of the PI table on the Purchase Payment form displays a list of outstanding Purchase Invoices. If you want to pay off the total outstanding from the Purchase Invoice, you can simply click (check) the Pay column on the Purchase Invoice line that will be paid off. But if the total outstanding is not paid in full or you only want to pay a portion of the total outstanding invoice (not paid in full), then you must type the amount that you want to pay in the Payment Amount column in the Purchase Invoice payable line.
1. Pay : Click on the line of the outstanding invoice that you want to pay. Note, when you click this column, the Payment column automatically appears. The amount will be filled in the amount of the invoice owed (amount owed). To cancel, click again until the check mark in the column disappears or click the clear button.
2. Invoice No: The number of the outstanding Purchase Invoice.
3. Date : The date of the outstanding Purchase Invoice.
4. Due: Due date for payment of the outstanding Purchase Invoice.
5. Amount : The total value of the Purchase Invoice.
6. Owing : Value payable from Purchase Invoice. If the Purchase Invoice is an invoice in a foreign currency, then this column will display two outstanding values, namely the outstanding value of the DPP Purchase Invoice presented in a foreign currency (prime currency) and the amount payable for VAT presented in rupees currency (base currency).
7. Payment Amount: The amount of your payment to the Vendor. If you type a nominal value in this column, the Pay column will automatically be checked.
8. WHT ST : This column displays information on the amount of sales tax that you deduct from the outstanding invoices that you pay to Vendors at 100% of tax. To record the number of sales tax deductions, right-click on the line of the invoice payable and then select WHT ST.
9 .Disc. Amount : The amount of discount/deductions you get/make at the time of payment. To record the amount of discount that you get when paying to the Vendor, right-click on the Invoice line then select Discount Info, for more details, see the following image:
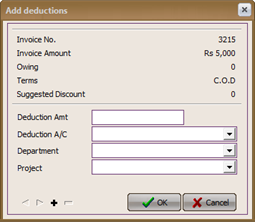
In the Discount Amount column, you can enter the amount of the discount you get from the Vendor for the activity of paying your outstanding invoices.
In the Discount Account column, you can select the account that you use to record the discount that you get from the Vendor for the activity of paying the outstanding invoice that you made.
Click the + sign to record additional discount information, if the total discount you get is recorded with more than one discount account.
HOW TO MAKE A PURCHASE PAYMENT FORM
You can record invoice payment activities payable to vendors on the Purchase Payment form by following these instructions:
1. Open the new Purchase Payment form by clicking on the main menu Activities – Purchase – Purchase Payment.
2. To fill out the Purchase Payment form, pay attention to the image below:
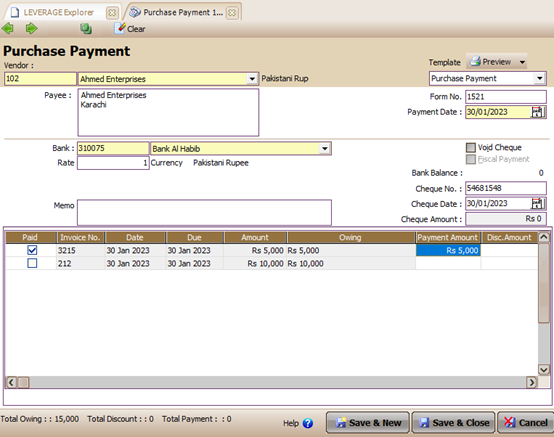
1. Select the Vendor name from the invoice which you will pay
2. Fill in the serial number forms and date payment
3. Select the name of the cash/bank account that records invoice payment, and type the memo briefly about the payment you made
4. Fill in the check number if any and fill in the date check (if you don't use check, You can fill in the same check date with payment date
5. Check the invoice line want to pay
6 . Pay close attention to this column automatically displays the value your outstanding invoice. You can edit it accordingly with the payment amount what you do.
3. After you have finished inputting the invoice payment information payable on the Purchase Payment form, the next step is to click the Save & Close button to save the input that you have made as well as close the Purchase Payment form display.
List Of Purchase Payment
All Purchase Payment forms that you have made will be recapitulated in one list (table) called the Purchase Payment List. On the Purchase Payment list you can perform editing activities, deleting Purchase Payment forms.
The Purchase Payment List can be opened by clicking on the main menu List – Purchase – Purchase Payment (Register – Purchases – Purchase Payments)
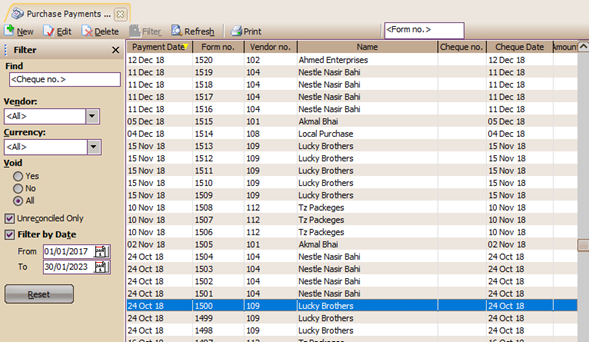
The Purchase Payment List displays information consisting of several groups, namely:
1. Menu button on the List of Purchase Payment forms
a. New : Create a new Purchase Payment form.
b. Edit : Reopens the highlighted Purchase Payment form view, so you can make edits (changes) to the form.
c. Delete : Deletes the highlighted Purchase Payment form.
d. Filter: Filter the Purchase Payment List view based on Vendor, Currency, based on void status, based on reconciliation status, and based on the date filter you want.
e. Refresh : Refreshes the display of the Purchase Payment List according to the input of the last Purchase Payment activity that you did.
f. Print : View the printed display of the Purchase Payment List on the monitor screen. To print a Purchase Payment List on paper, you can do this by clicking the Print button located on the printed display of the Purchase Payment List.
g. Find : This field makes it easier for you to find the Purchase Payment form that you want to edit or delete. Quick search of Purchase Payment form through this field is done based on <Check No> or <Form No>.
2. Columns in the Purchase Payment List details
a. Payment Date: The date of payment to the Vendor.
b. Form No: Purchase Payment form (voucher) number that you made.
c. Vendor No : Vendor Number .
d. Name : Name Vendor.
e. Check No: The check number used.
f. Check Date: Date the check can be cashed. Journalizing Purchase Payment activities at LEVERAGE is made based on this date
g. Amount : The amount you pay to the Vendor.
h. Reconcile : There are two states True and False. If payment activities to Vendors have been adjusted to bank records through bank reconciliation activities, then the status of the Purchase Payment form is True. Conversely, if the activity of payment to vendors
has not been adjusted with bank records through bank reconciliation activities, then the status of the Purchase Payment form is False.
i. Description : Purchase Payment information according to what you type in the description field on the form.
j. Discount Amount: The number of discounts (discounts) obtained from Vendors. The amount of discount displayed in this column is the amount of discount (discount) that you recorded through the Discount Info contained in the Purchase Payment form.
3. Right-click the mouse on the Purchase Payment List view
a. New : Create a new Purchase Payment form.
b. Edit: Changing the highlighted Purchase Payment form
c. Delete : Deletes the highlighted Purchase Payment form
d. Un reconcile Only : Only displays Purchase Payment forms that have not been reconciled (those whose reconciliation status is False).
e. Filter : Displays the filter column to the left of the Payment Vendor List.
f. Sort by : Sorts the display of the Purchase Payment List based on the column headings available in the List.
g. Refresh (F5) : Refreshes the display of the Purchase Payment List according to the input of the last Purchase Payment activity.
h. Vendor : Displays Vendor information from the highlighted Purchase Payment form.