B. Create a New Database A new database can be created with two possibilities, namely created Locally (on the PC's own hard disk) or placed on another person's PC or server (Remote). Creating a New Database on Local Computer Before creating a database on a local computer, make sure Firebird and the LEVERAGE program are properly installed on the computer. Here are the steps you can take to create a new Database on a Local Computer (on your PC's own hard disk): 1. Open the LEVERAGE program by clicking the Start button – Programs/All Programs – Nizamer – LEVERAGE V4 2. Or click the LEVERAGE icon on your computer desktop. 3. In the Welcome To LEVERAGE display, click the Create New Company button: Pay attention to the picture below: 
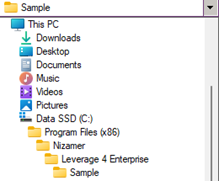
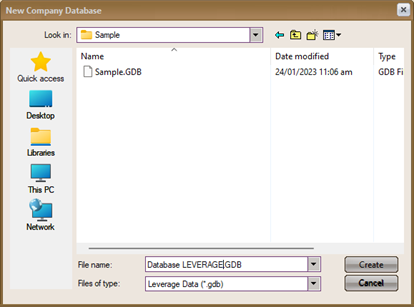
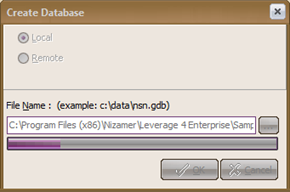
4. After you click the Create New Company button on the Welcome To LEVERAGE screen, the next step you can take is to click the Local check box on the Create Database form. The next step is to click the Ellipsis button [...], then select the folder where the data will be placed, then type a file name with the *.GDB extension, then click the Create and OK buttons. Wait a few moments until the database creation process is complete. For more details, consider the following image: 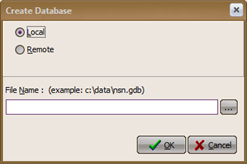
5. After the process of creating the LEVERAGE database is complete, the next step is to login to enter the database with USER ID and Password = SUPERVISOR (Password does not distinguish between lowercase and uppercase letters). Creating a New Database on Another Computer (Remote) If you run LEVERAGE from computer A and want to create a new database on computer B (as a server computer), you must know the IP Address number or computer name (Computer Name) from computer B as the server computer. Before creating a database remotely, make sure the client computer (computer A) and the server computer (computer B) are connected (connected) properly. Here are the steps you can take to create a database remotely: 1. Open the LEVERAGE program by clicking the Start button – Program/All Program – Nizamer – LEVERAGE V4 2. Or click the LEVERAGE icon on your computer's desktop. 3. In the Welcome To LEVERAGE display, click the Create New Company button. 4. After you have clicked the Create New Company button on the Welcome To LEVERAGE display, the next step you can take is to click the Remote check box on the Create Database form, the next step is to fill in the Server Name column with the server computer's IP address number, then on in the File Name column, type the address where the new database will be placed on the server computer, then type a file name with the *.GDB extension, then click the Create and OK buttons, wait a few moments until the database creation process is complete. For more details, consider the following image: 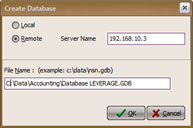
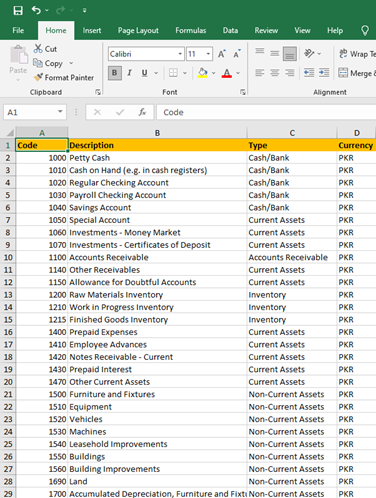
5. After the process of creating the LEVERAGE database is complete, the next step is to login to enter the database with USER ID and Password = SUPERVISOR (Password does not distinguish between lowercase and uppercase letters). C. Brief Database Preparation LEVERAGE Version 4 Quick Setup is a Form specially designed to help you prepare a new LEVERAGE Database that you will use to record your company's financial activities. In preparing a new database, LEVERAGE provides two types of database preparation that you can choose from, namely: 1. Manual Preparation (Basic Setup) 2. Advanced Preparation (Advanced Setup) Manual Preparation includes setting up company files without step-by-step Wizard. We will cover here Advanced Preparation ADVANCED PREPARATION (ADVANCED SETUP) Advanced Preparation (Advanced Setup) is a short database preparation type that you can use if you have mastered the LEVERAGE Accounting Software program well and want to input in detail your company's financial information in LEVERAGE. Before starting the initial database preparation using this type of advanced setup, it is recommended that you first prepare the Master Data required for the initial database preparation. Master Data that you need to prepare include: 1. List the currency you use in the transaction 2. Your company information, consisting of company name, company address. 3. List of accounts that you use to record your financial transactions. 4. List of Customers (Customer) 5. List of Suppliers (Vendors) 6. List of Goods and Services (Items) 7. List of Fixed Assets. Master data such as List of Accounts, List of Customers, List of Vendors, List of Goods and Services (List of Items), List of Fixed Assets, you should create in Excel format so that you can easily import the master data via Quick Setup Advanced without the need to manually enter the master data one by one. The following is an example of a table that you can use to record the master data in Excel format. 1. Register an Account | NO. | ACCOUNT NAME | ACCOUNT TYPE | CURRENCY | | | | | | Information : You can fill in the Type column in the Account List with the type of accounts you have. LEVERAGE provides 15 account types including: 1. Type of Cash/Bank account (Cash/Bank) 2. Receivable account type (Account Receivable) 3. Inventory account type (Inventory) 4. Other Current Asset account types (Other Current Assets) 5. Type of Fixed Asset account 6. Accumulated Depreciation account type 7. Type of Account Payable (Account Payable) 8. Other Current Liabilities account types 9. Long Term Liabilities account types 10. Equity account types 11. Account type Revenue (Revenue) 12. Account type Cost of Good Sold 13. Expense account type 14. Other Income account types (Other Income) 15. Account type Other Expenses (Other Expenses) 2. Customer List | NO. CUSTOMERS | NO CUSTOMERS | TYPE CUSTOMERS | WOMEN MONEY | BALANCE | PER DATE | | | | | | | | Information : You can fill in the Customer Type column in the Customer List with the type of customer you have. This column cannot be empty, so if you do not distinguish the type of your customer, then you can fill this column with the General type. If during the initial setup it turns out that you have not been able to obtain information on your customer's final balance per start date, then you can clear the Balance and Per date columns. Where you can enter this information after obtaining your customer balance information. 3. List of Suppliers | NO. SUPPLIER | NO SUPPLIER | CURRENCY | BALANCE | PER DATE | | | | | | | Information : If during the initial setup it turns out that you have not been able to obtain information on the ending balance of your supplier as per start date, then you can clear the Balance and As per date columns. Where you can enter this information after you get the supplier balance information. 4. List of Goods and Services | NO. GOODS | NAME OF GOODS | TYPE | QTY | TOTAL COST | PER DATE | | | | | | | | Information : The Type column in the Goods list is filled with information on the type of goods, whether the type is inventory part, non-inventory part or service (read the Inventory tutorial). If during the initial setup it turns out that you have not been able to obtain information on the ending balance of goods that you have per start date, then you can clear the Qty column, Total Cost and column per date. Where you can enter this information after you get the supplier balance information. 5. List of Fixed Assets | Asset Code | Descript ion | Purchase Date | Usage Date | Estimate ed Life (Year) | depreciation on Method | Asset Acct | Acc. About. Acct | Deprec Exp. Acct | Asset Cost | Spend law Acct | Asset Type | | | | | | | | | | | | | | Table Description: • Asset Code: Fill in the Fixed Asset code that you have • Description : Fill in the name or description of the Fixed Assets that you own • Purchase Date: Fill in the date of purchase or date of acquisition of Fixed Assets • Usage Date : Fill in the date when the Fixed Assets started to be used • Estimated Life (Year): Fill with the estimated age (useful life) of the Fixed Asset in years. If the estimated life of the fixed assets that you own is not month in year (for example: 5 years and 3 months), then you can add a new column to the list of fixed assets table, namely the Estimated Life (Month) column. • Depreciation Method : Fill in the depreciation method that you use to depreciate your Fixed Assets. • Asset Account: Fill in the Fixed Asset type account, this account functions to record the acquisition of Fixed Assets. • Acc. depression Account : Fill in the accumulated depreciation type account, this account serves to record the accumulated depreciation of Fixed Assets. • Deprec. Exp. Account: Fill in with an expense type account, this account serves to record the depreciation expense of Fixed Assets. • Asset Cost: Fill in the acquisition value or acquisition price of the Fixed Assets before being depreciated. • Expenditure Account : For recording Fixed Asset balances, you can fill in this column by typing Opening Balance Equity account. This account serves to record the balance of Fixed Assets. In order for the import of Fixed Assets data to be successful, you must fill in all the required fields completely. After all your master data tables are complete, you can do the initial preparation of the Advanced Setup type Database by following the instructions below: 1. Open the Quick Setup form by: a. Click main menu Setup – Quick Setup 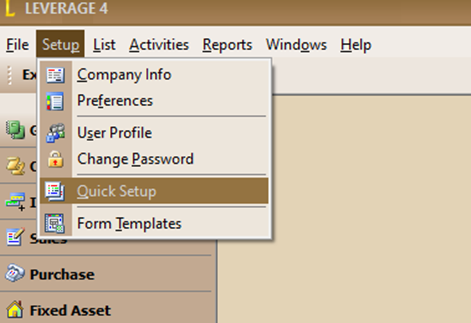 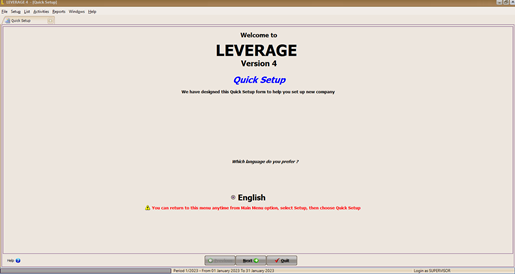
b. In the Welcome to LEVERAGE Version 4 Quick Setup screen, select the language you want, then click the Next button. c. On the What Setup Do You Like display, select Yes, I am. Then click the Next button to start the initial database preparation. 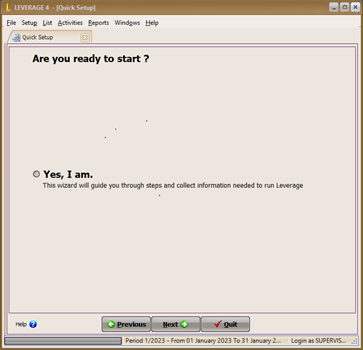
2. The first step that you have to prepare is the List of Currencies. In the currency list table you can enter the type of currency used in your company's financial transactions. Follow the instructions below: 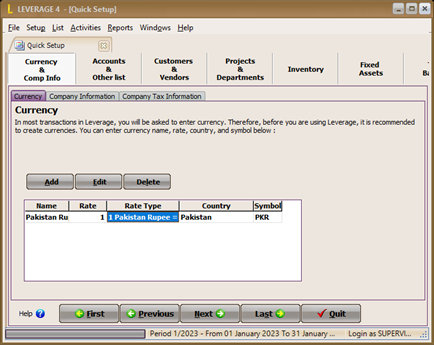
a. Name : In this column type the name of the currency, for example : PKR b. Rate : In this column type the exchange rate of the currency. For base currency, you can type in the exchange rate 1. For foreign currency, you can type in the exchange rate for the base currency that you use. Example: prime currency (prime currency) PKR with a rate of 1, foreign currency (foreign currency) USD with an exchange rate of 8,500 against the rupee. c. Rate Type : This column automatically displays information on the ratio of foreign currency to the base currency. d. Country : In this column, type the name of the country from which the currency originates. e. Symbol : In this column type the currency symbol. After you have finished inputting the currency list table, to proceed to the next preparation, please, click the Next button. 3. The second step that you must prepare is your company information. 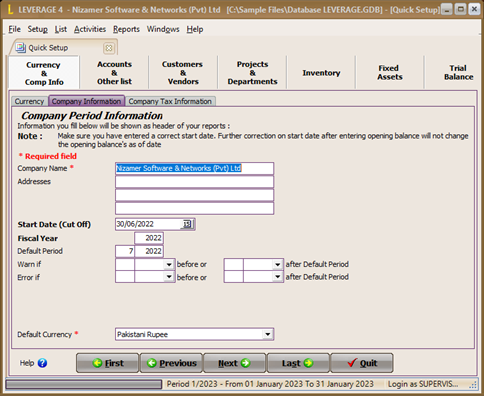
Enter your company information by following the instructions below: a. Company Name: In this column, type your full company name. b. Addresses : In this column type your company address. c. Start Date (Cut Off): Date of database initial balance or start date of bookkeeping using LEVERAGE.Example: You will start using LEVERAGE to record your company's financial transactions in 2009 with the condition that you have balance data from your old bookkeeping (2008 fiscal year). For this condition you can input Start Date 31-12-2008. If your company is newly established where you don't have balance data from the old bookkeeping, then you can input the Start Date 01-01-2009. d. Fiscal Year: In this column, enter the company's financial year, usually the year you input in the Start Date column. Example: if the start date is 31-12-2008, then you can fill in the fiscal year column with 2008. Filling in the fiscal year can be done by typing only two digit numbers, so for 2008, just type 08. e. Default Period : This column automatically displays period information according to your computer's system date. f. Warn If Before...... or.......After Default Period : Raise a warning if the transaction date you input is ….. month/year before the default period or … month/year after the Default Period, but you are still can continue inputting transactions without changing the date. Example Default entry shows October 2009 period. You can enter Warn If Before 2 Months or 1 Month After Default Period. Meaning : LEVERAGE will display a warning when you input or edit a transaction with a date before September 2009 or if you input or edit a transaction with a date after October 2009. g. Error If Before….. or …… After Default Period : Generates an error if the transaction date you input is ….. month/year before the Default Period or …. Month/year after Default Period. You will not be able to continue inputting transactions with a restricted date unless you change the allowed date or if you want to continue inputting transactions with a restricted date you must change this date setting. Example: The Default Period shows the period October 2009. You fill in the Error If Before 2 Months or 1 Month After Default Period. Meaning : LEVERAGE will display ERROR when you input or edit transactions with dates before September 2009 or if you input or edit transactions with dates after October 2009 h. Default Currency : This column automatically displays your prime currency. After the Company Information has been inputted, to continue with the next preparations, click the NEXT button. 4. The third step that you must prepare is to enter company tax information. 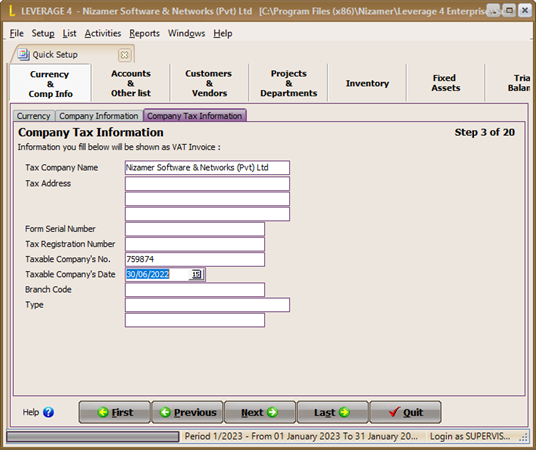
Enter your company tax information by following the instructions below: a. Tax Company Name : The full name of the company that will be displayed when you print a Standard Tax Invoice. b. Tax Address: The company address that will be displayed when you print a Standard Tax Invoice. c. Serial Number Form: Standard Tax Invoice serial number which will be displayed in the first column of the Standard Tax Invoice serial number. d. Tax Registration Number : National Tax Number (NTN) e. Taxable Company No : Sales Tax Number f. Taxable Company Date : Company Confirmation Date as a Taxable Entrepreneur. g. Branch Code : Branch Code h. Type : Field of Company Business i. Tax Ind : Business Classification as per Tax Laws After the Company Tax Information has been inputted, you can continue with the next preparation by clicking the NEXT button. 5. The fourth step that you must prepare is the List of Accounts Table. You can fill in this Account List table by importing the master data that you prepared earlier. Note, before you import your account list, LEVERAGE has provided a default account according to the currency you input. To avoid double accounts in the Account List Table, you should first edit the default account number according to the Account List Table that you are going to import. For more details, consider the following picture: 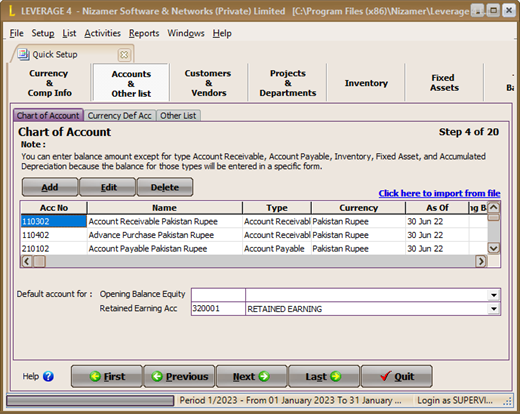
CHANGE/EDIT DEFAULT ACCOUNT NUMBER LEVERAGE ACCORDING TO COMPANY ACCOUNT NUMBERING YOU. After you edit (change) the default LEVERAGE account number according to your company account number, the next step is to import your account master data (excel file that was prepared earlier). Import account master data can be done by: a. Click “click here to import from file”, then specify the folder and file name to be imported. After the file to be imported is found, click the Open button, then click Extract Data. Pay attention to the following picture:  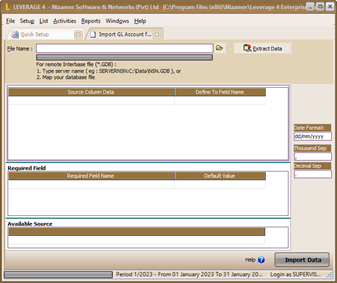 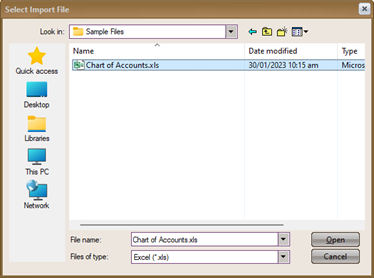
b. After the data extract process is complete, delete the column headings in the available source table by right-clicking on the first row of the table (the row containing the column headings) then selecting delete. Pay attention to the following picture: 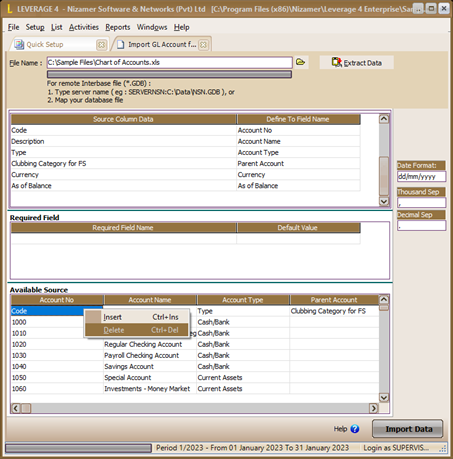 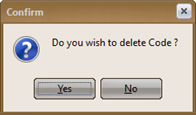
c. After you delete the first row of the available source table, the next step you have to do is define the data source (define available source). The goal is for LEVERAGE to be able to identify the source data (excel file) that you have in the fields provided in LEVERAGE. Pay attention to the following picture: 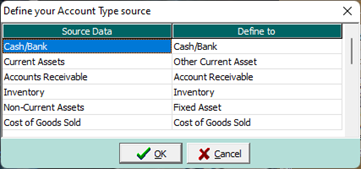

d. Make sure the column in the Required Field table is empty. The Required Field table is a table that displays the required columns in LEVERAGE. This Required Field table will be empty if all the required columns are available in your Excel Data and those columns have been defined to the available columns in LEVERAGE. e. Click the Import button to import your excel data. Wait until the import process is complete and a confirmation message appears informing whether the import was successful or not. For more details, consider the following picture: 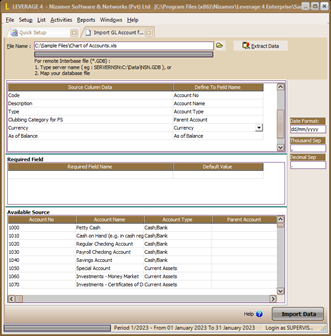

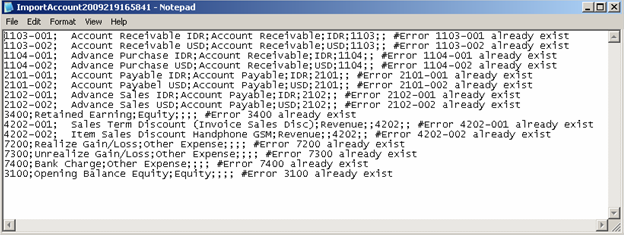
Wait until the import process data has been completed. Information message inform quantity your successful record import and number of records which failed to import. If there is a record that import failed, click OK on information message form it to open the Notepad files display what records just failed to import and cause of the record import failed. f. After you have finished importing the import list, click the NEXT button to make the next short preparation. 6. The fifth step that you have to do is set the currency default account. This currency default account will function to record (journalize) your financial transactions related to currency automatically. Setting the default account currency (default account currency) according to the currency you have. As a guide, consider the image below: 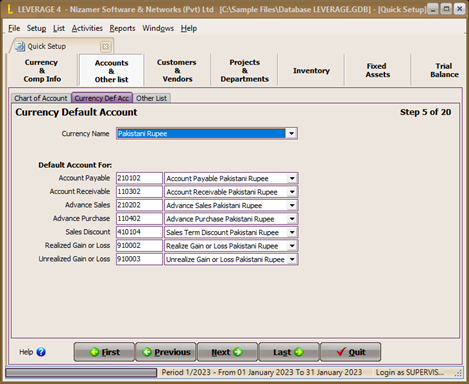
  Information : Information :
a. Default account 'Account Payable' : Default accounts payable which functions to record debts on Purchase Invoice, Purchase Return, Purchase Payment and Period End forms. b. Default account 'Account Receivable' : Default account for purchase advances which serves to record activities for payment of advances to Vendors (Suppliers). The account that you can select in this column is a purchase advance account with the type of receivable (account receivable). c. Default account 'Advance Sales': Default sales advance account which functions to record the activity of receiving sales advances from customers (customers). The account that you can select in this column is a sales advance account with a payable account type. d. Default account 'Advance Purchase': Default account for purchase advances which serves to record activities of payment of advances to Vendors (Suppliers). Accounts that you can select in the column. This is an advance purchase account with the account type (account receivable). e. Default 'Sales Discount' account: Default sales discount account that functions to record sales invoice discounts that you give to your customers. The account that you can select in this column is an account with revenue type. f. Default account 'Realized Gain or Loss: This default account serves to record exchange differences at the time of payment of debt or receipt of settlement of receivables in foreign currency, where there is a difference in the exchange rate when payment is made at the time the debt/receivable is incurred. g. Default account 'Unrealized Gain or Loss': This default account functions to record the difference between the initial exchange rate (transaction) and the exchange rate at the end of the period (Period End). After you have finished setting the currency default account, click the NEXT button to continue inputting the next brief preparation. 7. The sixth step is to fill in another list, which is inputting data which consists of filling in the Table of the List of Payment Terms (Terms Of Payment) that you use in transactions and filling in the Table of List of Tax Codes (Taxes). a. Term Of Payment Is a list of conditions or terms of payment in cash or credit. LEVERAGE uses the X?Y n/Z and C.O.D (Cash On Delivery) term formats. X is the percent discount given to the payer if payment is made during the discount period, Y is the discount period, and Z is the due date period. For example 2/10 Net 30 means getting a 2% discount (will get discount) from the selling price, if paid within 10 days (if paid within) from the date of sale, repayment exceeds 10 days is not subject to a discount, receivables are due 30 days from the date of sale The following image shows an example of filling out the Terms Of Payment table: 
Information : • Discount % : Fill in this column with the term discount (in percent) • Discount Days : Fill in this column with the term discount period • Net Due In : Fill in this column with the maturity period of the debt/receivable • Name : After you fill in the Net Due In column, please press Enter on the keyboard twice, LEVERAGE will automatically fill in this column with the term name according to the input you did. You can add, edit and delete Terms Of Payment data directly on the Terms Of Payment Table or you can do it using the buttons available above the table. Here's the explanation: • Add button: This button functions to add term data to the Terms Of Payment table. • Edit button: This button functions to change (edit) the term data contained in the Terms Of Payment table. • Delete button: This button functions to delete term data contained in the Terms Of Payment table. b. Taxes In the Taxes table, you can set the VAT code. This code can be used to display Output VAT on the sales form when you make a sales transaction of taxable goods/services and display input VAT on the purchase form when you make a purchase transaction of taxable goods/services. With this tax code, LEVERAGE can calculate the amount of output VAT and input VAT into the default tax account that you have specified. The input of this tax code will relate to three form lists, namely the Customer List, Vendor List and Item List. Information: • Code: Fill in the VAT code you want. • Name : Fill in the name of the tax. Example: Standard VAT or Simple VAT • Description : Fill in the description or description on behalf of the tax that you input. Example: VAT 10% Standard. • Rate: Fill in the tax rate. Example: VAT rate = 10% • Sales Tax: Fill in the account number that you will use to record Output VAT (Sales VAT). • Purchase Tax: Fill in the account number that you will use to record Input VAT (Purchase VAT). • Sls Tax Acc Name : This field automatically displays the name or description of the Sales VAT account number you selected. • Pur Tax Acc Name : This column automatically displays the name or description of the Purchase VAT account number you selected. You can add, edit and delete Taxes data (Tax Code) directly in the Taxes Table or you can do it using the buttons available above the table. Here's the explanation: • Add : This button functions to add tax code data to the Taxes Table. • Edit: This button functions to change or edit tax code data in the Taxes Table. • Delete : This button functions to delete the tax code data in the Taxes Table. After filling in the Terms Of Payment table and the Taxes table you have created, click the NEXT button to continue inputting the next short preparation. 8. The seventh step is to fill in the customer type and shipping method data. a. Table of List of Customer Types (Customer Type) Filling in the customer list table (customer type) will relate to the customer list. The customer type function is to group your customers based on the type you created so that you can easily view sales reports per customer type. By default this table is filled with the 'General' customer type. If your customers are not differentiated by type, then this table will only show the General type. 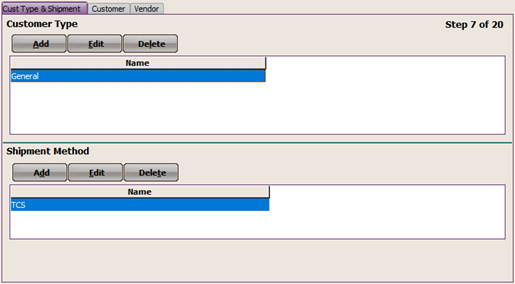
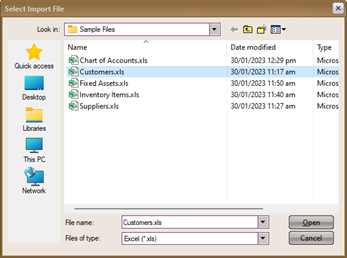
b. Table of List of Shipping Methods In the shipping method list table, you can enter the name of the goods delivery service that you use in buying or selling goods transactions. Filling in this table is related to purchase and sales invoices. After filling in the customer type and delivery method, click the NEXT button to continue inputting the next brief preparation. 9. The eighth step is filling in the Customer List Table. Customers or customers are parties who buy the goods/services that you sell. You can fill in this Customer List table by importing the customer master data (excel file) that you prepared earlier by: a. Click ‘click here to import from file, then specify the folder and excel file name (customer data) to import. Once the file is found, click the Open button and then click the Extract Data button. For more details, consider the following picture: 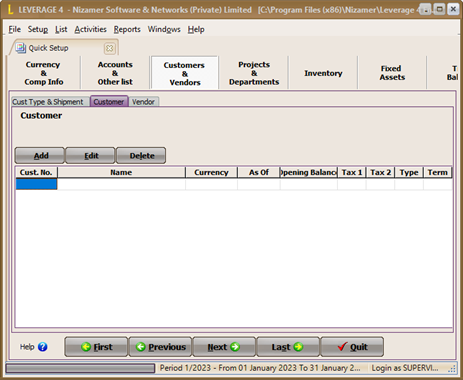
  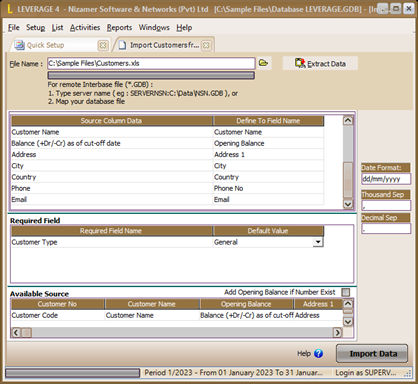
After clicking the button Extract Data Table Available Source by will automatically display. The data contained in the file excel that you import. Because the data is imported is the contents of the available table source not table title, then before define data done, you should over first remove the table title. Available Source by the way right click on the first line table containing the table title then select delete(delete). b. After you delete the first row of the available source table, the next step you have to do is define the data source (define available source). The goal is for LEVERAGE to be able to identify the source data (excel file) that you have in the fields provided in LEVERAGE. Consider the example define source data (excel file) which is presented in the following image: After all the columns in your excel file match the columns in LEVERAGE, the next step is to adjust the LEVERAGE date format to the date format in the imported excel file. To avoid failing Import, adjust the format date in LEVERAGE with date format your excel source data. c. After your LEVERAGE date format matches the date format of the Excel file that you imported, the next step is to click the IMPORT DATA button to import your source data. Wait until the data import process is complete. After the import process is complete and all data has been successfully imported, click the OK button and then click the NEXT button to continue further inputting. 10. The ninth step is filling out the Vendor List Table. Suppliers or Vendors are parties who buy the goods/services that you sell. You can fill in the Vendor List table by importing the supplier master data (excel file) that you prepared earlier by: a. Click ‘click here to import from file, then specify the folder and excel file name (supplier data) to be imported. Once the file is found, click the Open button and then click the Extract Data button. b. Delete the table title contained in the first row of the available source table. c. After you delete the first row of the available source table, the next step you have to do is define the data source (define available source). The goal is for LEVERAGE to be able to identify the source data (excel file) that you have in the fields provided in LEVERAGE. After all the columns contained in your excel file match the columns contained in LEVERAGE, the next step is to adjust the LEVERAGE date format with the date format in the excel file that you imported. For more details, consider the following image: 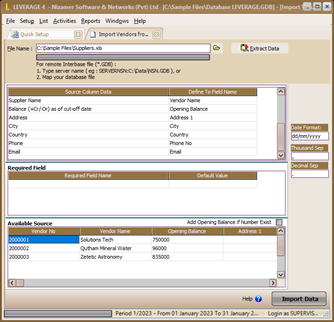
For avoid import failed adjust format date on LEVERAGE with format data date Excel source You. d. After your LEVERAGE date format matches the date format of the Excel file that you imported, the next step is to click the IMPORT DATA button to import your source data. Wait until the data import process is complete. 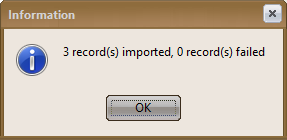
e. After the import process is complete and all data has been successfully imported, click the OK button and then click the NEXT button to continue further inputting. 11. The Tenth Step is to make a List of Departments. The Department List serves to separate several transactions according to the Department/Division that relates to the transaction. If you do not separate your transactions by department or division, you can continue inputting to the next short preparation without filling in this list. 12. The eleventh step is to make a List of Warehouses and a List of Item Categories. a. List of Warehouses. Information : • Add : Use this button to add a new Warehouse • Edit : By default, LEVERAGE has provided the Warehouse Center name. Use this button to change the default Warehouse name according to your Warehouse name. • Delete : Use this button to delete the Warehouse data that you created in the Warehouse List table. Warehouse data that can be deleted is only Warehouse data that you create, you cannot delete the default Warehouse created by LEVERAGE but can only be changed. b. List of Item Categories, which is a table that displays a list of the categories of goods (products) that you sell. So that the items you sell can be differentiated by product category, you must first fill in this table with information on the product categories that you own. If you previously had product category data in excel file form, you can easily import the file in LEVERAGE by clicking 'click here to import from file’. 13. The twelfth step is setting up or setting the default account for goods (currency default account). At this stage you can set the default account which will become the Standard GL Account every time you enter new item data in LEVERAGE. The following image shows an example of filling in Default Account Items: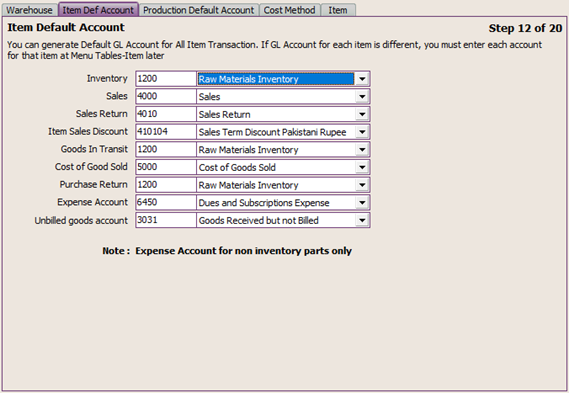 Information: • Inventory Account : Fill in this column with an inventory type account. This default account functions to journalize (record) purchase activities of inventory part type items that are inputted on the Purchase Invoice form. • Sales Account : Fill in this column with a revenue type account. This default account functions to journalize (record) item sales activity which is inputted on the Sales Invoice form. • Sales Return Account : Fill in this column with a revenue type account. This default account functions to journalize (record) sales return activities which are inputted on the Sales Return form. • Good In Transit : Fill in this column with an Inventory type account. This default account functions to journalize (record) the activity of delivering goods to customers which is inputted on the Delivery Order form (Surat Jalan). The Good In Transit account records shipments of merchandise that are not accompanied by invoices. • Item Discount Account: Fill in this column with a Revenue type account. This default account serves to journal (record) acknowledgment of sales discounts given to customers (customers) which are inputted on the Sales Invoice form. • COGS Account : Fill in this column with an account type Cost Of Good Sold (Cost of Goods Sold). This default account functions to journalize (record) the cost of goods sold item type inventory part. LEVERAGE will automatically calculate the cost of goods sold for inventory part type items inputted on the Sales Invoice form. • Purchase Return Acc: Because LEVERAGE records inventory using a perpetual system, you can fill in this column with the same account as you filled in the Inventory Account column. • Expense Account: This account serves to record activities related to Item Type Non Inventory Part. Fill in this column with Administrative and General Miscellaneous expense accounts. • Unbilled Goods Acc. : This account serves to record the activity of receiving goods from Vendors (suppliers) which are recorded on the Receipt of Goods form (Receive Item) where the invoice for receipt of the goods has not been received. 14. The thirteenth step is to determine the costing method that you will use to calculate the cost of goods sold for your merchandise. 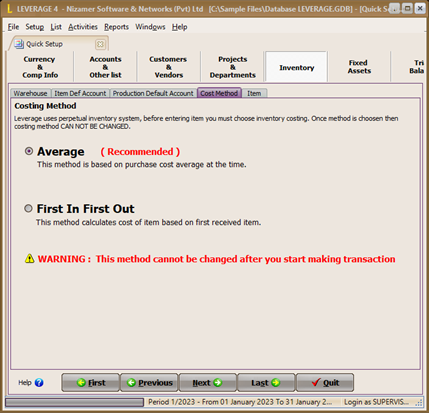
Choose the costing method your sales use with clicking the Option available. Click the Next button to continue inputting to the next short preparation. 15. The fourteenth step, namely inputting information on goods and services (items). You can fill in this Goods and Services List table by using the Add button or by importing the Goods and Services master data that you prepared previously by: a. “click here to import form files to open window import item from file. b. In the import item form file window, fill in the File Name column with the address and name of the file to be imported. Click the Explorer button located at the end of the File Name column to make it easier for you to fill in the column. c. Click the Extract Data button 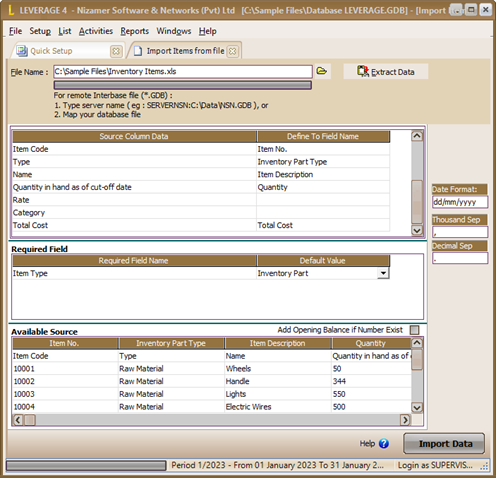
Click Notice, after You click a button Extract Data, by AUTOMATIC LEVERAGE will display the contents. Your Excel file import on table number data (Available Source). d. Before defining the source data, first delete the column headings in the first row of the Available Source table. Delete column headings in the first row of the table by right-clicking on the first row and then selecting Delete or Delete. The column headings in the first row of the table are deleted because what will be imported is the contents of the table, not the table title. You can tick the Add Opening Balance If Number Exist option if the quantity balance of the item you are importing is in the same Warehouse different (more than one Warehouse). e. After the column headings in the first row of the table are removed, the next step you should take is to define the Available Source table column headings to the columns available in LEVERAGE. To understand the process of defining Available Source table column headings in the available columns in LEVERAGE f. After all the source data columns have been defined, the next step is to click Import to import the source data. g. Wait until the data import process is click the OK button complete, then After all data items have been successfully imported, the next step is to click the NEXT button to continue inputting data to the next short preparation. 16. The Fifteenth Step, namely inputting the Table of the List of Fiscal Fixed Asset Types. As with item data, you can also input this table by importing. The following is an example of the display of the Data Source Table (Excel File) that can be imported in the Tax Fixed Asset Type List Table: | Fixed Asset Type | Fiscal Estimated Life | Fiscal Depreciation Method | | Goal 1 [SLM] | 4 | Straight Line Method | | Goal 2 [SLM] | 8 | Straight Line Method | | Goal 3 [SLM] | 16 | Straight Line Method | | Goal 4 [SLM] | 20 | Straight Line Method | | Permanent Building | 20 | Straight Line Method | | Semi Permanent Building | 10 | Straight Line Method | | Intangible 1 [SLM] | 4 | Straight Line Method | | Intangible 2 [SLM] | 8 | Straight Line Method | | Intangible 3 [SLM] | 16 | Straight Line Method | | Intangible 4 [SLM] | 20 | Straight Line Method | | Gol 1 [DDM] | 4 | Double Declining Method | | Gol 2 [DDM] | 8 | Double Declining Method | | Gol 3 [DDM] | 16 | Double Declining Method | | Gol 4 [DDM] | 20 | Double Declining Method | | Intangible 1 [DDM] | 4 | Double Declining Method | | Intangible 2 [DDM] | 8 | Double Declining Method | | Intangible 3 [DDM] | 16 | Double Declining Method | | Intangible 4 [DDM] | 20 | Double Declining Method | | Non Depreciable | 0 | Non Depreciable | | Intangible Assets | 10 | Straight Line Method | Besides importing Excel data, you can also import this table from the Sample.GDB Database that has been provided. Import the excel/sample.gdb file by following the instructions below: 1. “click here to import from file” 
2. In the import fiscal fixed asset from file window, fill in the File Name column by clicking the explorer button (browse) then search for the folder address and file name to import. After the file is found click then Open. 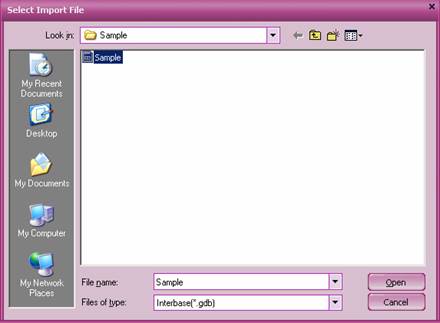
3. After the file name column is filled in with the folder address and file name to be imported, click the Extract Data button. If the file you are importing is a .GDB (Data Sample LEVERAGE) file, the source data column will be automatically defined. If the file you are importing is an excel file, then you must define the source data columns to the columns available in LEVERAGE. After all the columns are defined, click the IMPORT button to start the import process. 4. If the import process is successful, click the OK button and then click the NEXT button to continue inputting data to the next brief preparation. 17. The sixteenth step, namely inputting the Table of the List of Company Fixed Asset Types. Similar to the Table of List of Tax Fixed Asset Types, you can also fill in this table by importing the table of types of fixed assets in excel file format. In order to import the excel file successfully, you must create a table with two columns, namely: Fixed Asset Type Column and Fiscal Fixed Asset Type Column. For more details, the following is an example of a Table of List of Fixed Asset Types that can be imported at LEVERAGE: | Fixed Asset Type | Fiscal Fixed Asset Type | | Vehicle 2 | Goal 2 (SLM) | | Vehicle 1 | Goal 1 (SLM) | | Building 2 | Permanent Building | | Building 1 | Semi Permanent Building | | Non Depreciable | Non Depreciable | | Office Equipment 1 | Goal 1 (SLM) | | Office Equipment 2 | Goal 2 (SLM) | | Intangible Asset | Intangible Asset | Import the table by following the instructions below: a. Click “click here to import from file” b. In the Import window Fixed Asset Type From File, fill in the name and address of the folder where the excel file will be imported by clicking the explorer button, then click OPEN to open the excel file then click the Extract Data button then delete the column headings in the first row of the table. 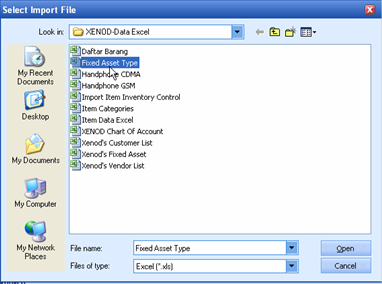 
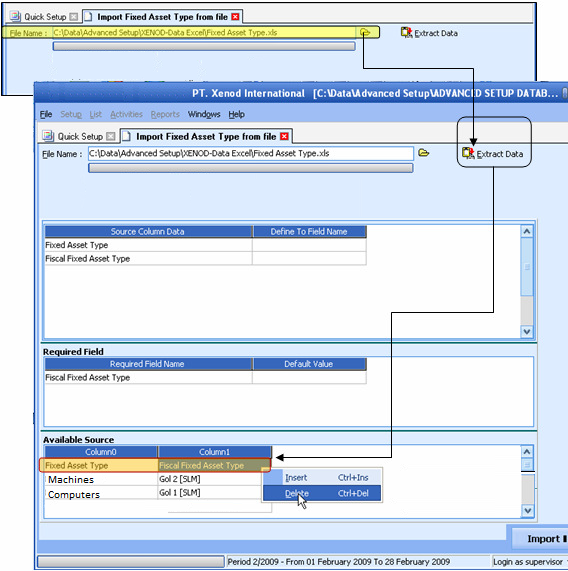
c. Define (define) the column title of the source data to the available columns in LEVERAGE. d. Once the source data column definition is done, the next step is to click the Import button to start the data import process. e. After all the Fixed Asset Type data has been successfully imported, the next step is to click the Next button to prepare the Company's Fixed Asset Data. 18. The seventeenth step, namely inputting the List of Fixed Assets List of the Company (List of Fixed Assets). You can fill in this Fixed Asset List table by using the Add button provided or by importing the Fixed Assets master data (excel file) that you prepared earlier by: a. Click “click here to Import from file” b. In the Import window Fixed Asset From File, fill in the name and address of the folder where the excel file will be imported by clicking the explorer button (open folder button), then click OPEN to open the excel file then click the Extract Data button. c. After Extracting Data, the next step is to delete the column headings in the first row of the Available Source table. Pay attention to the following picture: 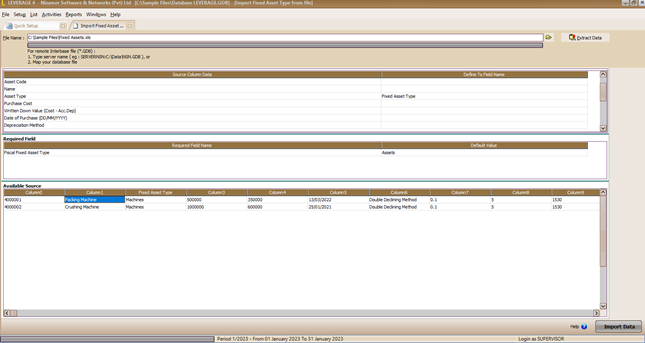
Happy title column on the line first table Available Source. d. Define (define) the column title of the source data to the available columns in LEVERAGE. e. After the source data columns are defined and the date format is adjusted to the source data date format, click the Import button to start the process of importing your excel file. After all the Fixed Asset data in the excel file has been successfully imported, click the Next button to continue the Database preparation to the next stage. 19. The next step is to check the account balances in the Trial Balance table. Filling in or editing account balances with cash/bank account types, other current assets, other assets, other current liabilities, long term liabilities, and equity can be done directly in this Trial Balance table. You cannot edit account balances with the types of accounts receivable, inventory, accounts payable, fixed assets, and accumulated depreciation in this table. You can edit account receivable type balances through the Customer List, you can edit inventory type account balances through the List of Items, you can edit account payable type account balances through the Vendors List. List), you can edit your fixed asset type account balance through the Fixed Asset List. 20. The final step in the short preparation of the Advanced Database is the Period End Process to calculate the balance of Accumulated Depreciation of Fixed Assets. You can do the Period End process by following the instructions below: a. Click the Quit button to exit the Quick Setup display. b. Click the main menu Activities – Periodic – Period End (Activity – Period – End of Month Process) c. In the Period End form, select the month and year according to the month and year of your Database start date. Then click the OK button. Wait until the end of the month process (period end) is complete. To check whether the initial preparation of your Database is correct and correct, you can open the Classic Trial Balance Report by following the instructions below: a. Click the main menu Report - General Ledger (Report - General Ledger) b. Then in the report details select Trial Balance Classic c. Filter the date parameter according to your database start date. |